DMETRICS MINSKY
MACHINE LEARNING WORKFLOW EDITOR
Before the prevalence of the many GenAI integrations of today, dMetrics' Minsky SaaS Natural Language Processing platform aimed to empower clients to build their own machine learning pipelines and use them to process data from any text sources they chose. Unlike many other machine learning platforms at the time, Minsky was designed to be codeless and target clients unversed in artificial intelligence, instead using a graphic editor and modifiable components to set up the processing workflows. The challenge was to design an interface and pipeline development procedure that kept the learning curve to a minimum while still producing outputs and insights that returned high value.
ROLES
Research, Information Architecture, UX Design, UI Design, Testing
INITIAL RESEARCH
In order to design this product, especially the workflow editor and the training functions, it was very important to fully grasp how Natural Language Processing fundamentally worked and what types of outputs were possible. Because of this, the majority of my early research was focused on talking to machine learning experts (including researchers and engineers), reading technical documentation, and running tests using the existing backend infrastructure.
Once I had a foundational understanding of the constraints and potential of the general technology and dMetrics' NLP algorithm, I began gathering insights from our early client partners. Minsky was a new product and interface, but dMetrics had been using some very rough UI in order to run their own platform tests, and it was made available to some early partners. This allowed me to get some feedback on their experiences and ultimate expectations for the product, while also gaining insight into the actual problems they were trying to solve with an NLP solution.
Key Takeaways
The understanding of the machine learning process and its associated training was very limited for consumers
Guiding users through the setup flow and clearly connecting the various sections of the app into the workflow editor would be very important
Most use cases were based around the need to parse and categorize extremely large sets of text, then access any associated insights
Generally, there was a targeted goal in mind for the output use - for example, finding specific clauses in legal documents or understanding content trends across the internet
SCOPE
The entire Minsky application covered data collection and upload, source material viewing, training, processing, output viewing and categorization, and an insights dashboard. Accessing and understanding the data throughout the workflow design process was very important, so the visual editor would need to plug into almost all of these functions and quickly make the associated information available within the pipeline interface. Based on the way the NLP algorithm was built, I knew there would be three main types of processing modules needed. Unfortunately, I needed to design the information architecture and prioritize the data visibility for each component in parallel to the workflow editor, so the scope became quite large.
WORKFLOW DESIGN
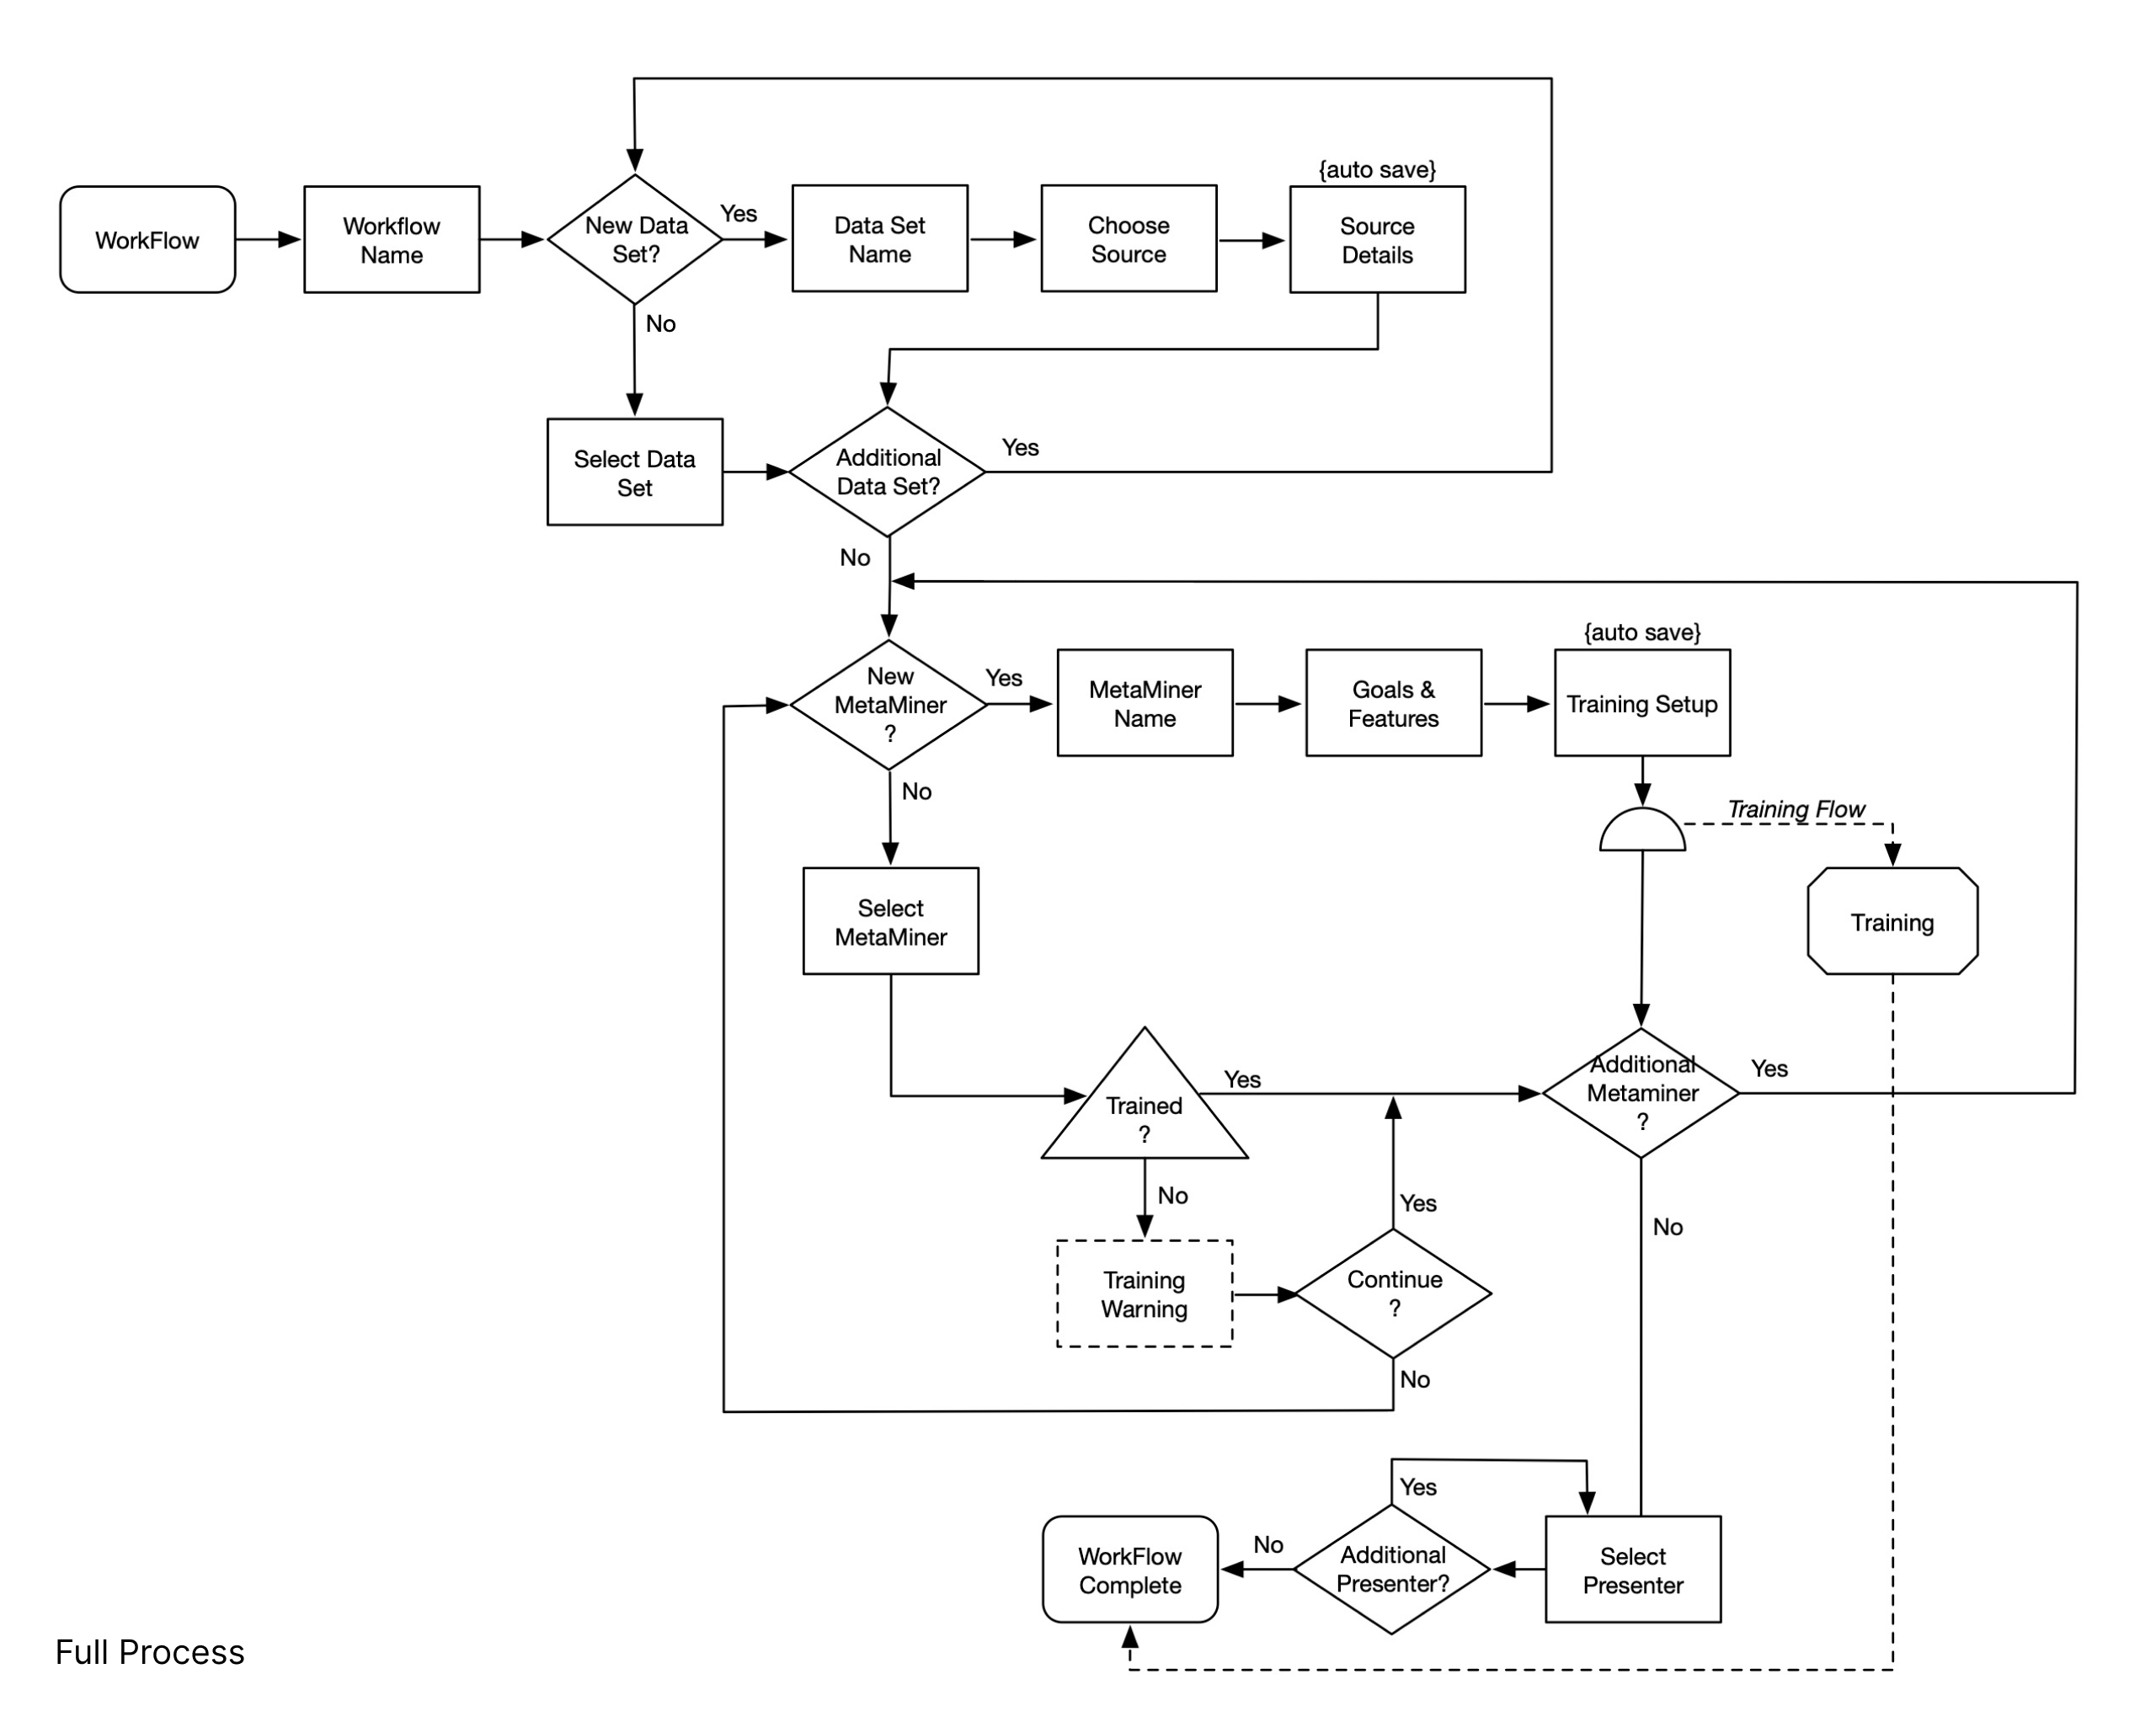
Before designing the interface, I needed to determine the best end-user workflow for building out these NLP workflows. Because of the complexity and general lack of ML understanding for the average user, a lot of guidance would be required, and the steps would need to feel logical and familiar. Users would have to create various processing modules, with separate modules for data collection and access, parsing and filtering, and various types of output and organization. Each module required some amount of specific information provided manually in order to function correctly, with examples being component names, data sources, applied filters, etc.
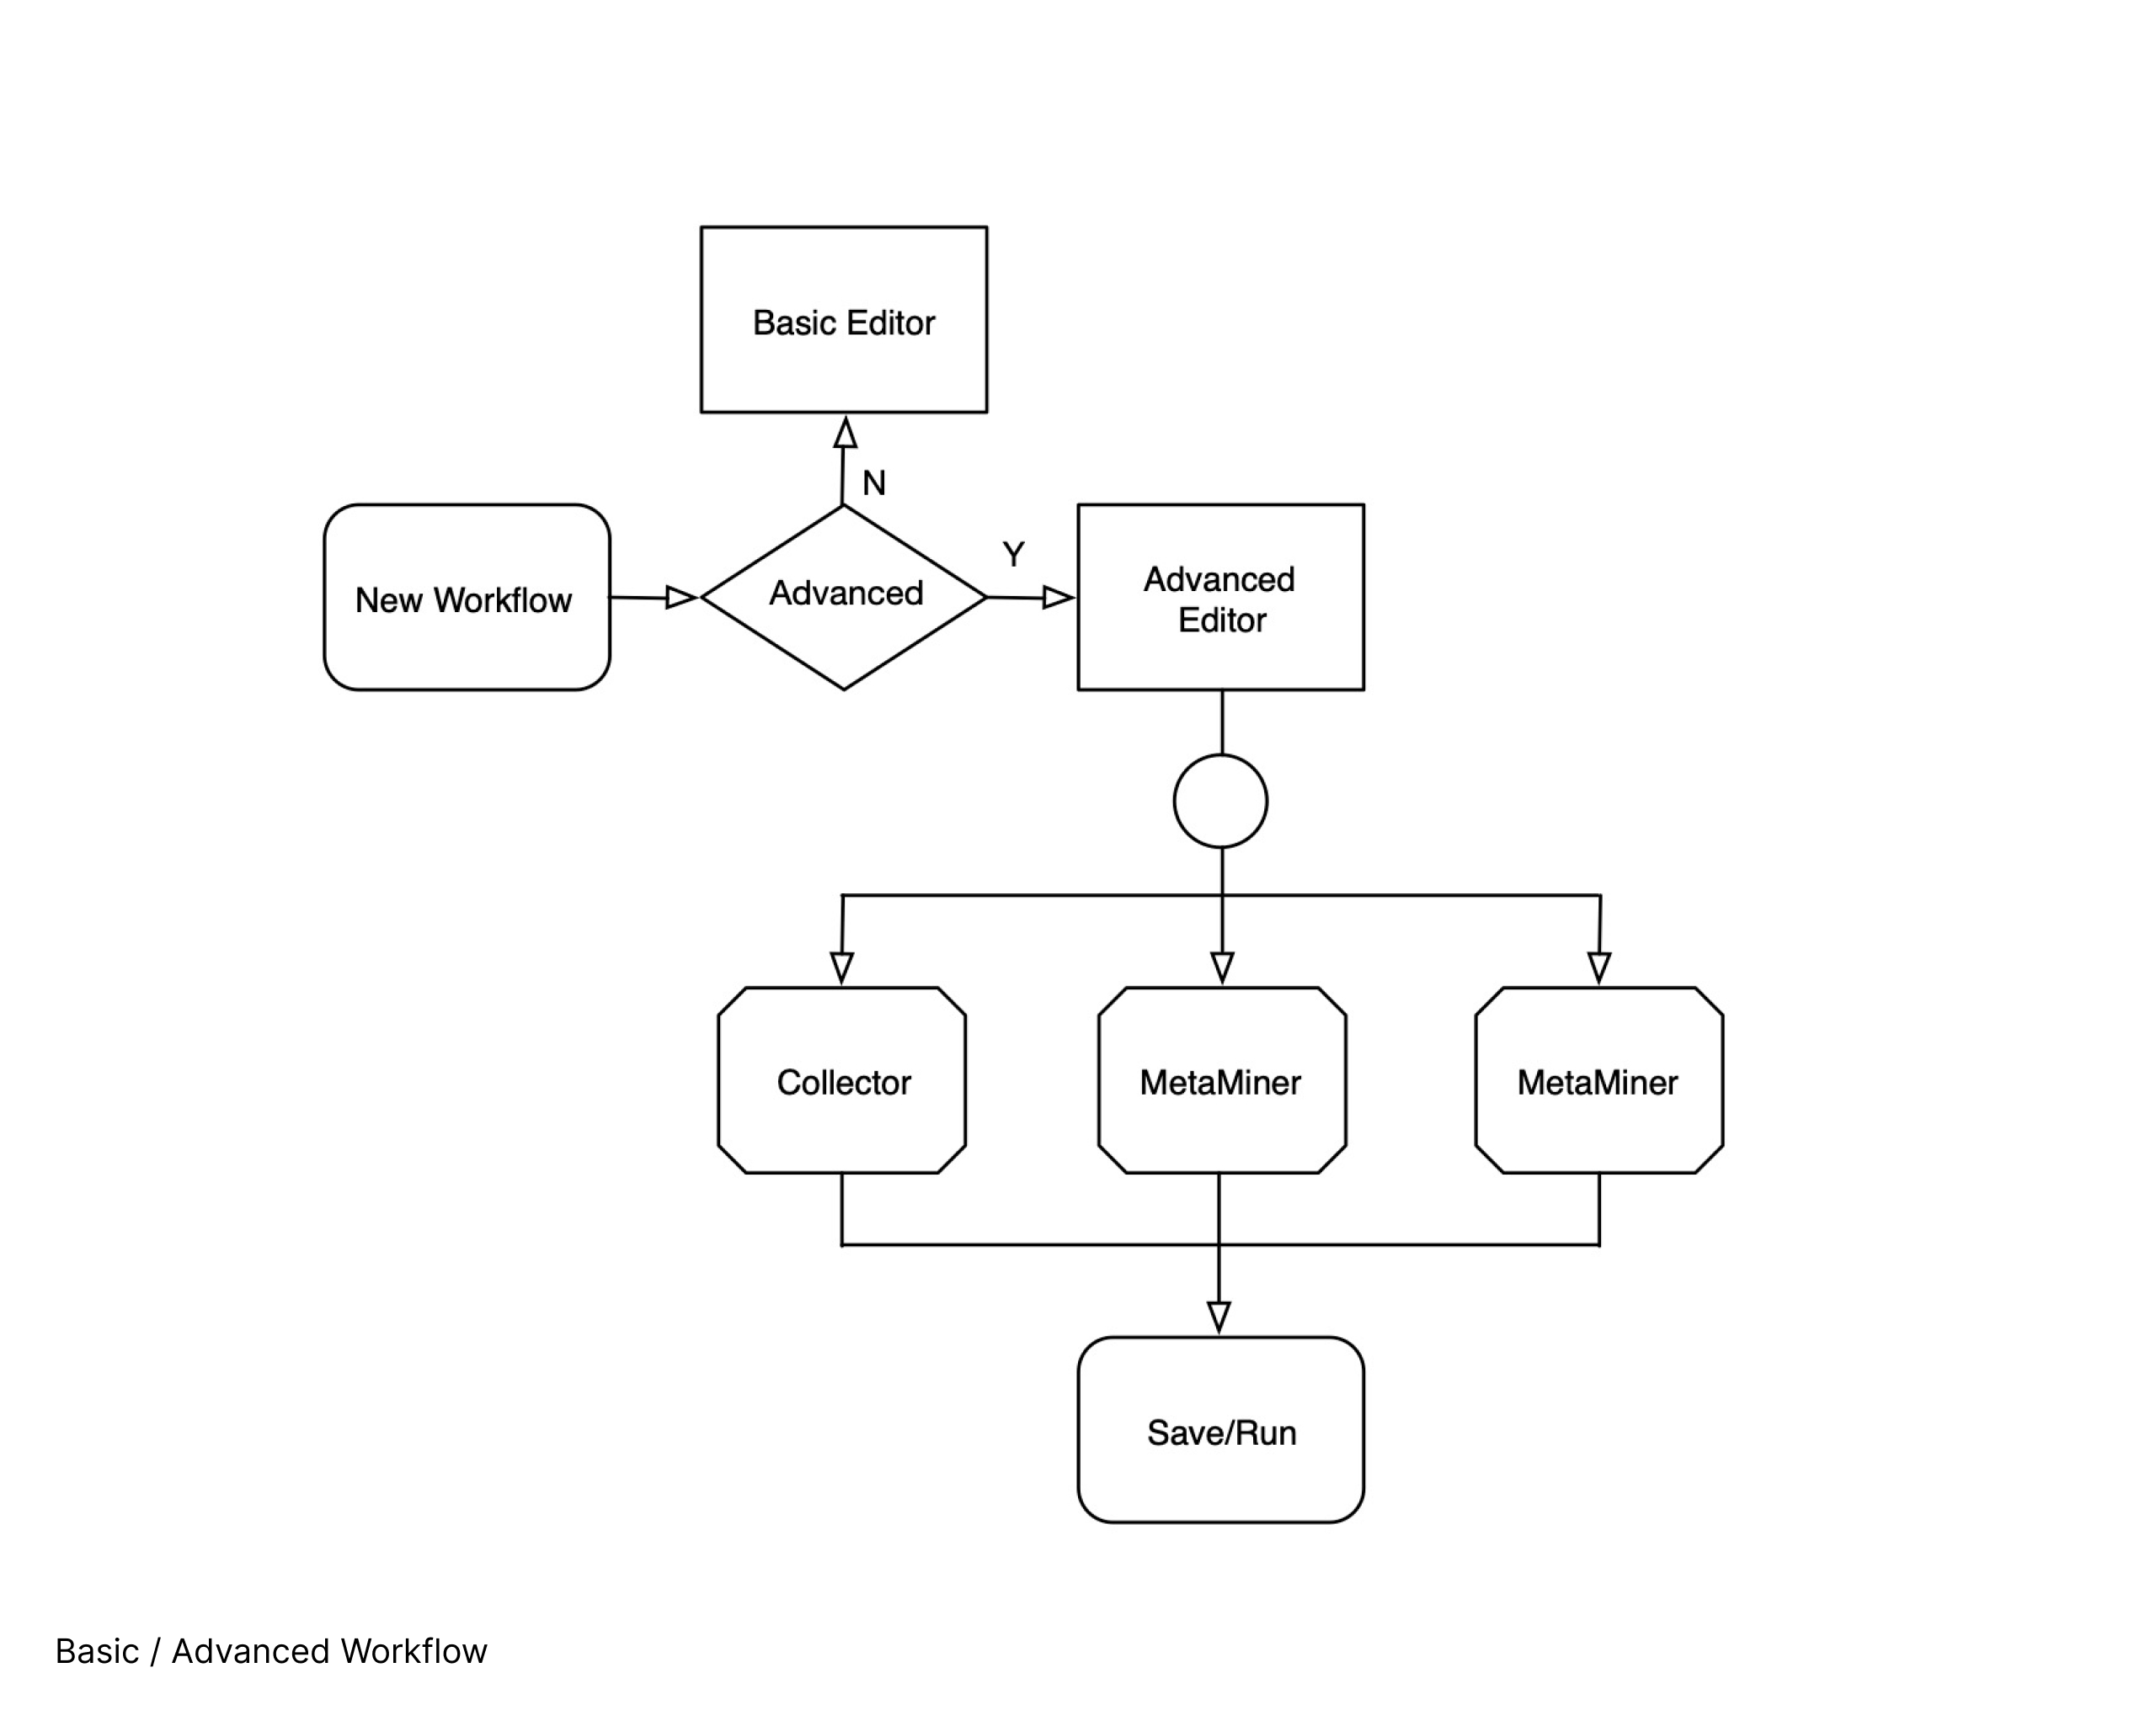
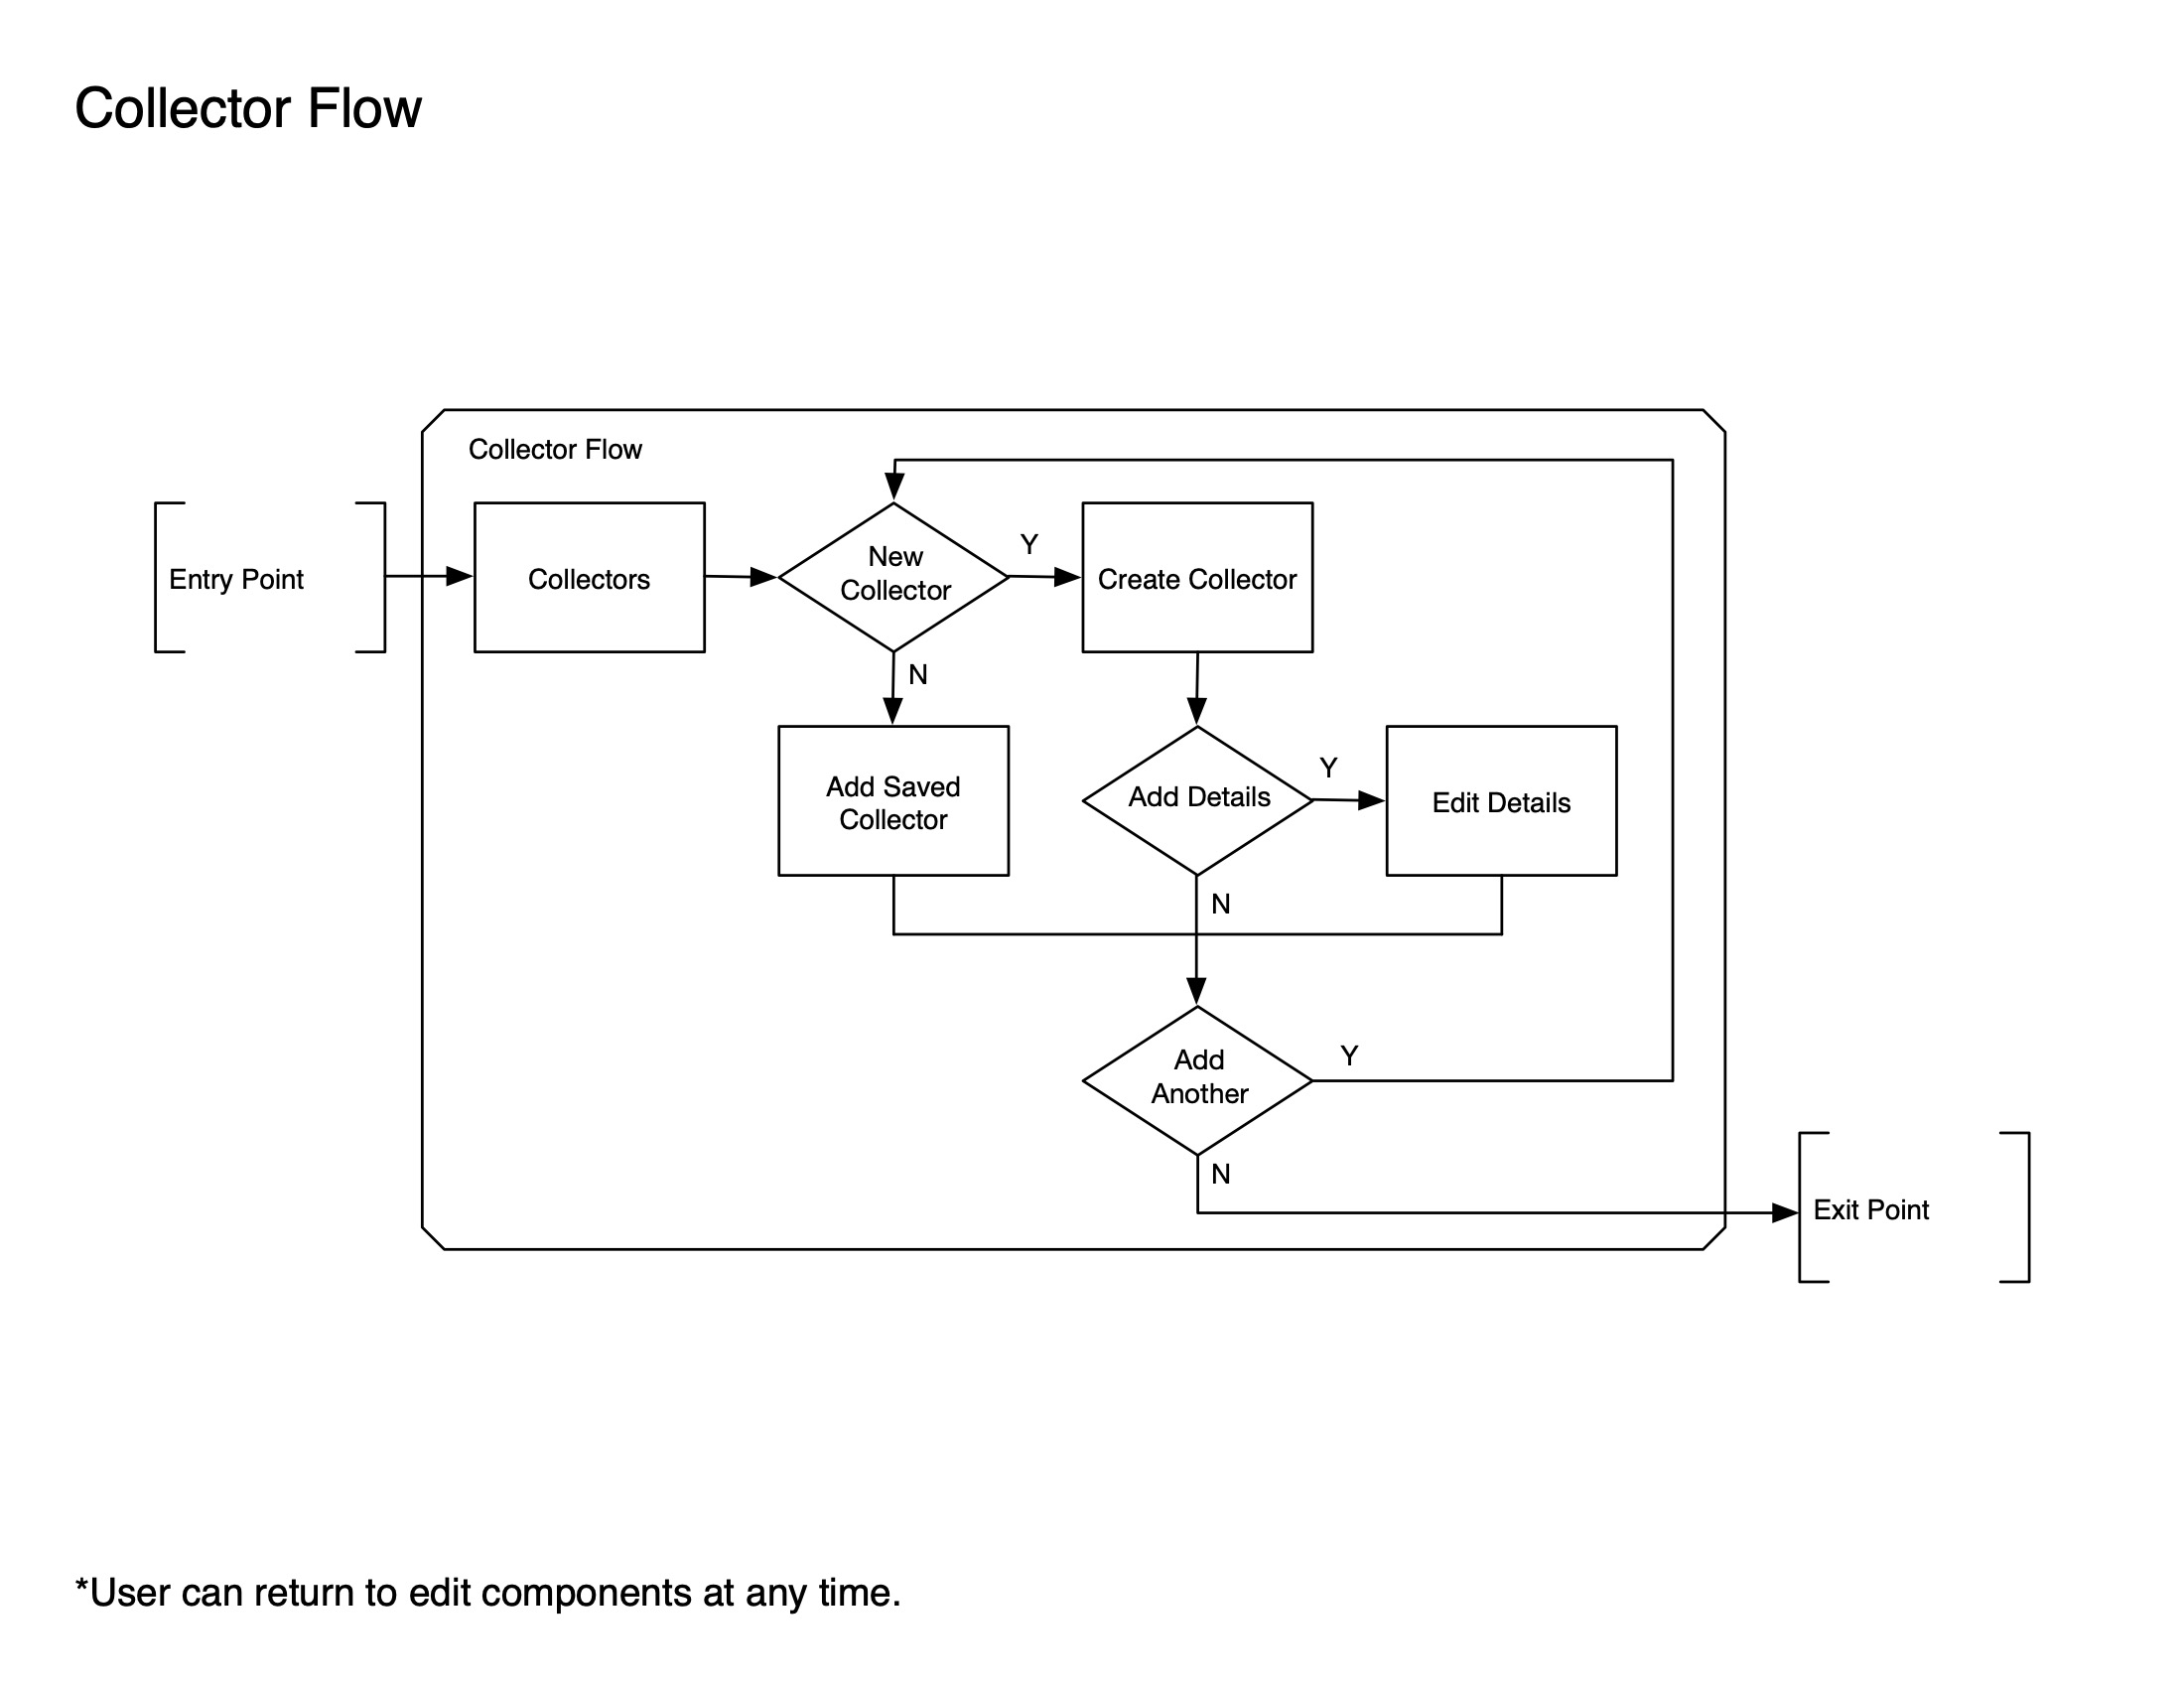
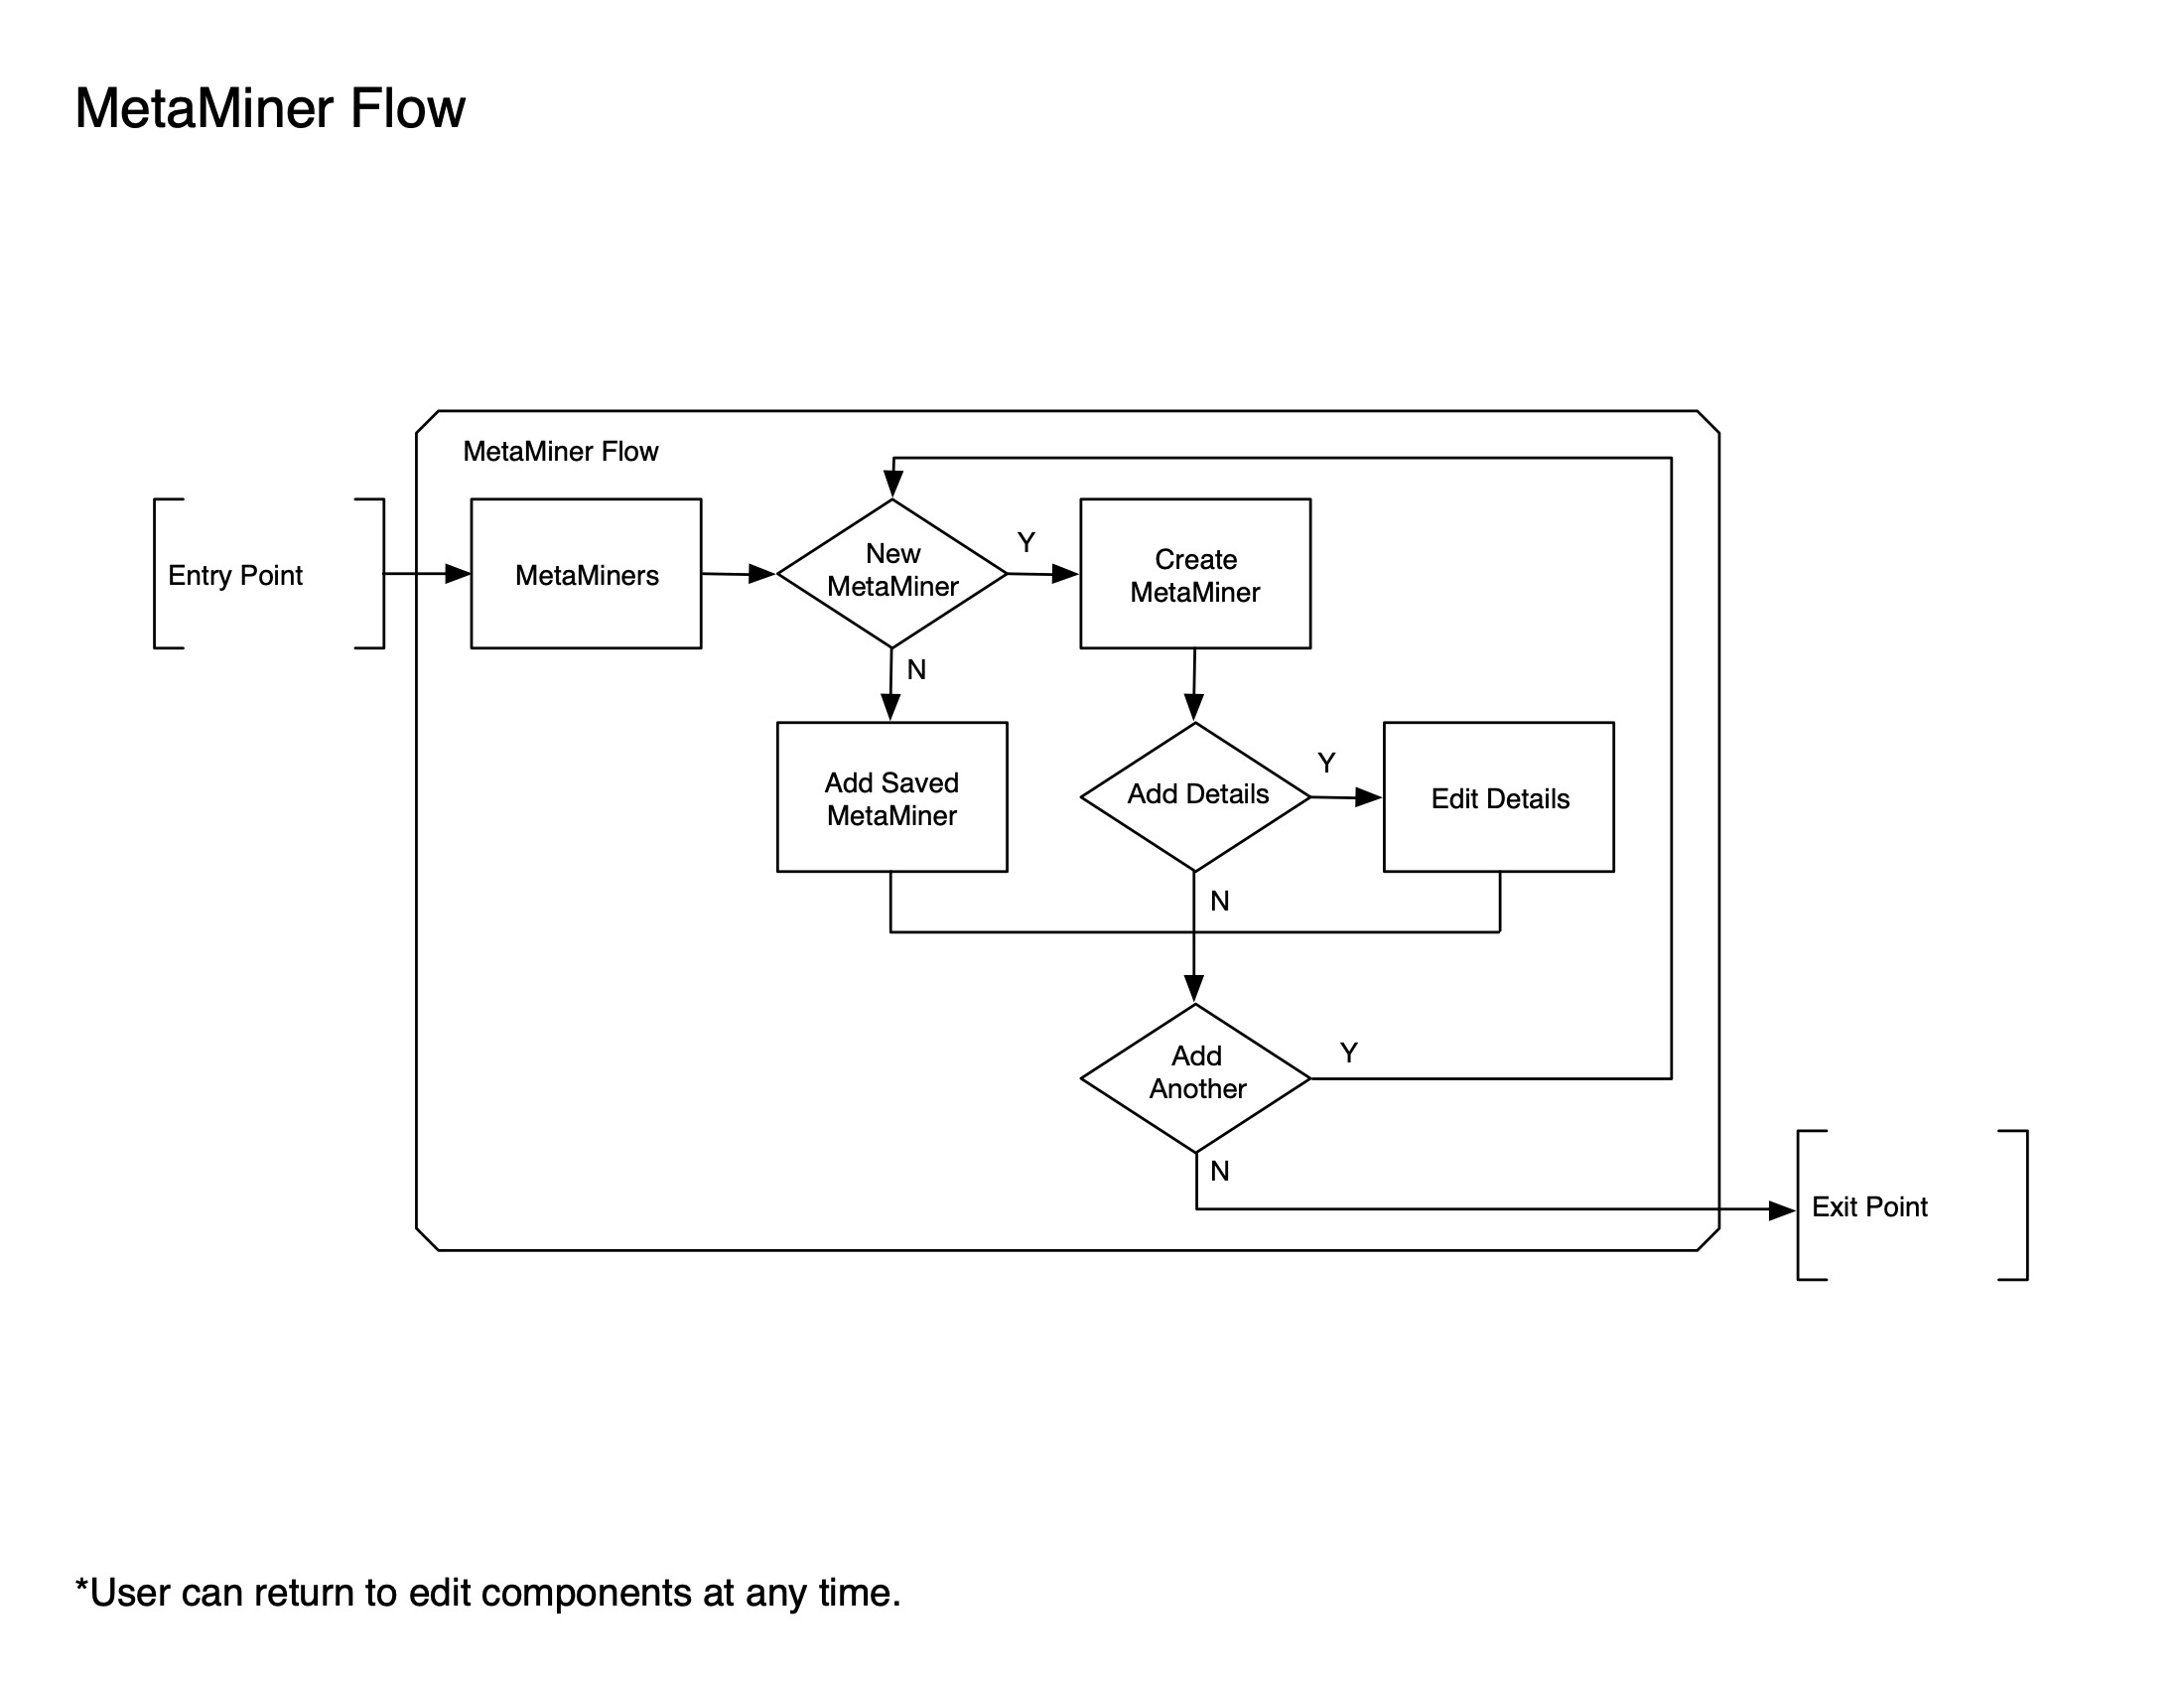
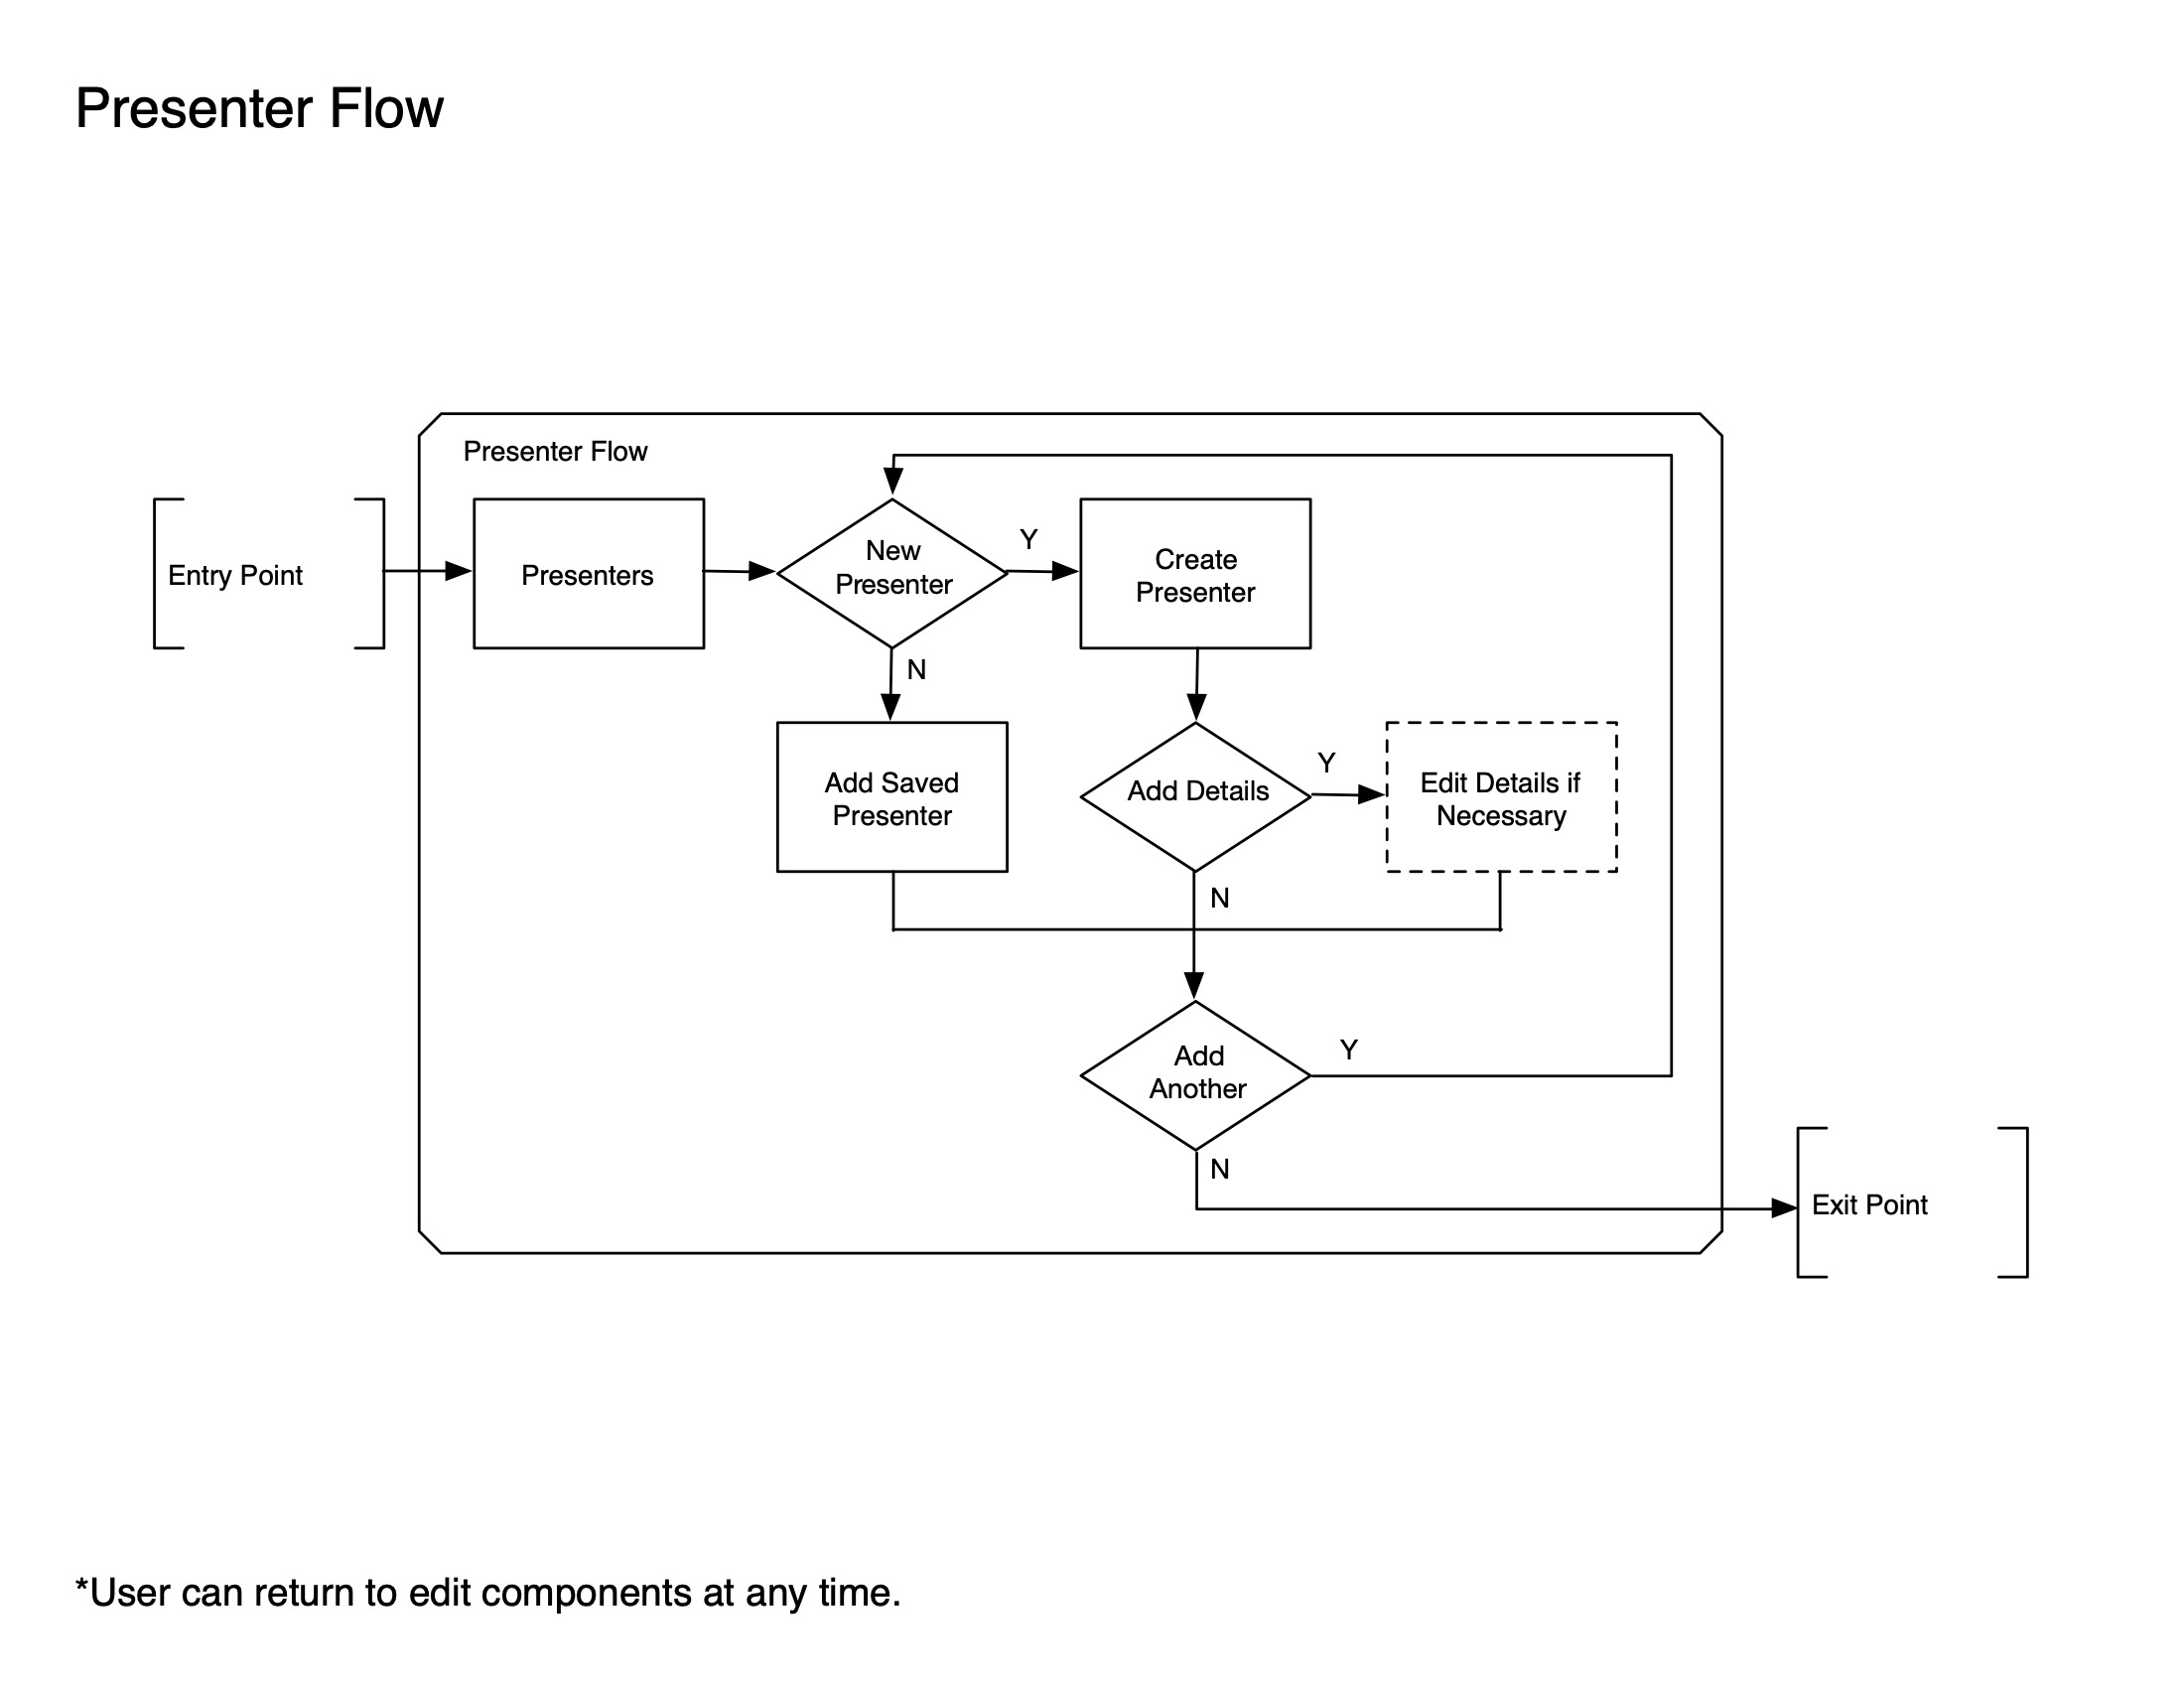
Working closely with the NLP researchers and engineers, I mapped out the processing steps and then added the moments users would be required to input information or set up training models. This was done for the overall flow and for the creation of each processing module type. I was then able to organize each step in a way that felt the most logical, allowing users to add the components in the flow and then add more specific details as necessary. During this time, I also made sure to account for workflows and modules being edited after the initial creation and any limitations that may be present at different stages of processing.
POTENTIAL INTERFACE MODELS
In order to design and construct the machine learning workflows, users needed the ability to create, edit, save, and access processing modules. These modules would then be used in the processing paths, and data would move through the pipeline in a linear fashion, getting sorted and categorized. The modules would be trained as this happened, making the entire workflow smarter and more efficient. Graphical interfaces for consumers were not common for building machine learning workflows at the time of Minsky's initial development, so established patterns did not exist for our use case. Due to the nature of the machine learning algorithm, I knew the mutiple path and forks throughout the various processing steps would need to be visually represented, and I would need to determine a method to build the flow and display all of this information clearly to someone who did not have a lot of machine learning experience.
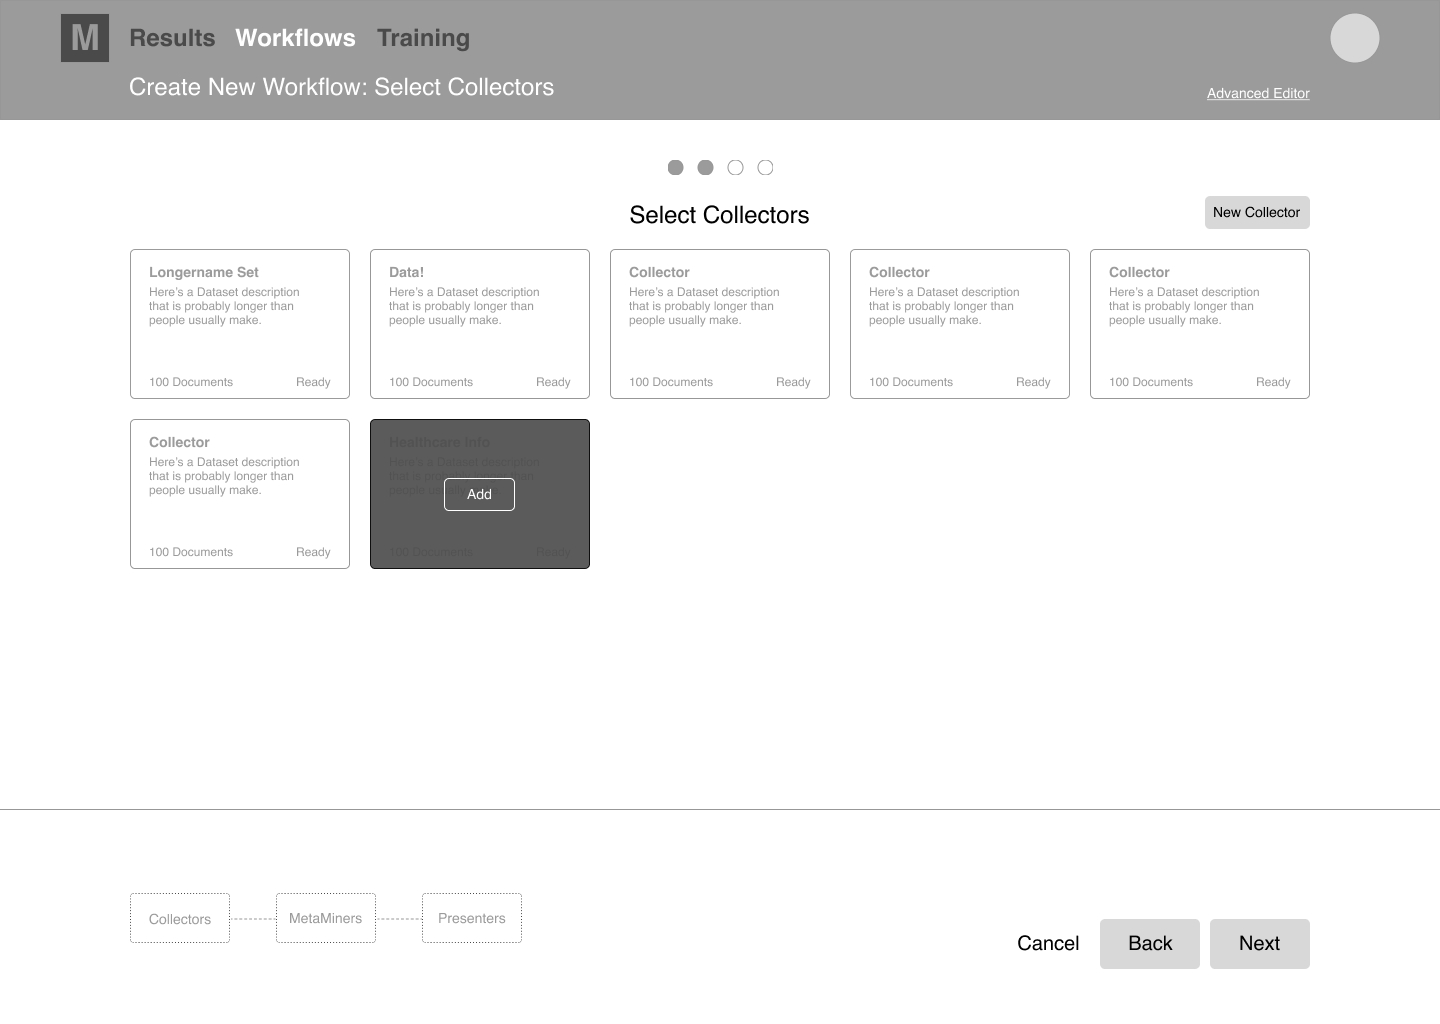
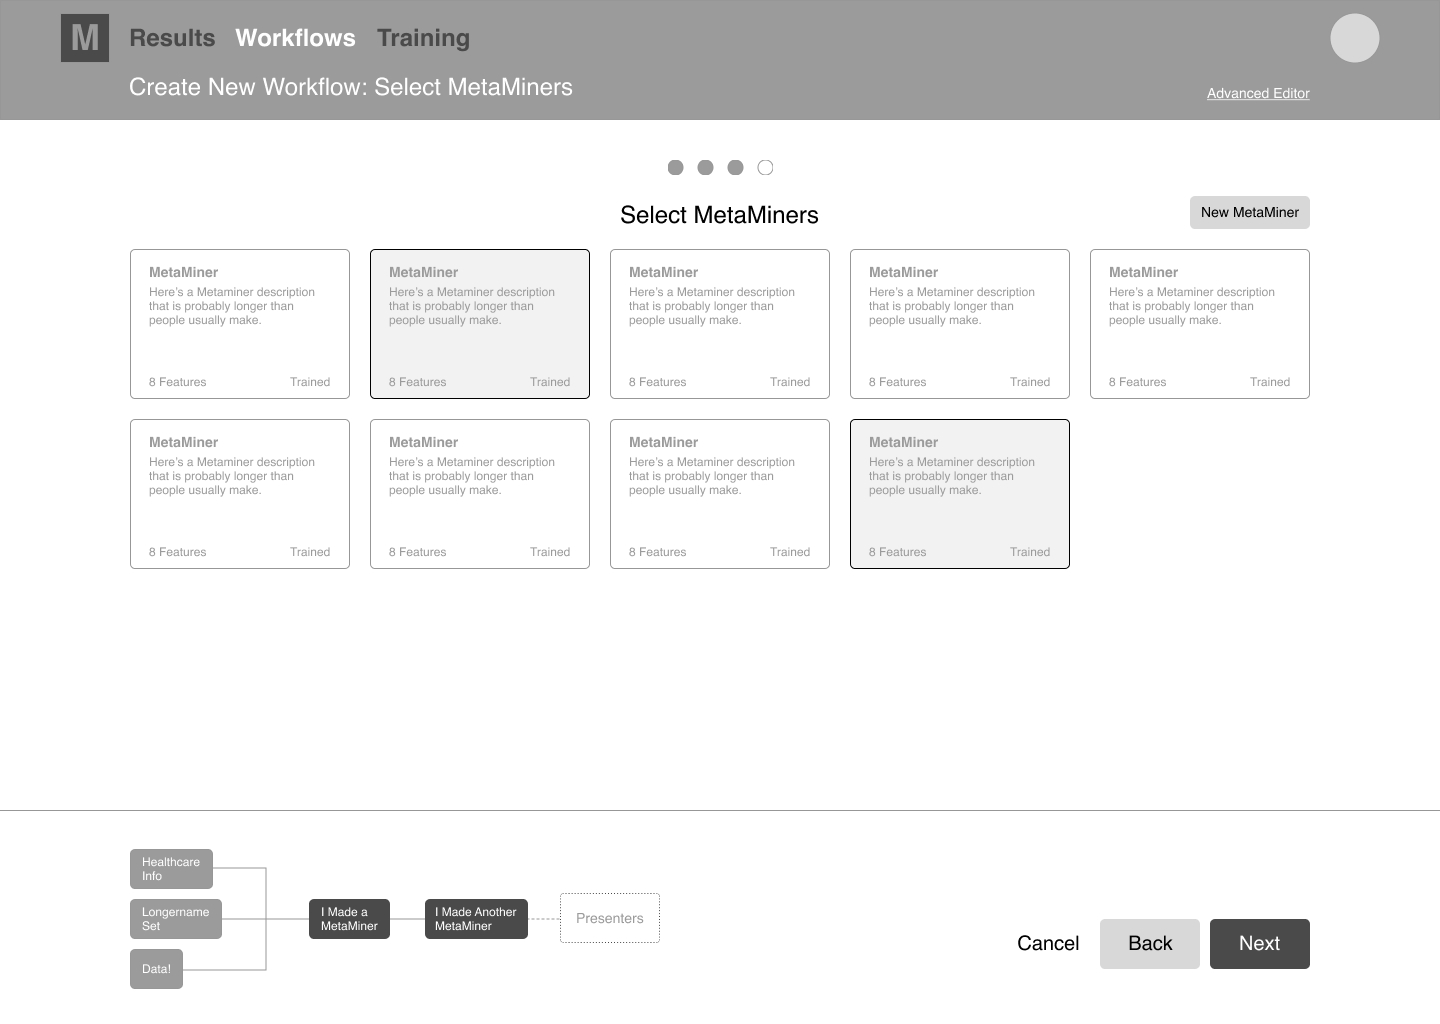
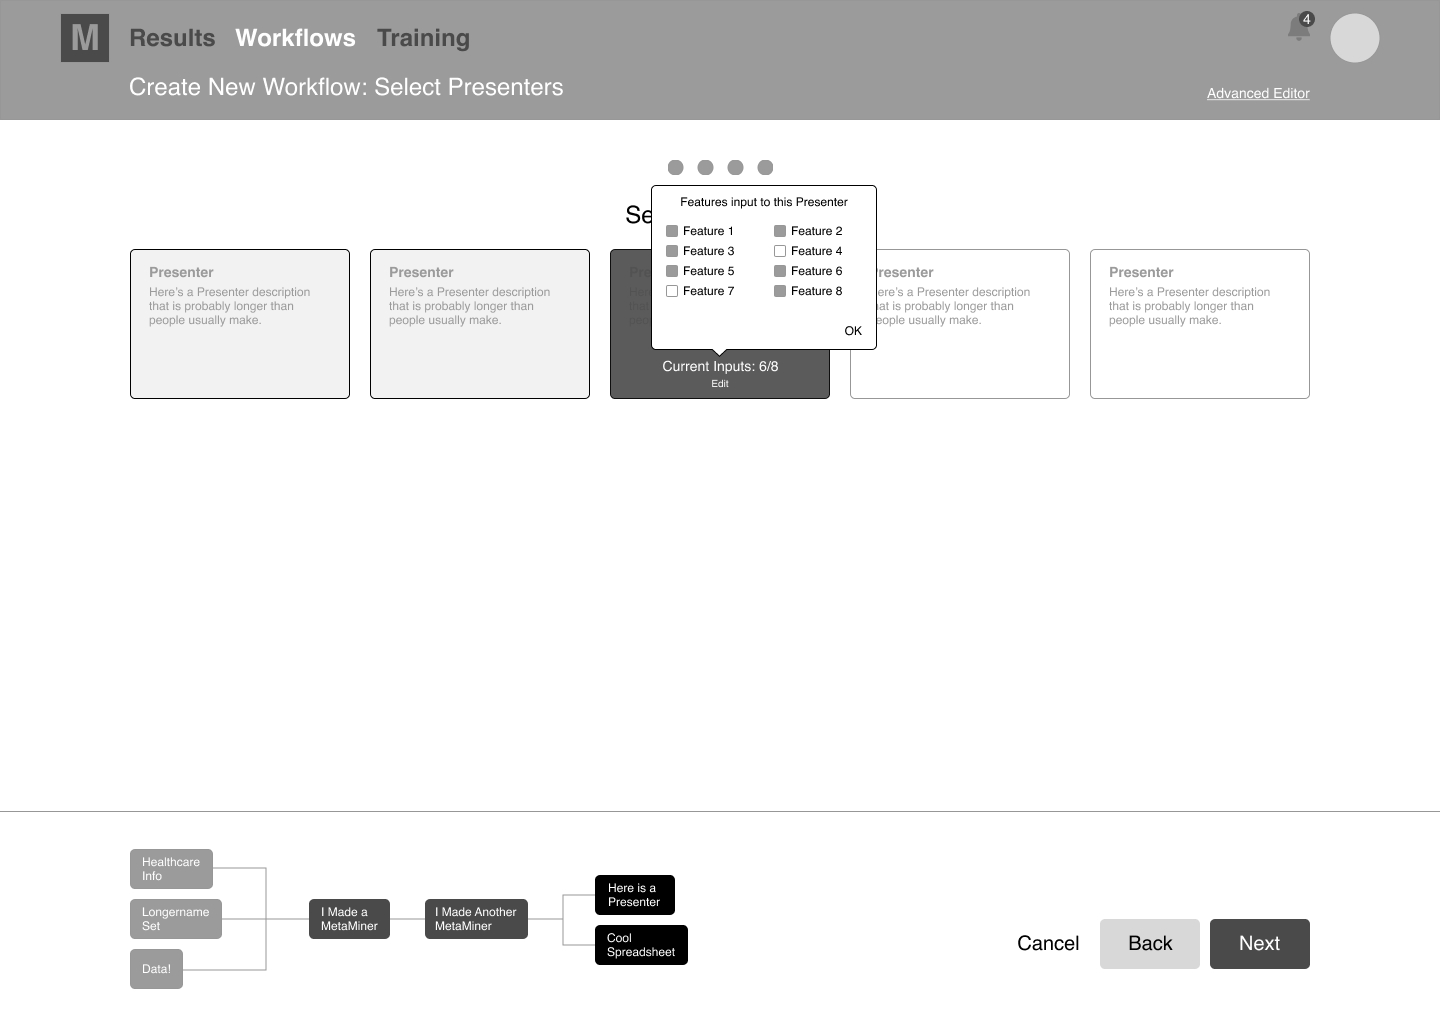
WORKFLOW "WIZARD"
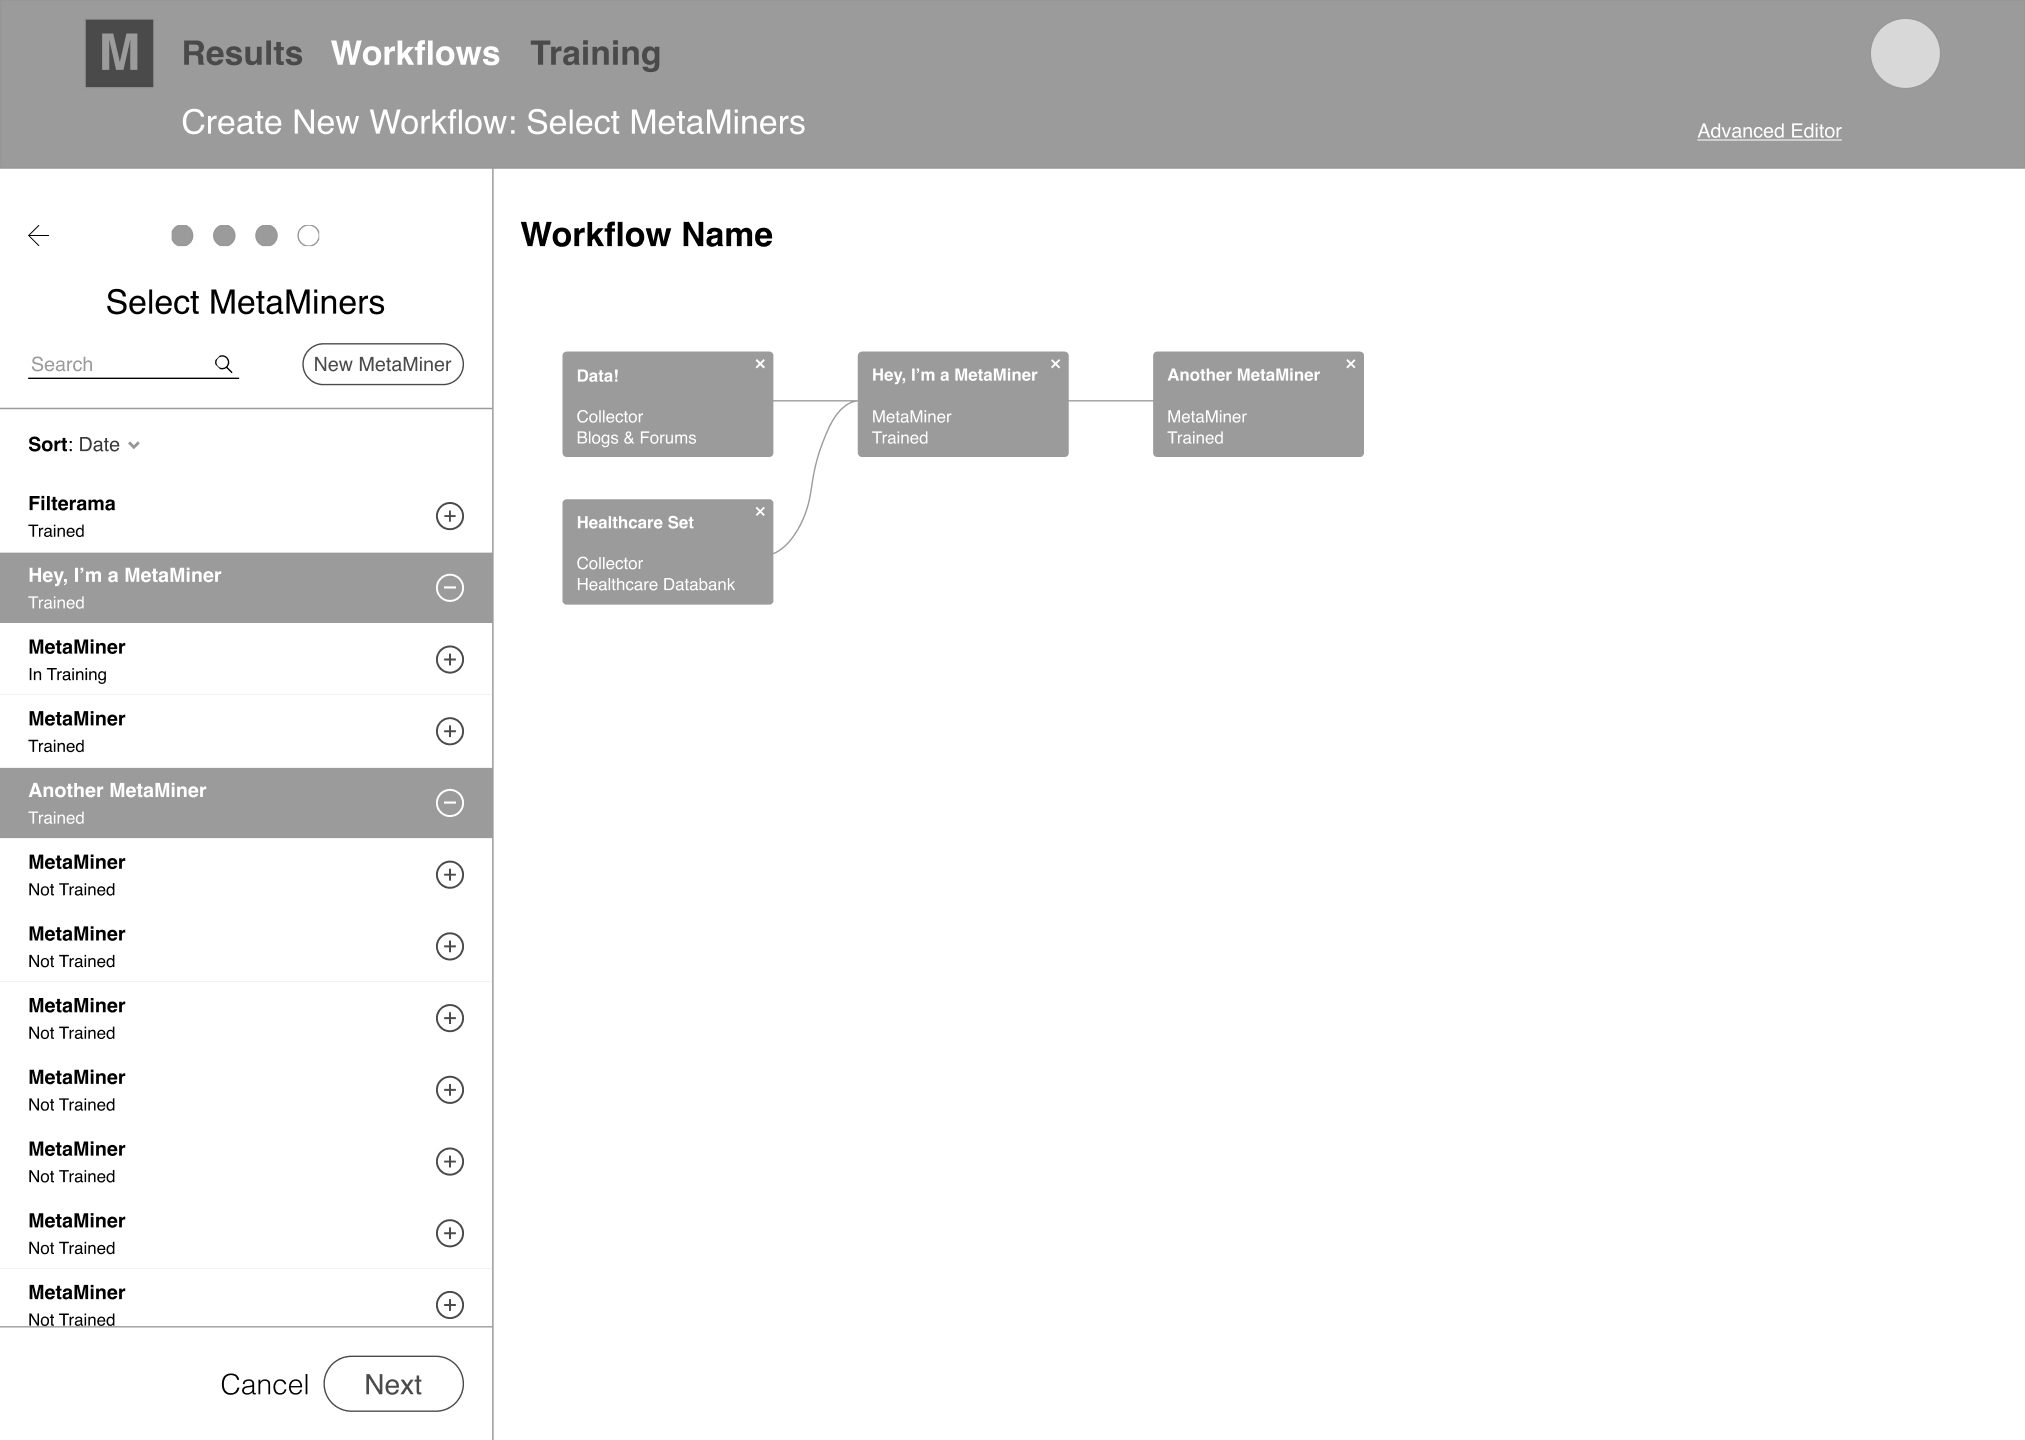
As a potential way to guide users through the complexity of creating a new workflow, I designed rough screens and prototypes to test a wizard-like, linear method that brought the users through a step-by-step build flow. Once done, the complete workflow was mapped out and displayed. While creating an initial workflow in this manner was very straightforward, I was concerned it felt clunky, laborious, and a bit limiting. Editing the workflow paths or modules after completion also felt inefficient and could become confusing. Additionally, representing more complicated workflows would be difficult. The team and I discussed possible modifications and any back-end limitations this type of interface, made some tweaks, and compared it with other solutions.
WORKFLOW NODE EDITOR
Since node editors and pipeline editors were already an accepted standard for designing workflows in other applications, we had been discussing applying a similar model in Minsky. The largest initial concerns with this type of interface centered on the target userbase's lack of previous interaction with node editors and the potential for confusion surrounding proper workflow construction during early adoption, with a fear that expecting a new user to learn how to use an unfamiliar editor while also trying to grasp machine learning workflows in general might be overwhelming.
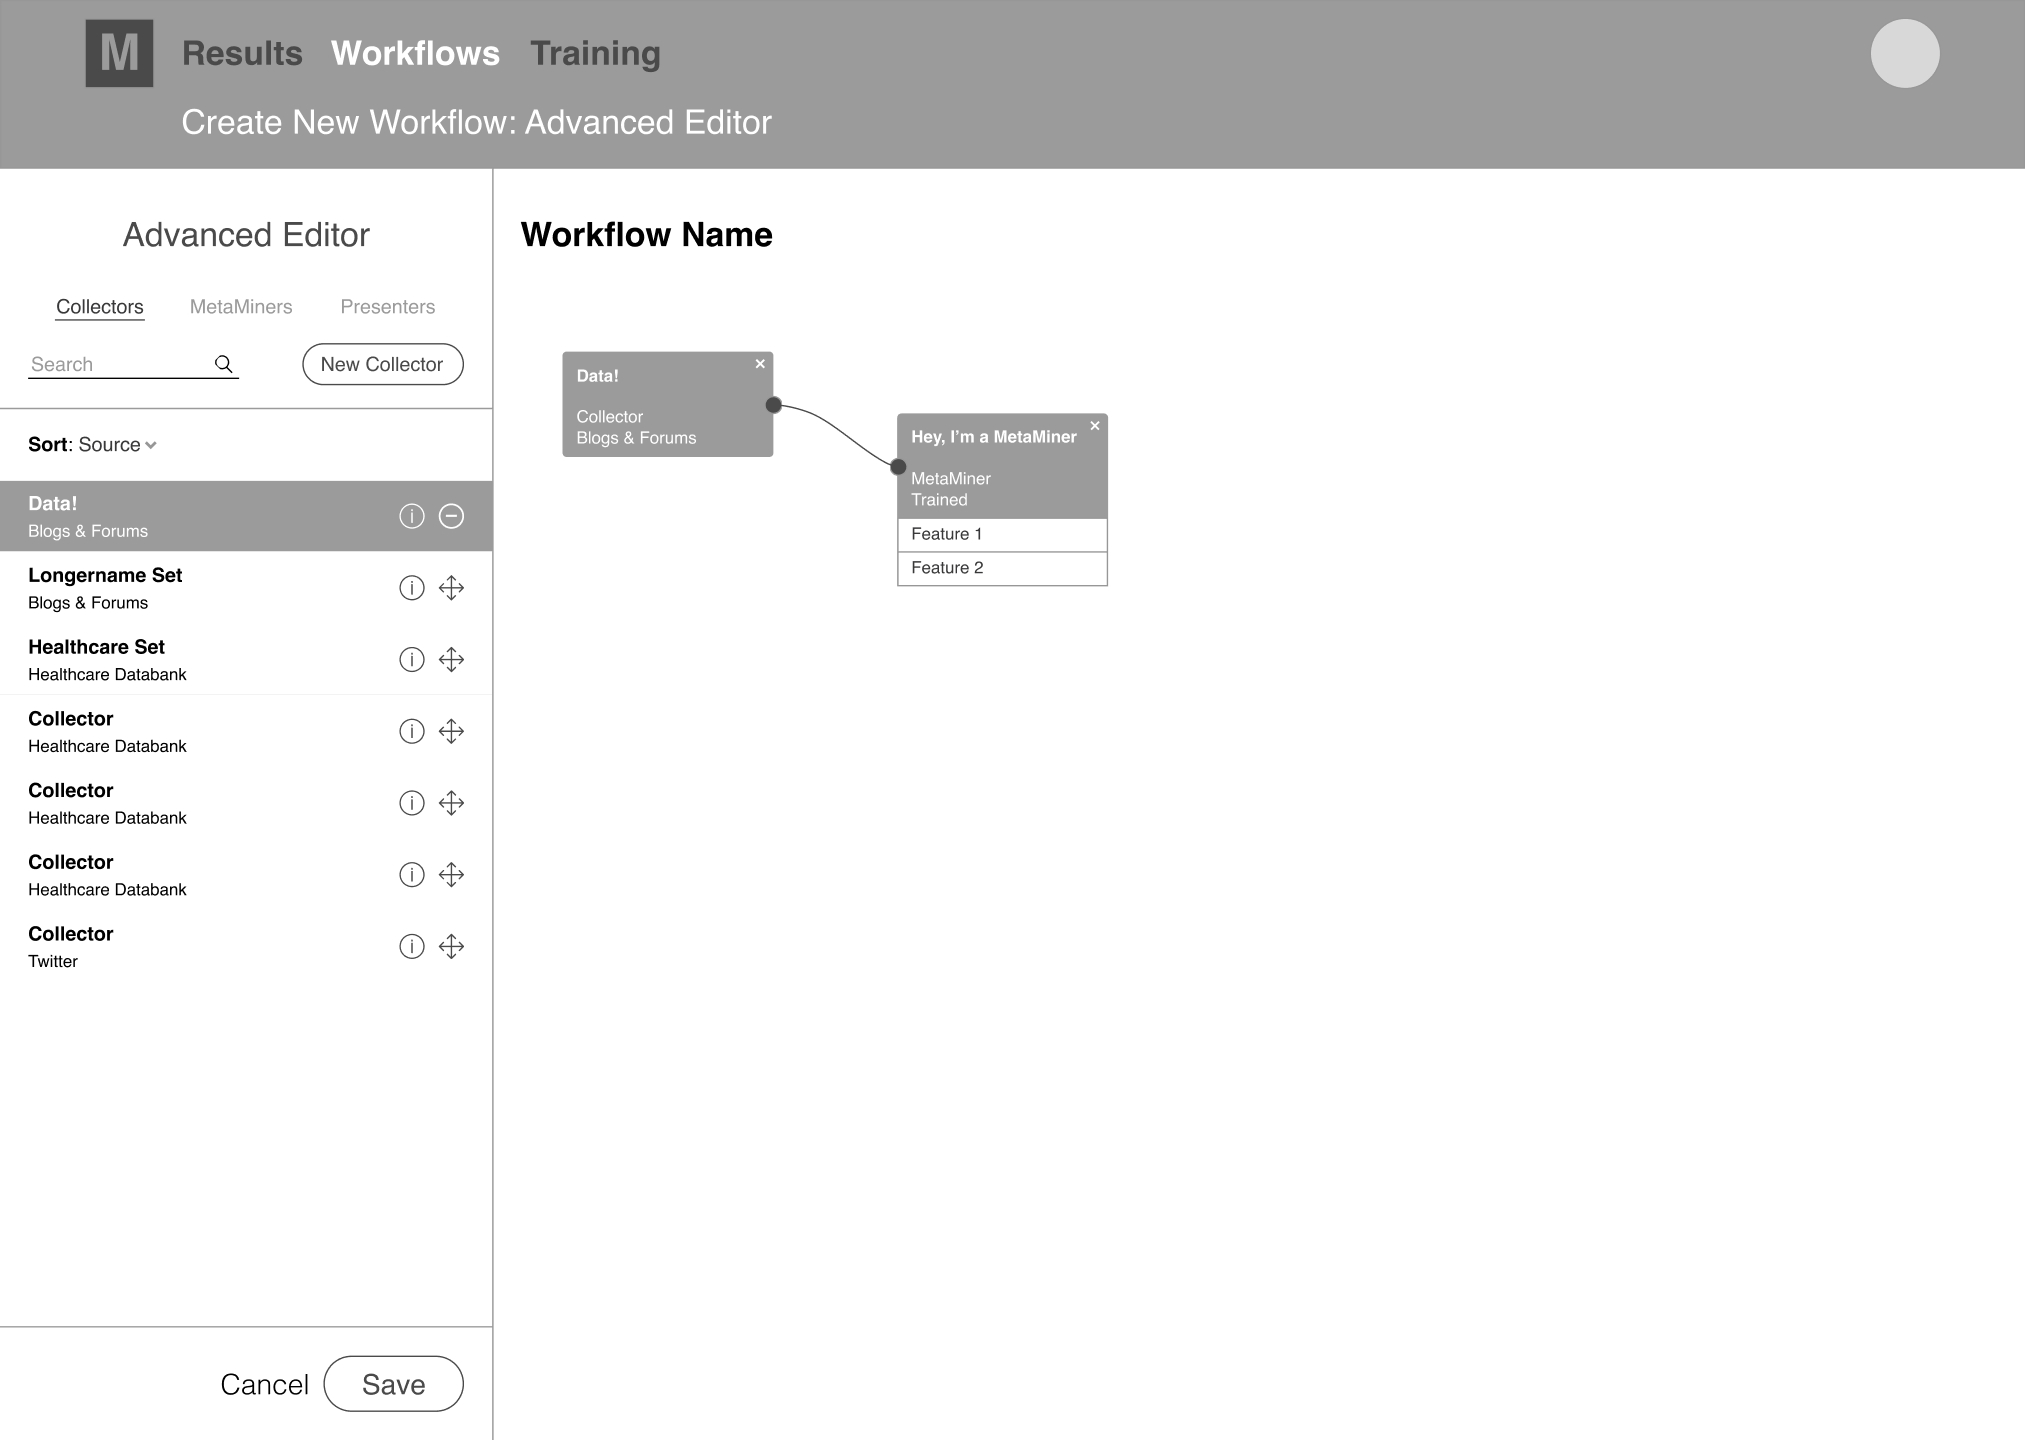
However, when considering the end requirements for creating and succesfully running a workflow, we determined a node editor would most likely be the best solution, even if it would take more upfront time for a user to fully understand. This type of interface could allow for the best full-picture view of the workflow and provide the easiest methods to modify and edit the entire workflow or individual pieces within it. I put together some early UI and built low fidelity prototypes so our team could interact with the concept and determine if this would be the best method to prioritize.
MODEL SELECTION & EARLY DESIGN
Due to a combination of time constraints and the inherent nuances and expertise involved in creating successful NLP workflows at this stage, it was decided to rely on internal testing for the different models. Once a decision was made and some more work could be done to streamline the assumed best solution, I would test with users. After interacting with both models, we worked through the pros and cons of each. While easier to conceptually understand, my concerns about the wizard were verified, especially when more complex workflows were desired or if post-creation editing was needed. On the other hand, the node editor allowed more scalability, direct interaction with the nodes for positioning in the flow, and provided easier methods to modify or expand completed workflows. It also gave users a better global view of entire workflows, and users could drag and drop processing modules into the pipeline area. Ultimately, we saw more benefits in the node editor and determined that would be the focus.
WORKSPACE
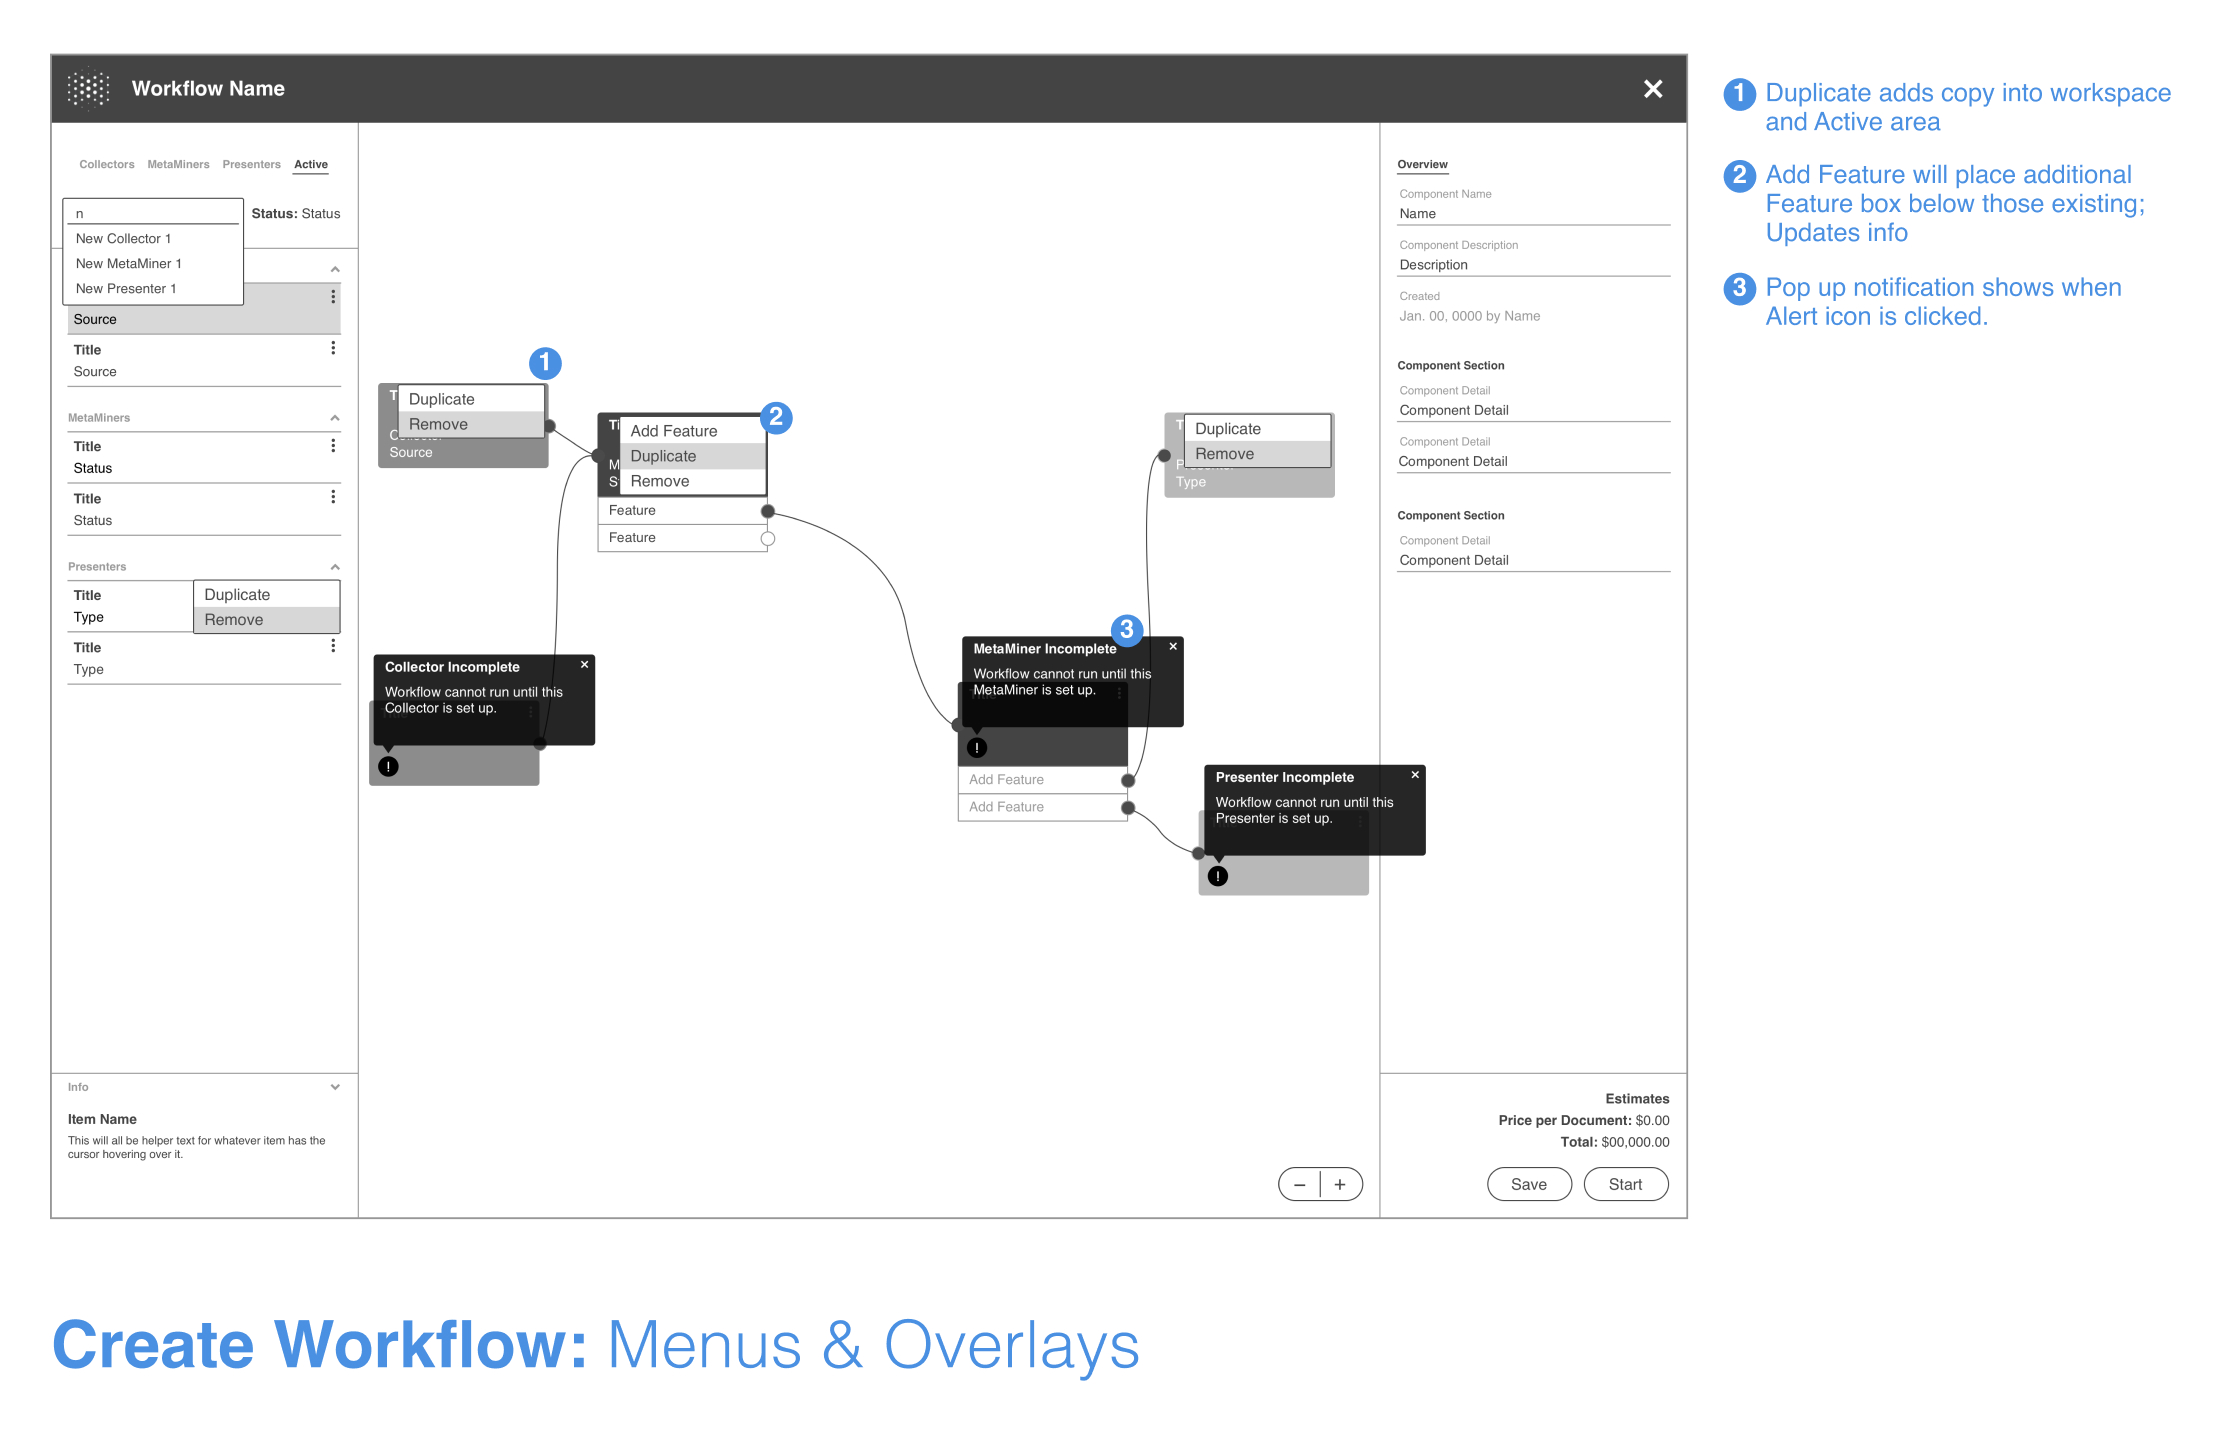
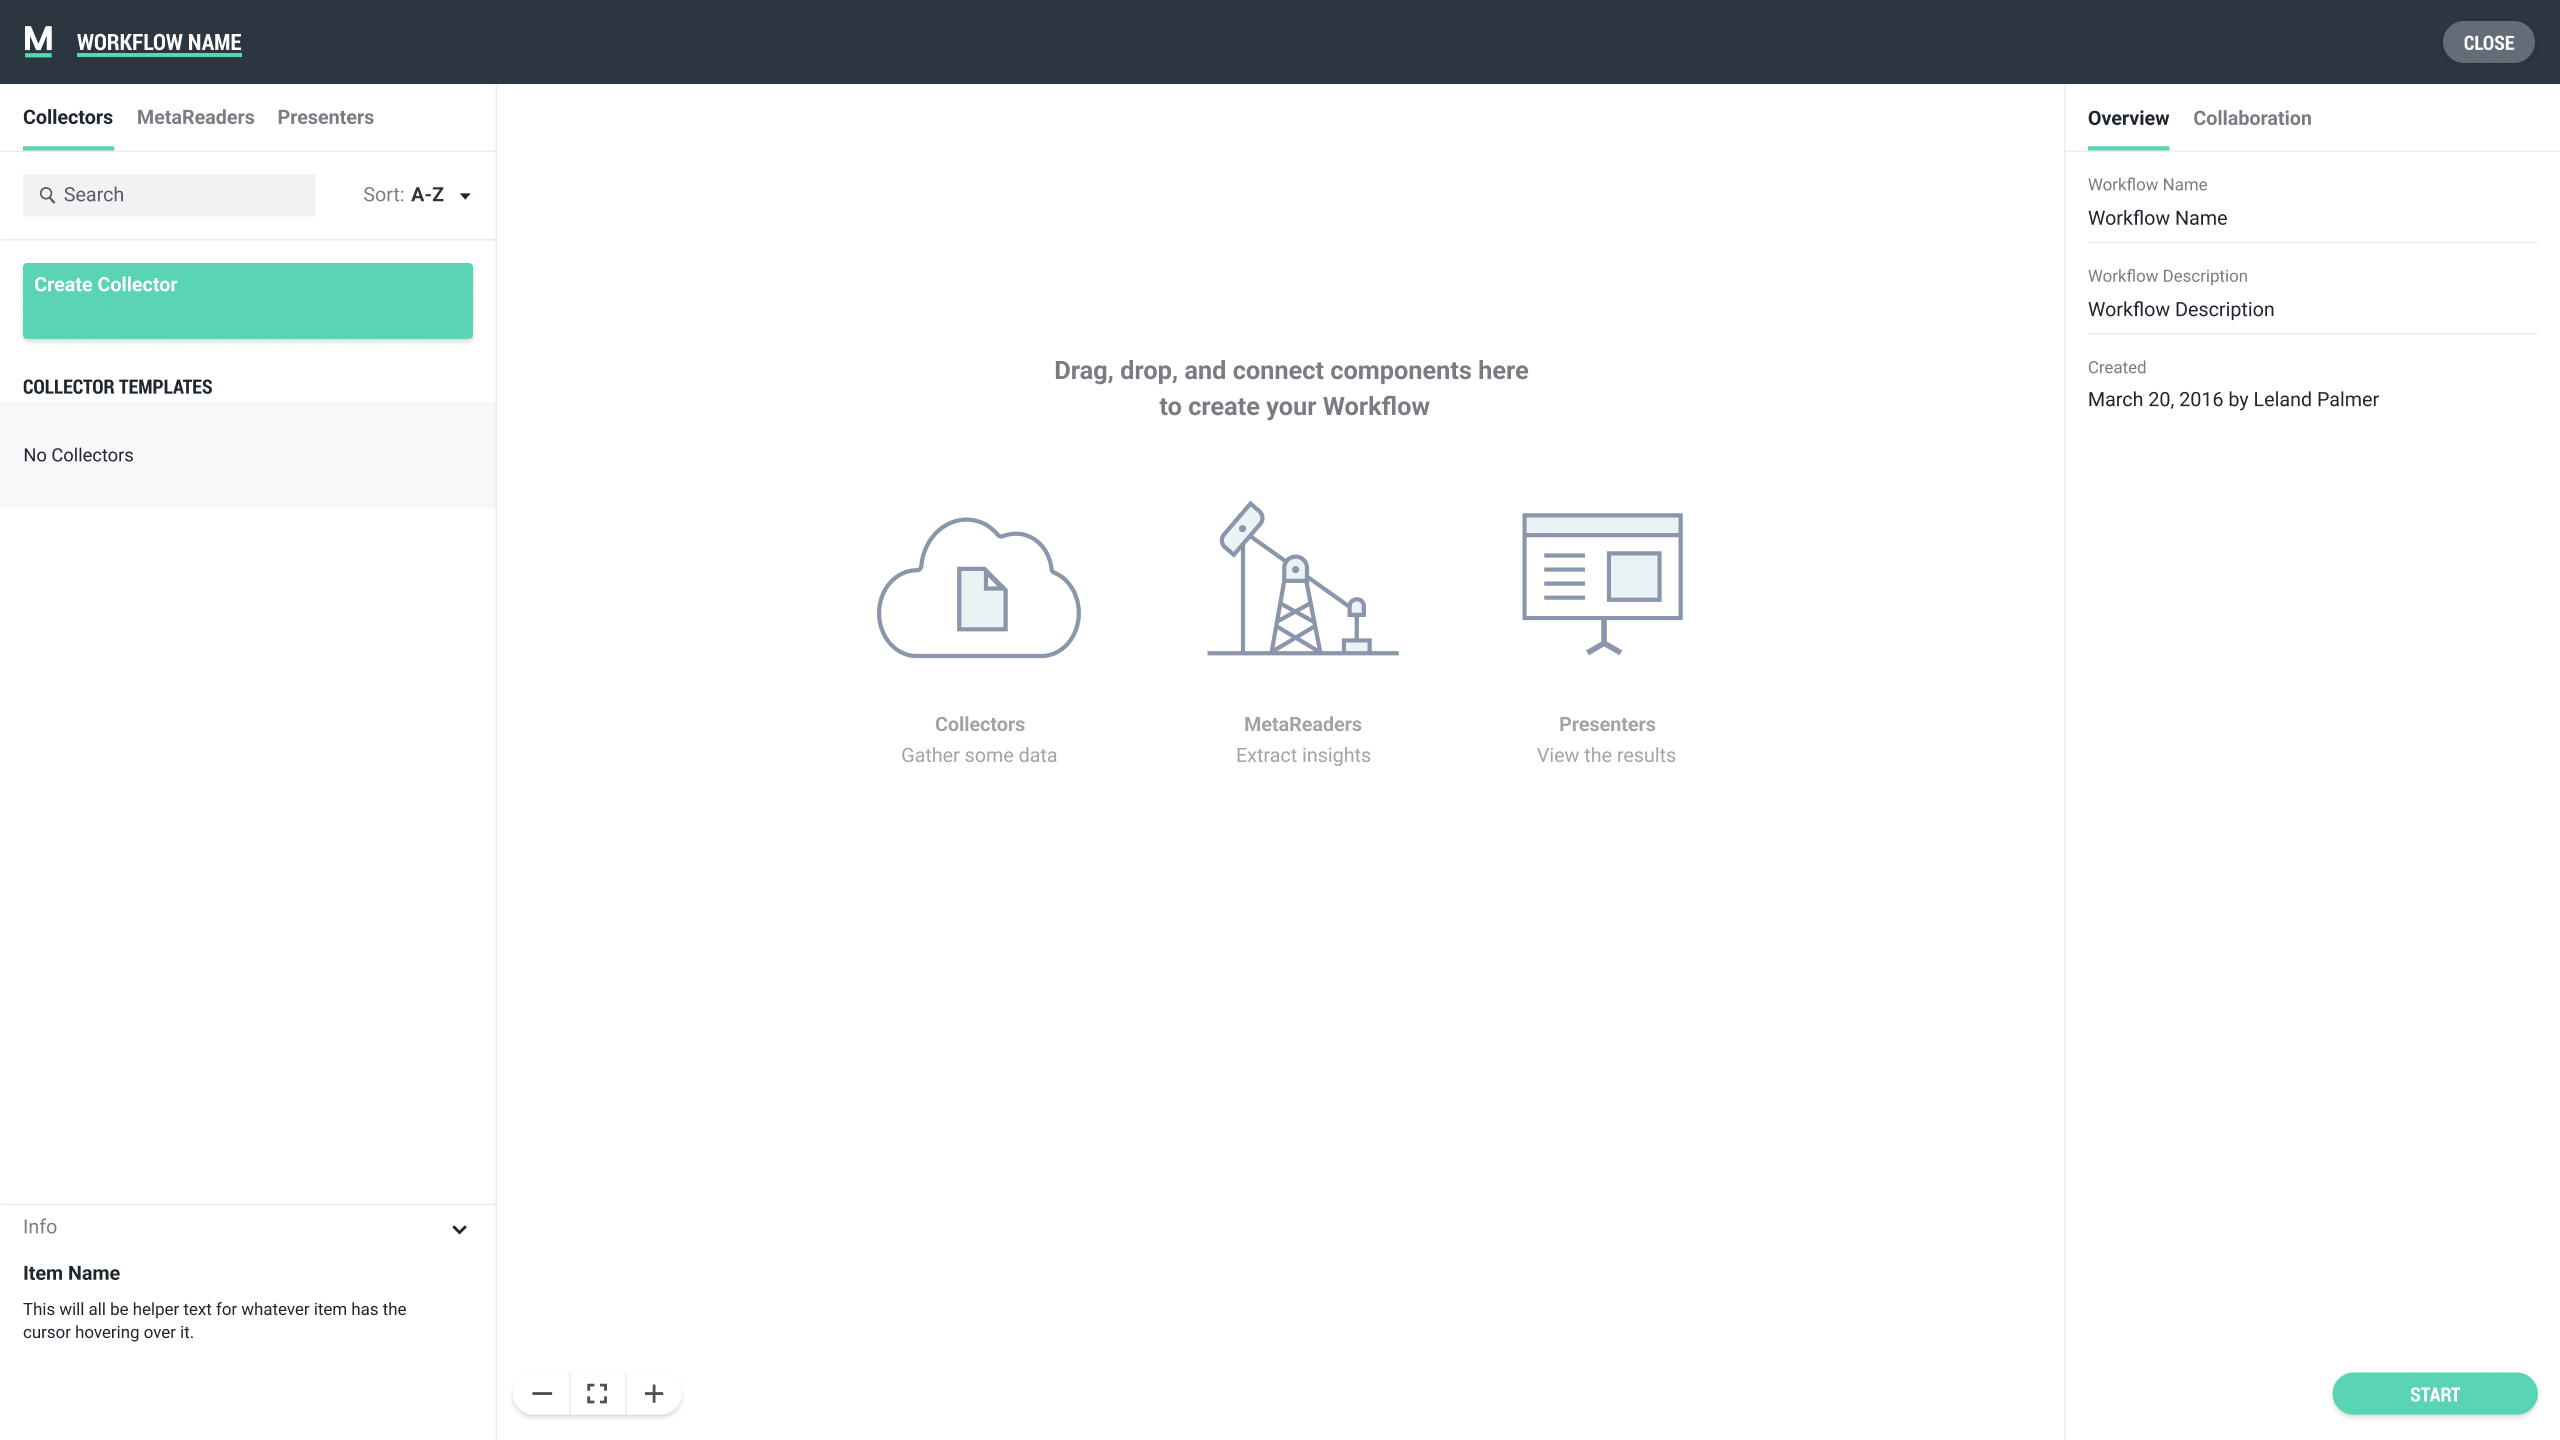
It was obvious a large area of the interface would need to be dedicated to the interactive node editor, and although I had designed an early layout to test the prototype, I hadn't actually decided how the various other functions of the application would be accessed or organized. Once in the main workflow interface, the main objectives were building or editing the workflow itself and creating, accessing, and managing the processing modules. Controling workflow processing and viewing information on pricing would also be available functions. I felt it was important to keep the user in the same workspace while completing any of these actions, so I blocked out multiple layouts and associated patterns to better understand how someone could handle the necessary tasks without exiting the main screen.
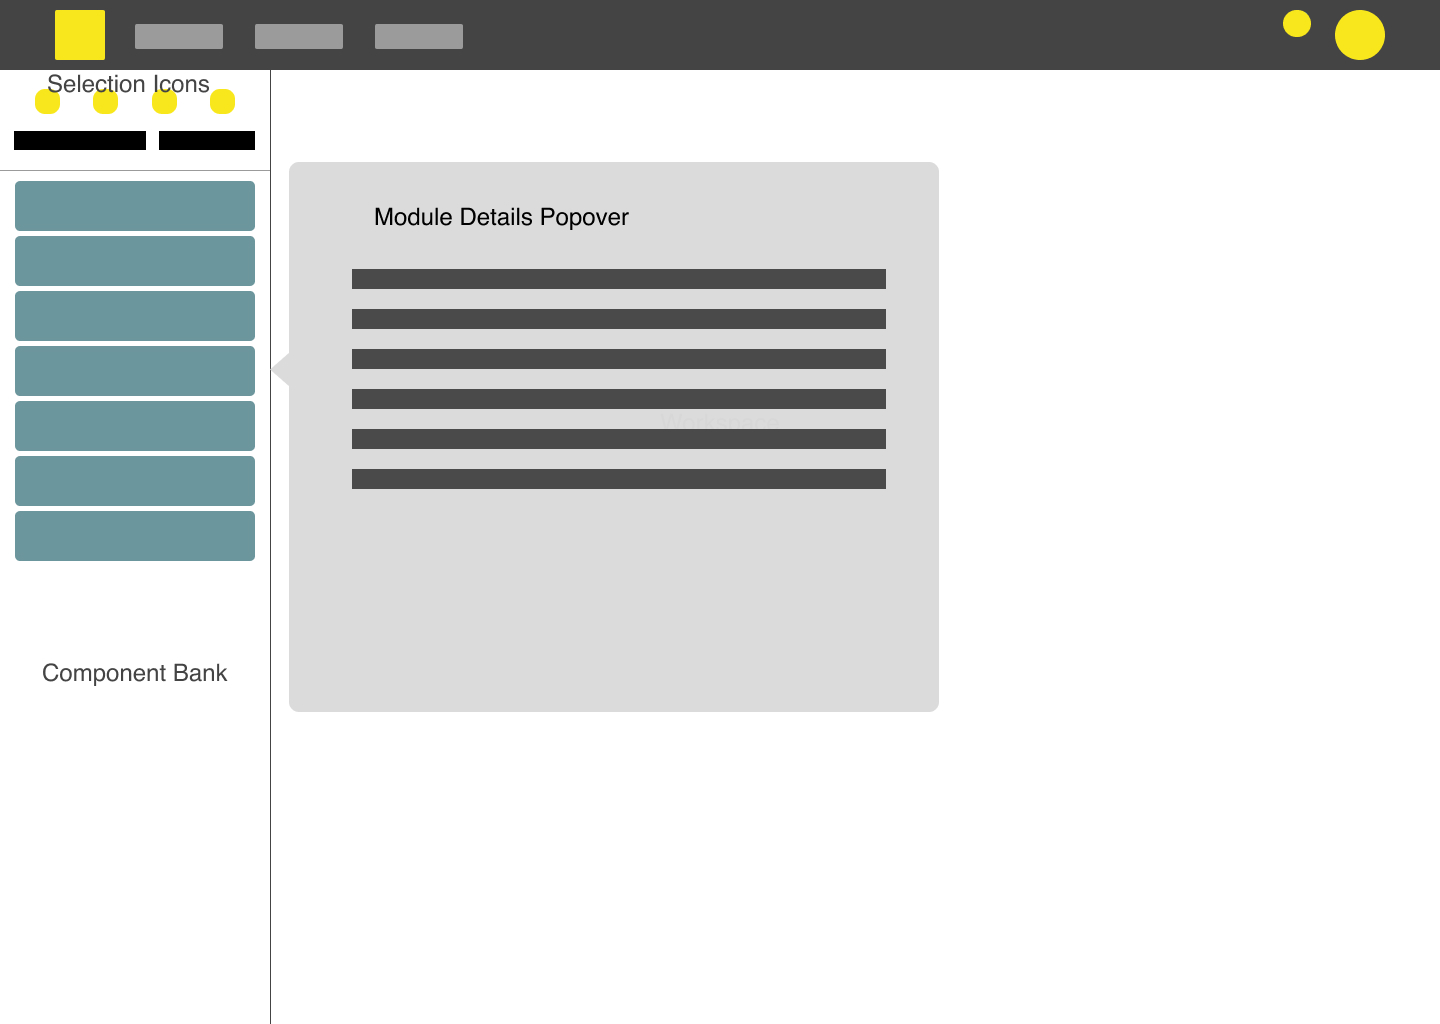
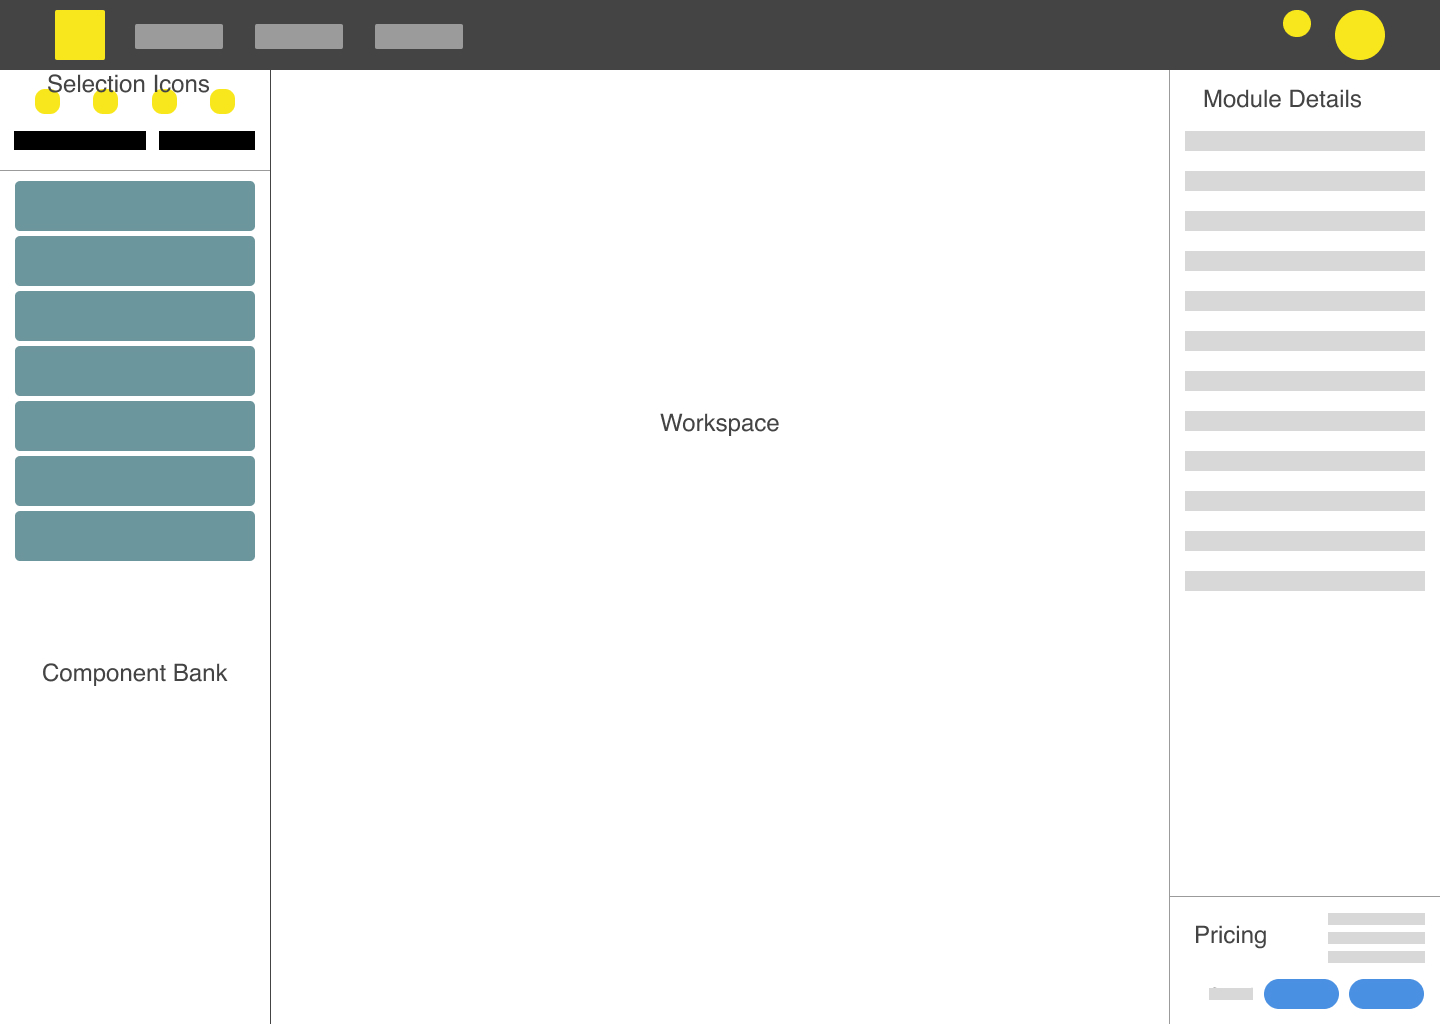
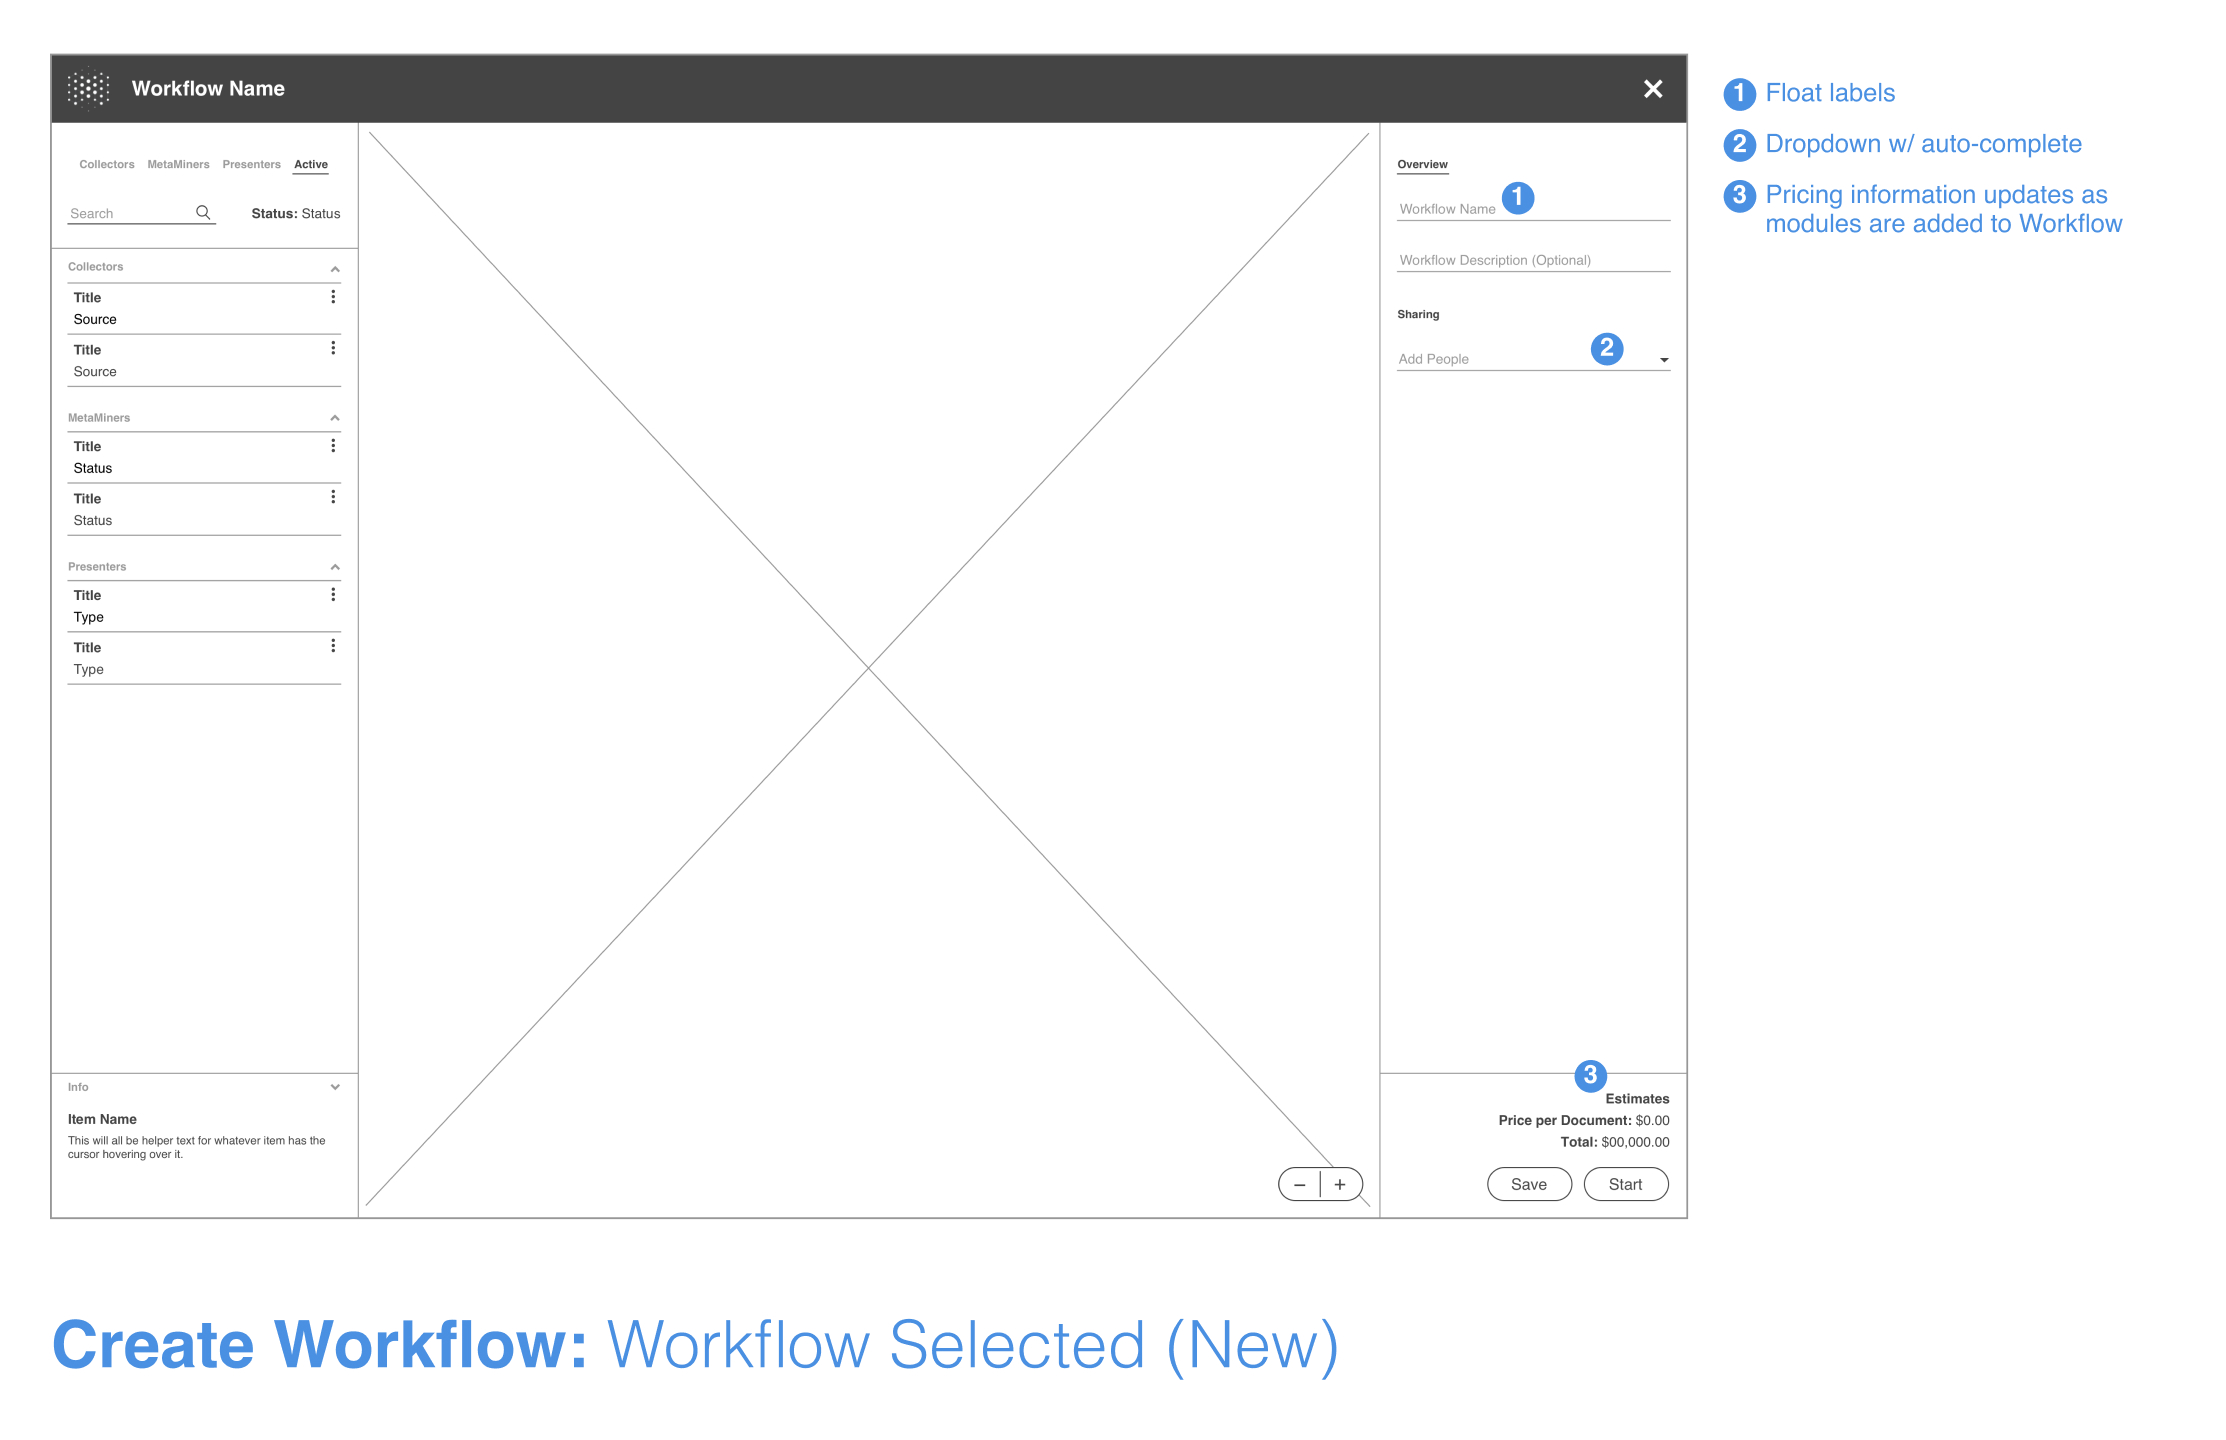
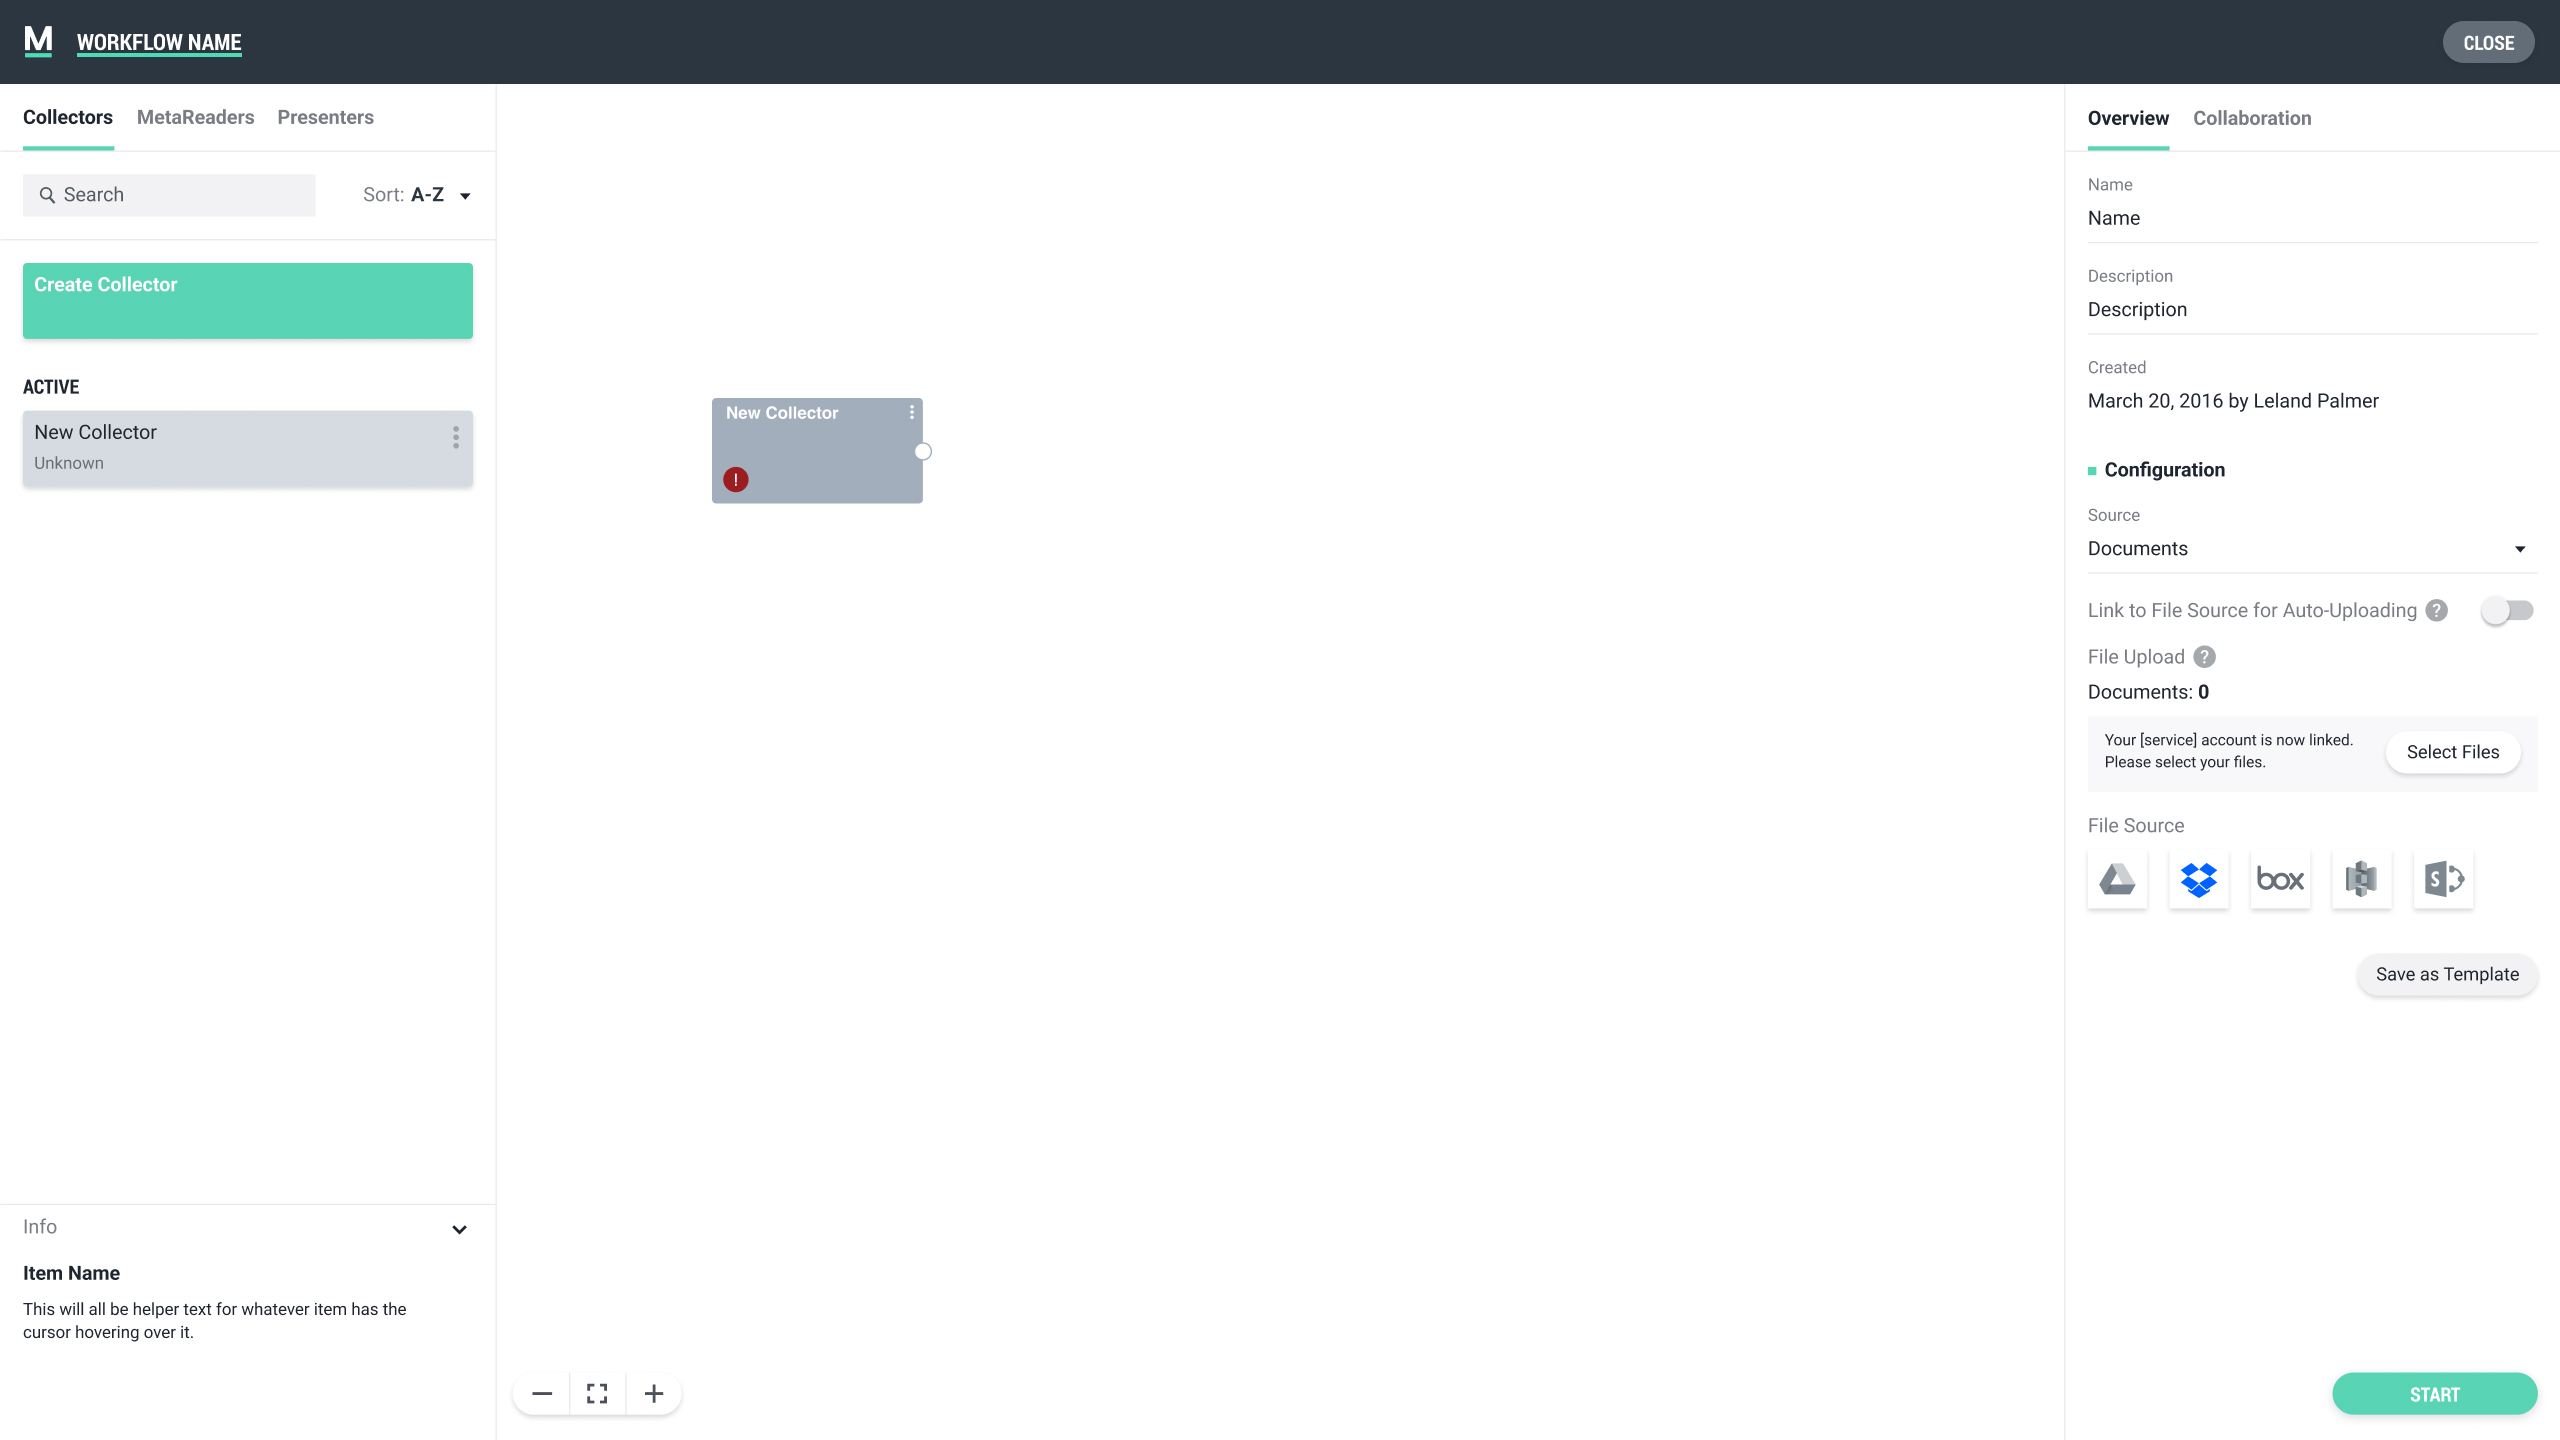
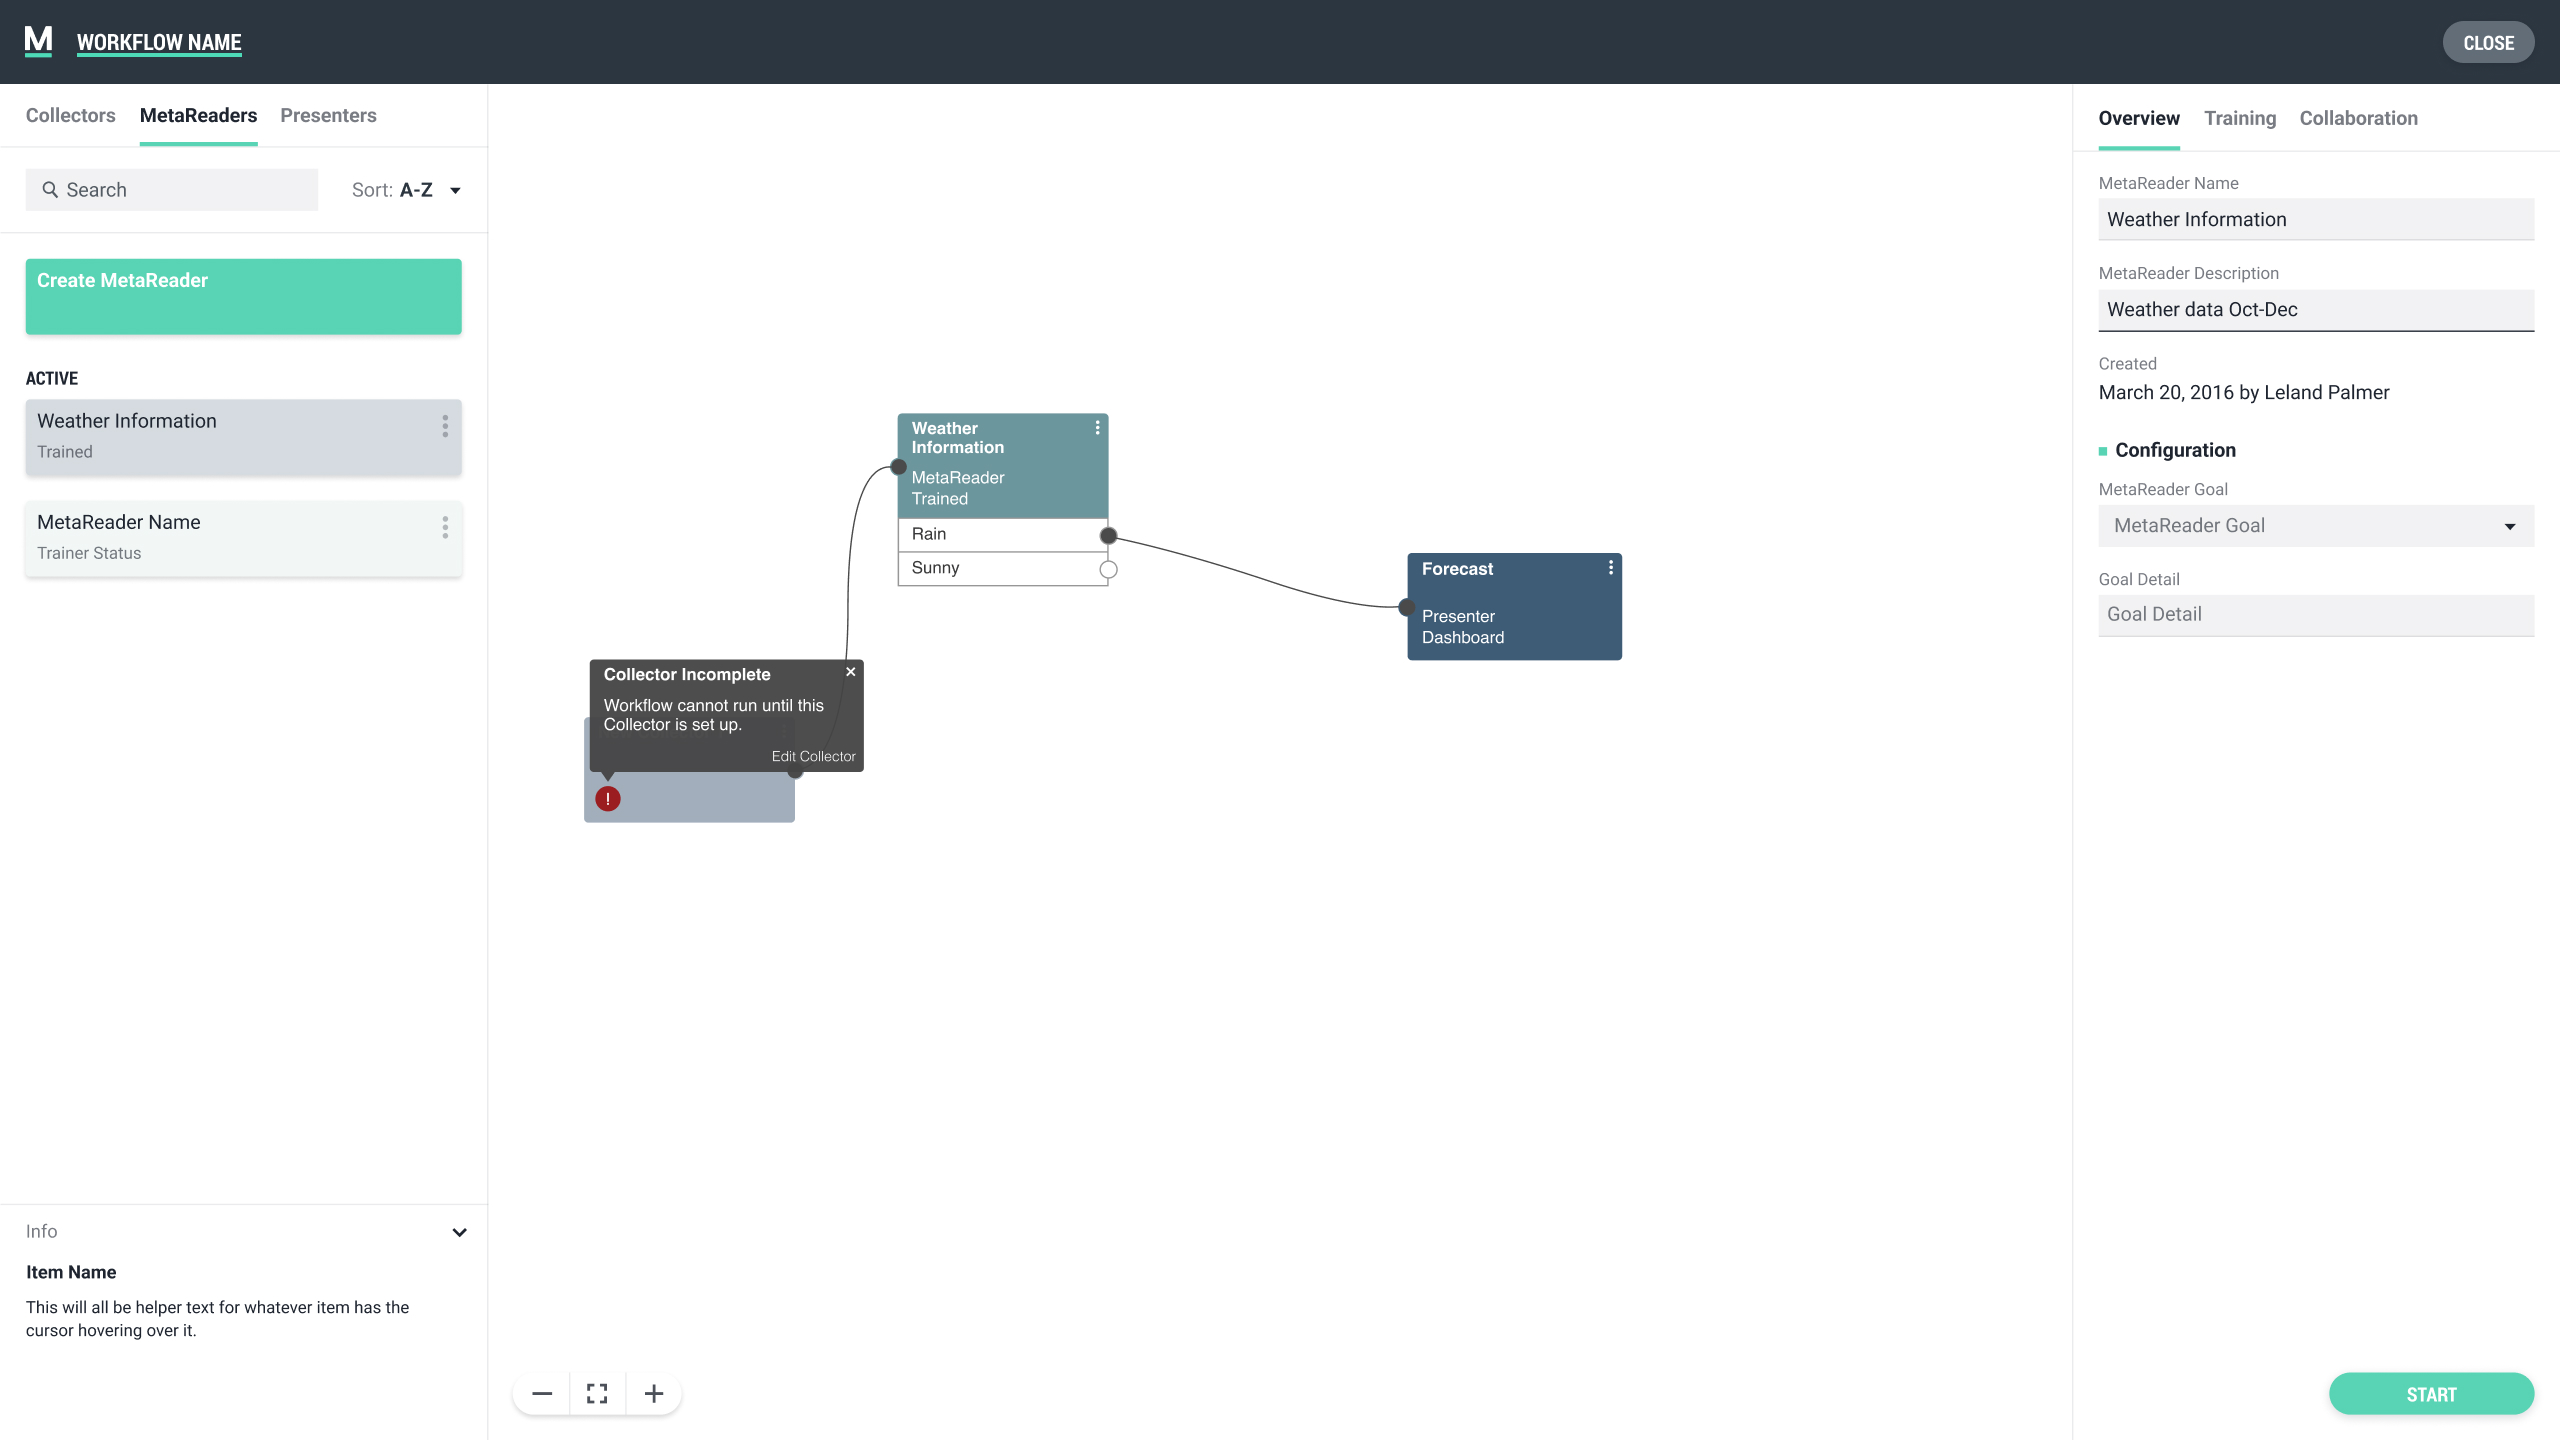
After consideration, I decided a central workspace for the node editor and two sidebars would be the most effective. The left sidebar would house a module list and give users the ability to filter by different types. Initiating the creation flow for new modules would also live in this space. Modules could be dragged from the list into the central work area where they could be arranged and linked to each other to build out the workflow. The right sidebar would contain all of the specific information tied to a directly selected module and allow users to do any necessary editing. Structuring the workspace in this manner helped move the user through the steps needed to build a workflow in a left to right fashion.
PROCESSING MODULES
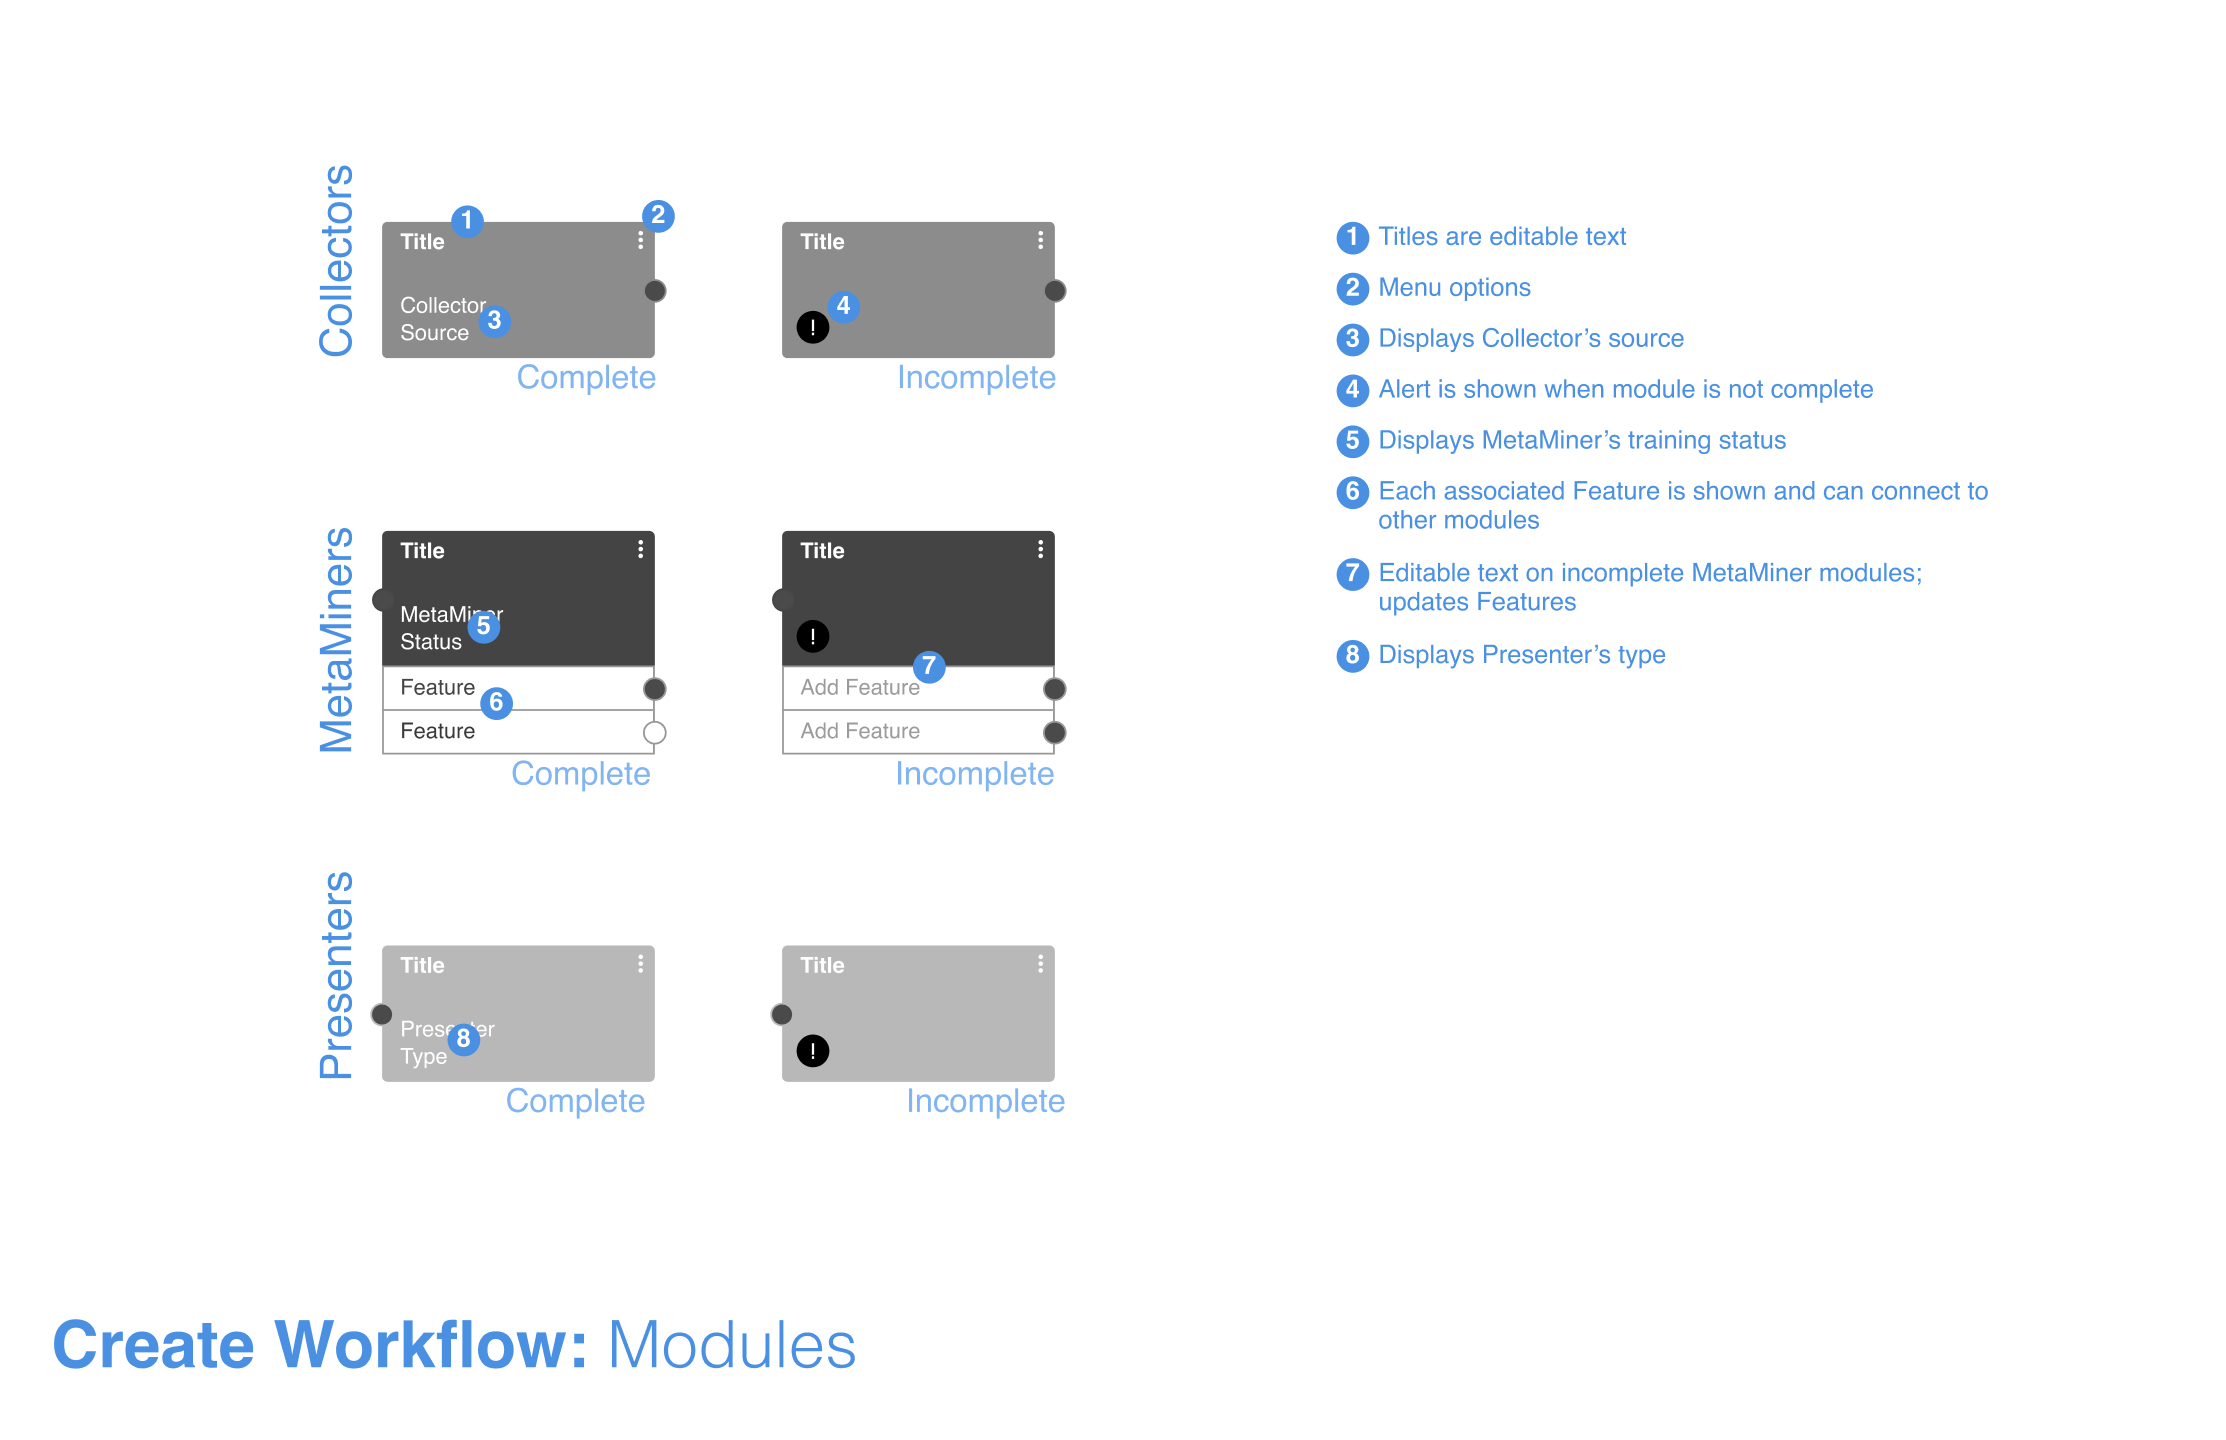
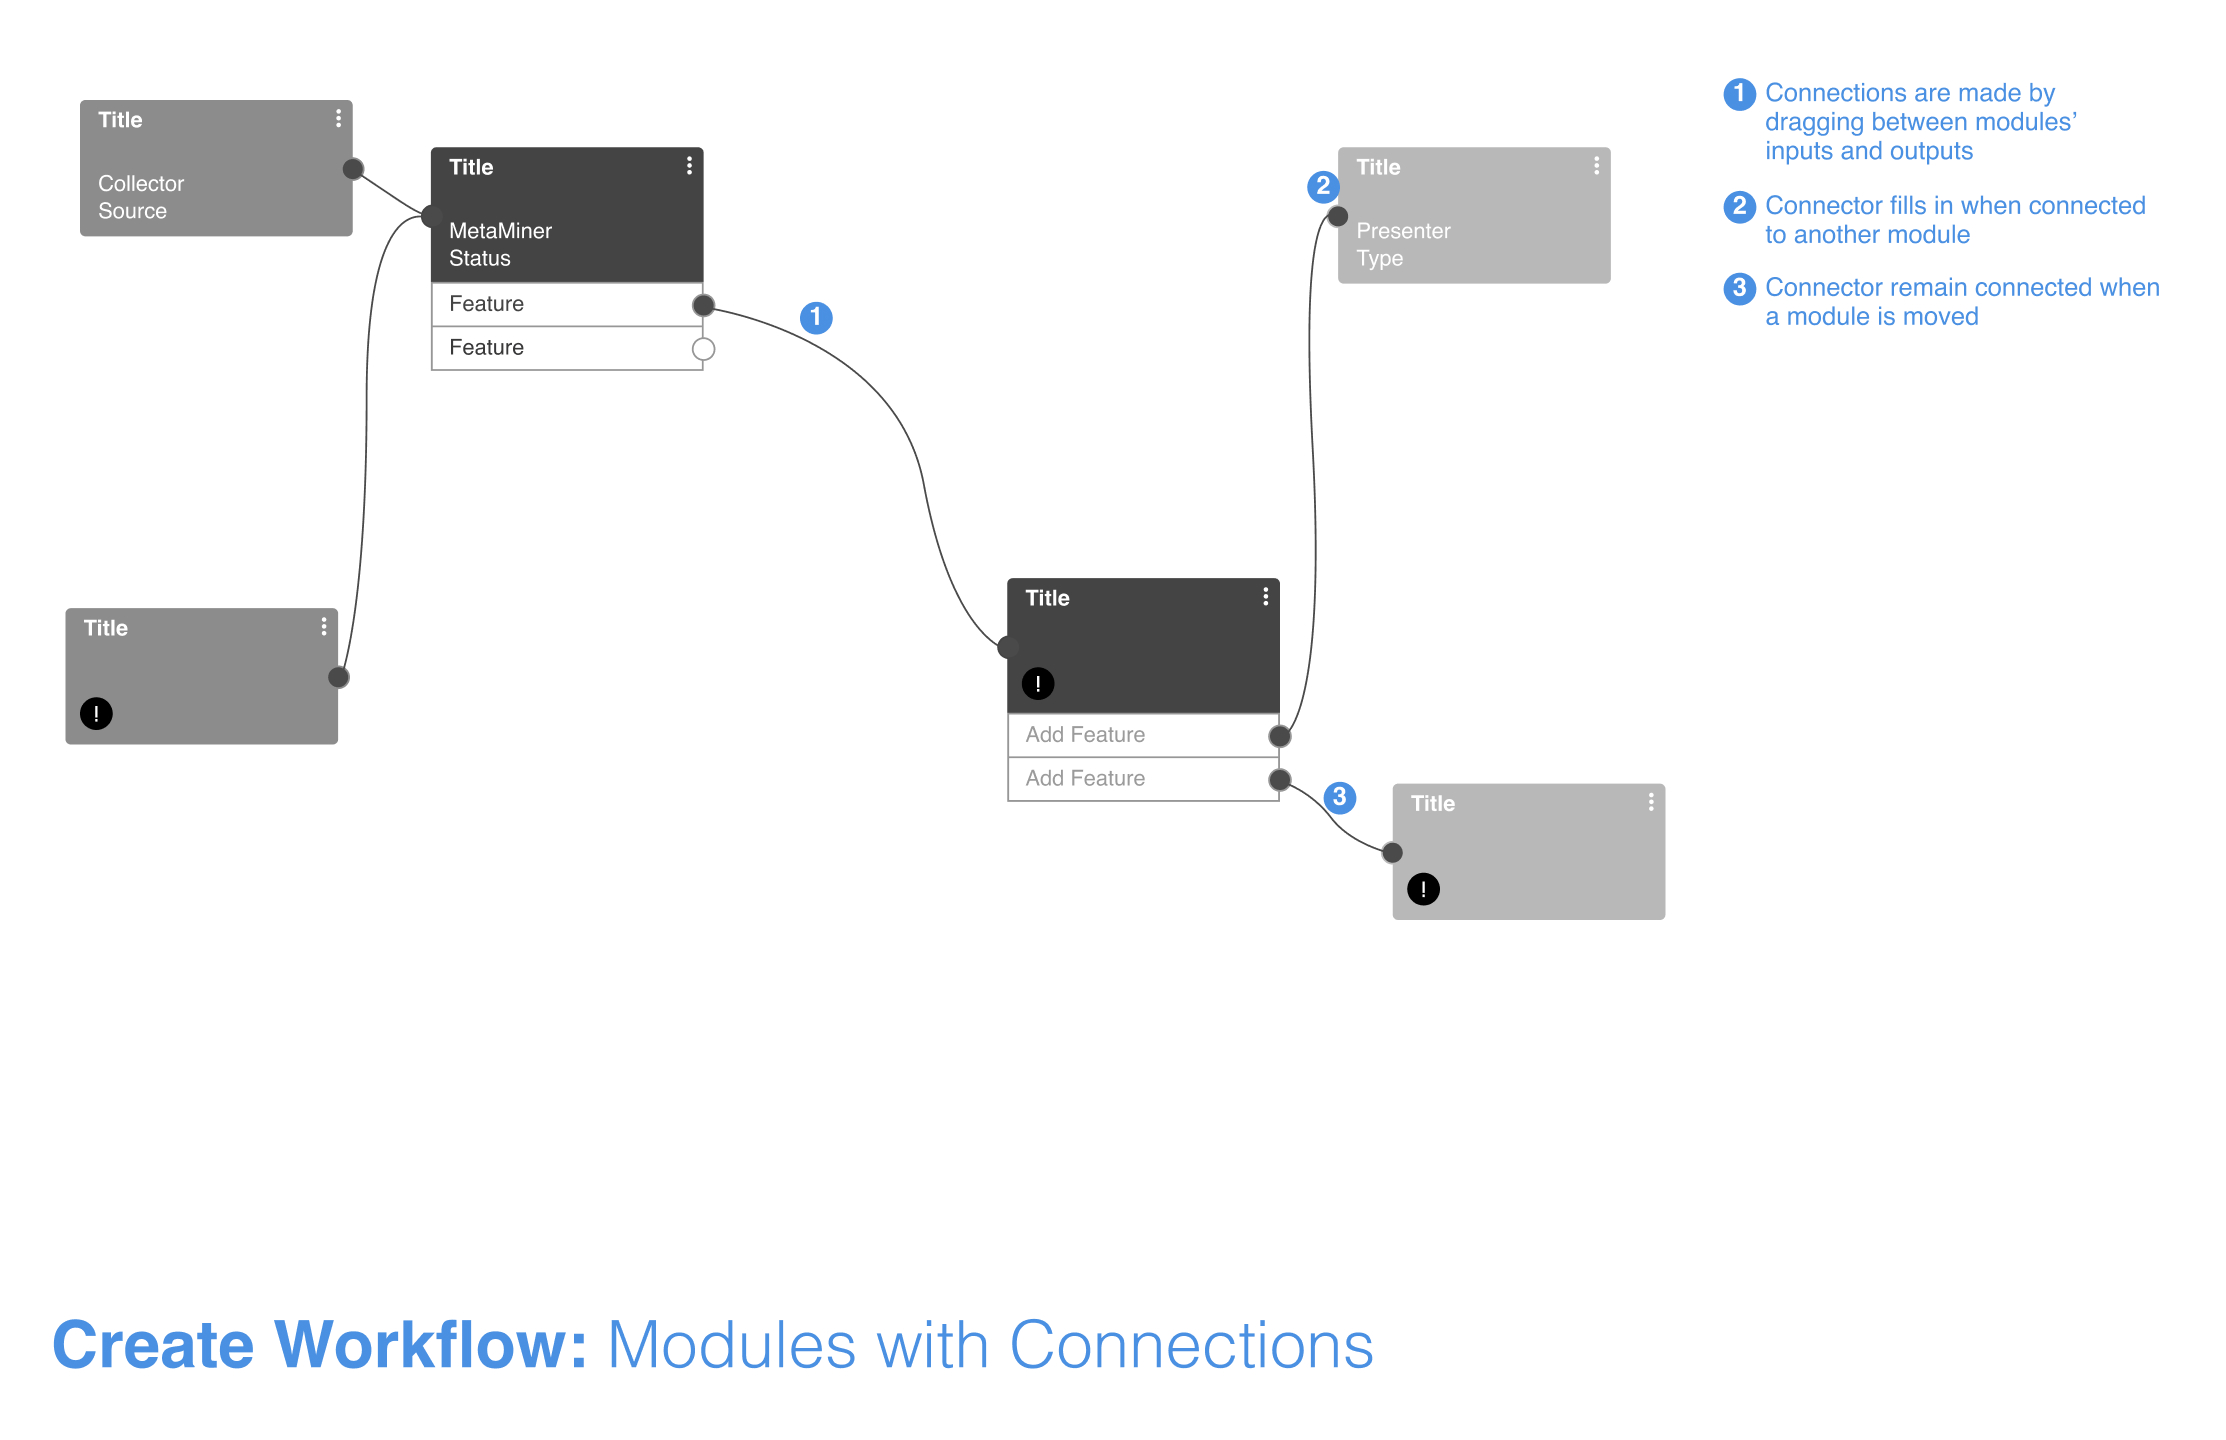
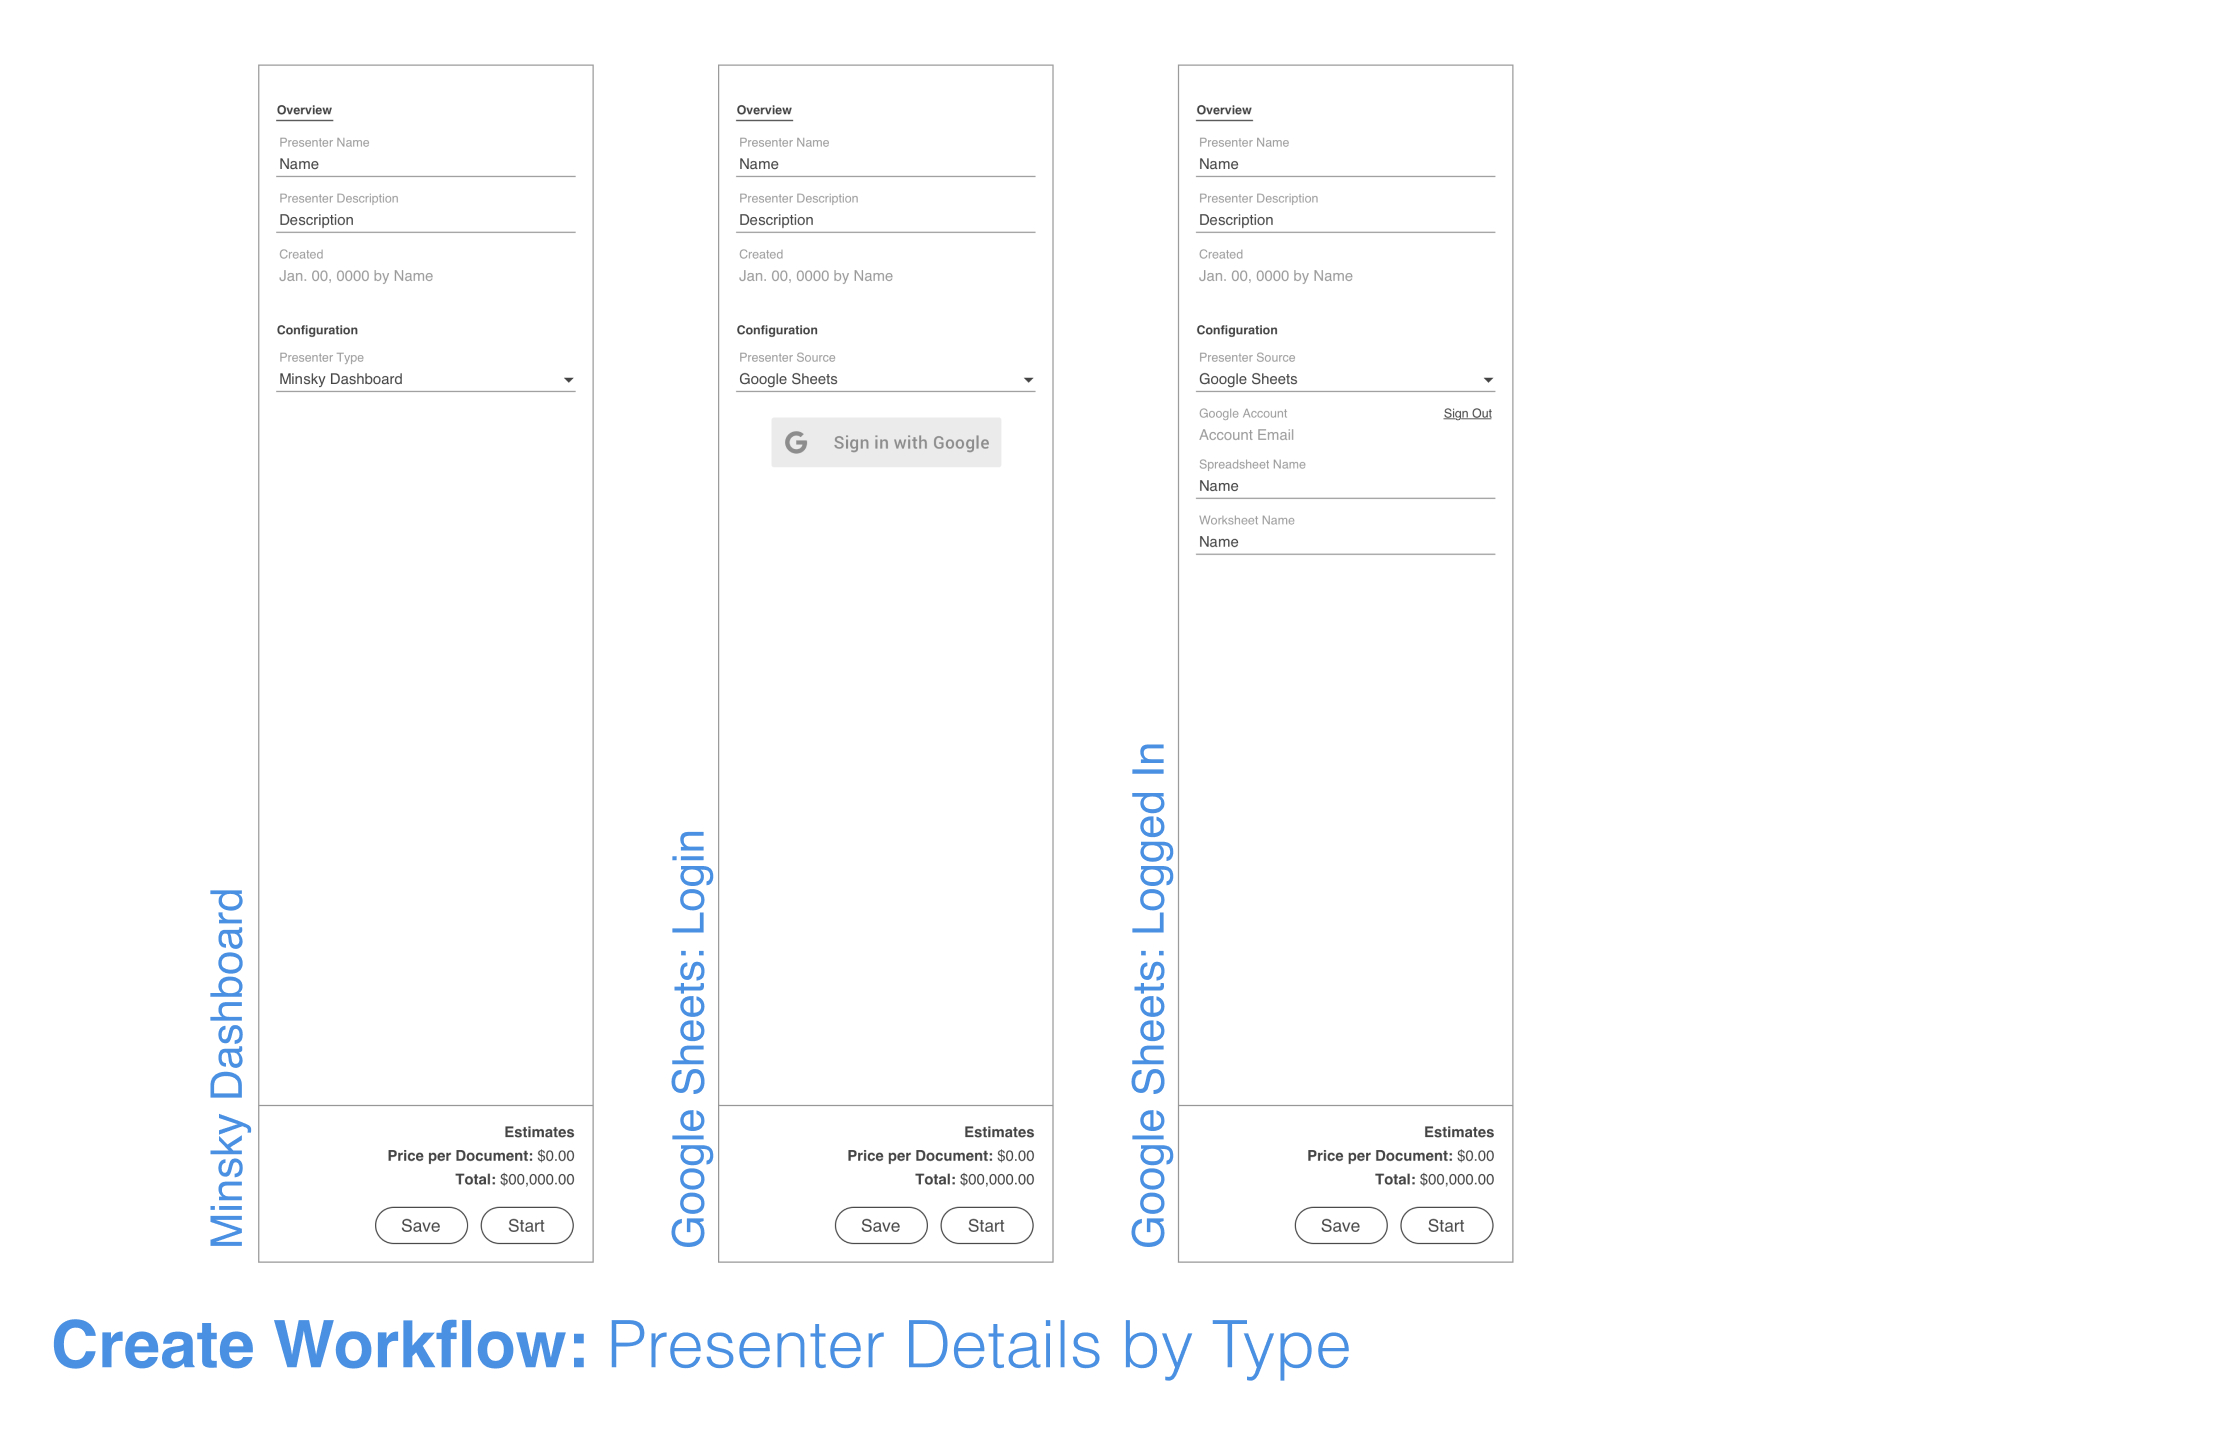
In essence, Minsky's user-facing Natural Language Processing pipeline relies on three main processing modules to function. Collectors gather data from a number of different sources and store it for processing. MetaMiners / MetaReaders process, filter, and sort the data while continuously learning and training themselves. Presenters are different output types where users can access and interact with the processed information. Each module can be configured to produce the best processing results. Some modules would be preconfigured, but in many cases a user would need to manually set them up.
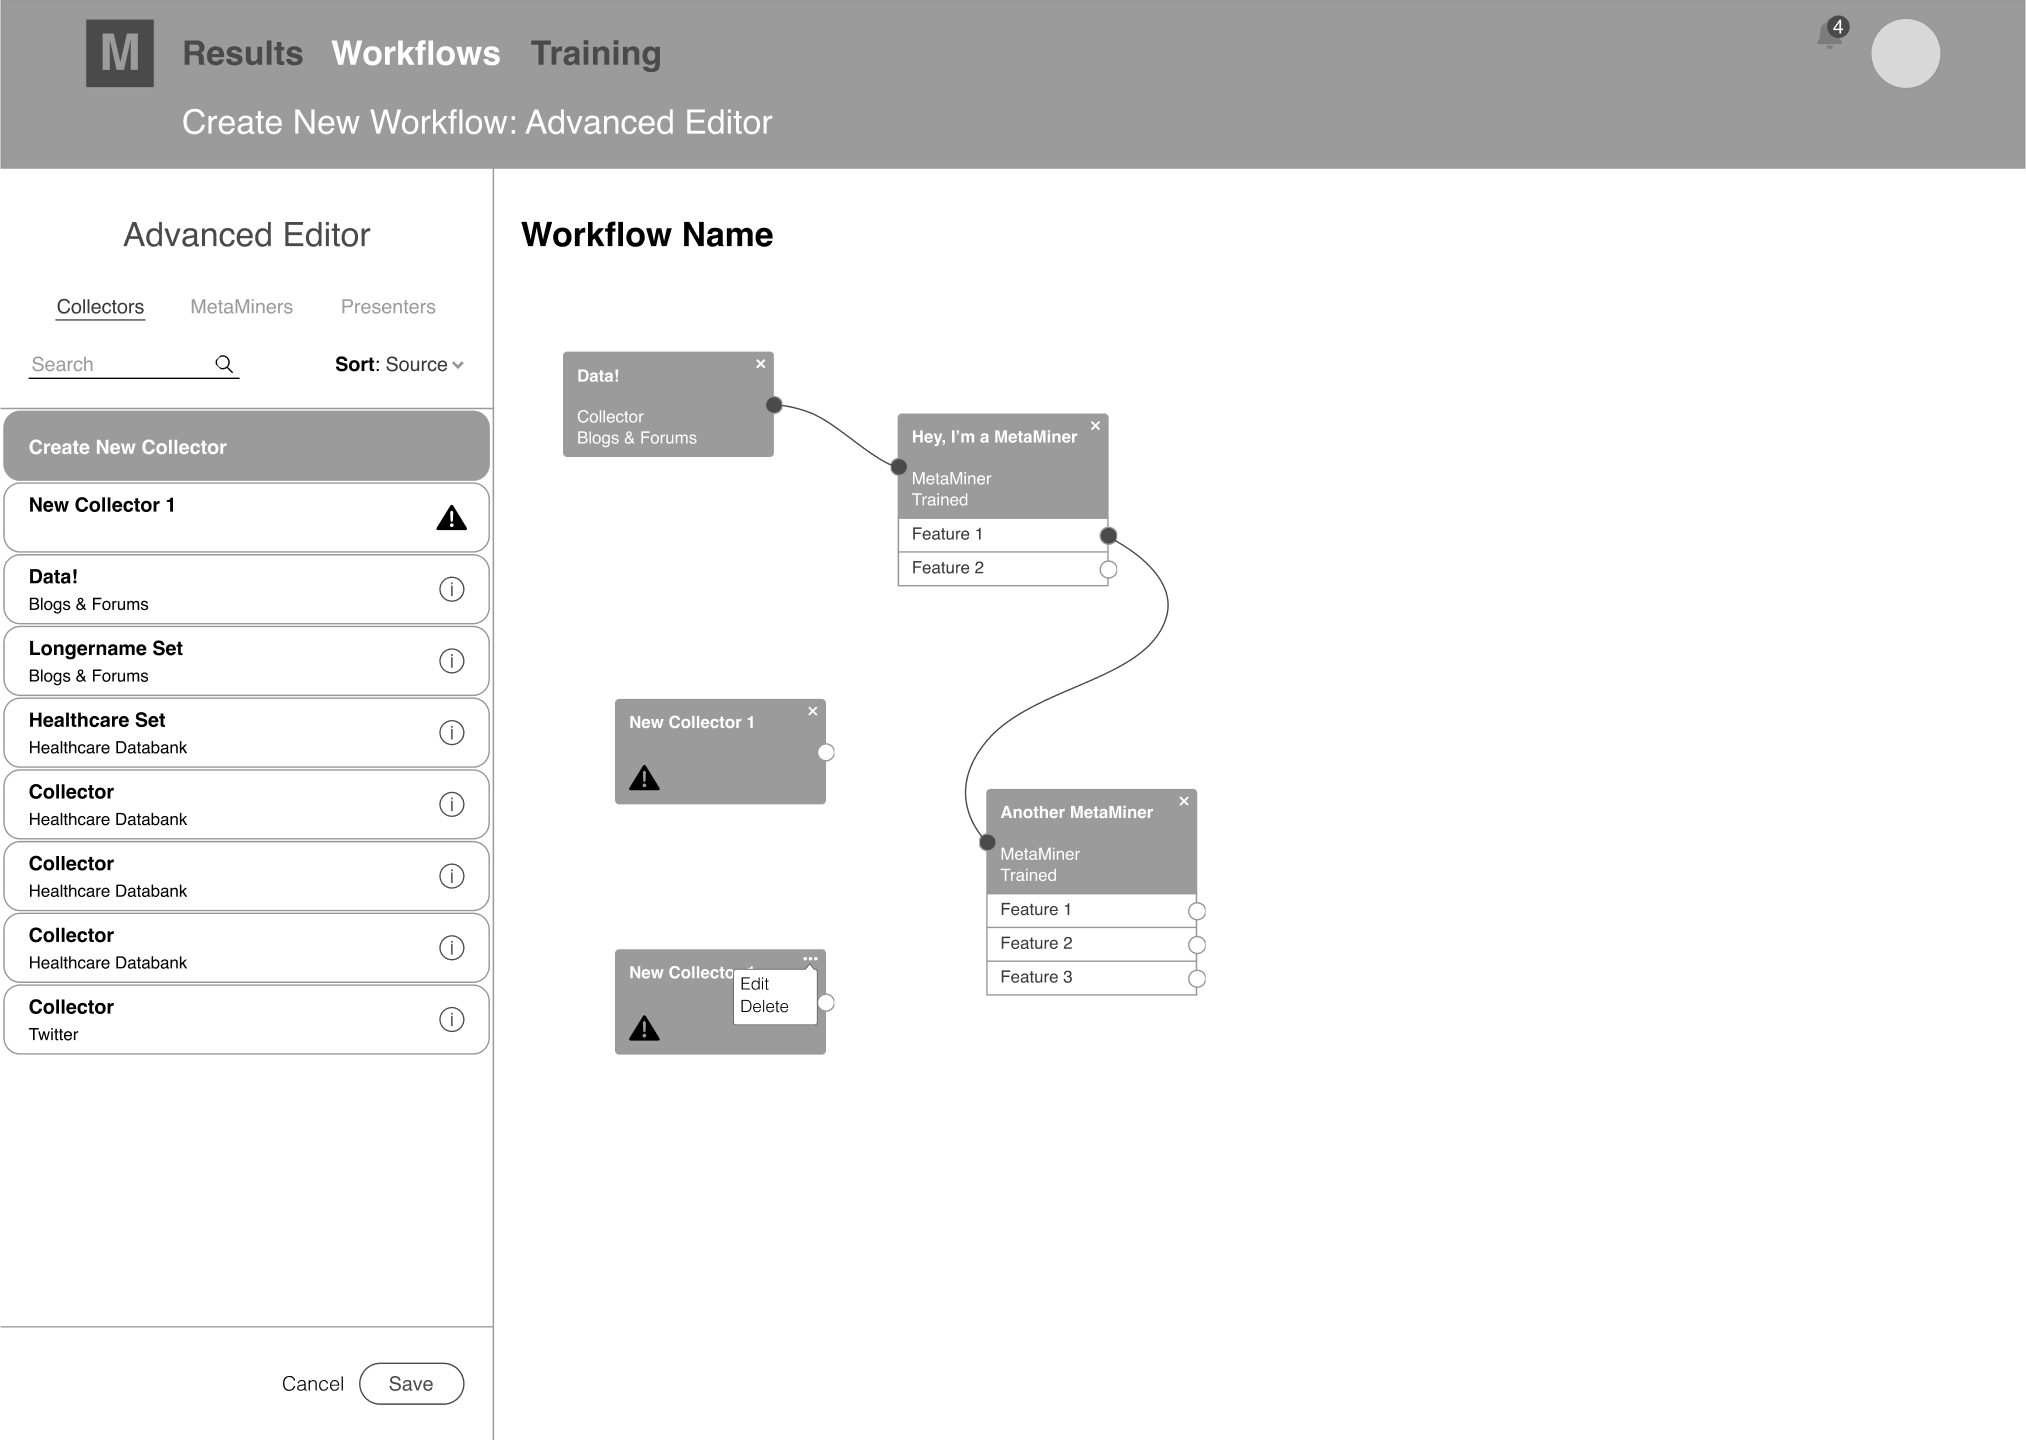
I wanted to design the modules to be easily added, edited, and moved within the workflow, and it was important for each to convey enough information about its dedicated process at a glance. Each module would be a block with identifying information on it, and if multiple output paths were available, attributes connected to the main block would show this. A user could then draw paths between the blocks and attributes, and this would create the processing schematic. The modules also contained elements for alerts and editing actions such as duplication or deletion.
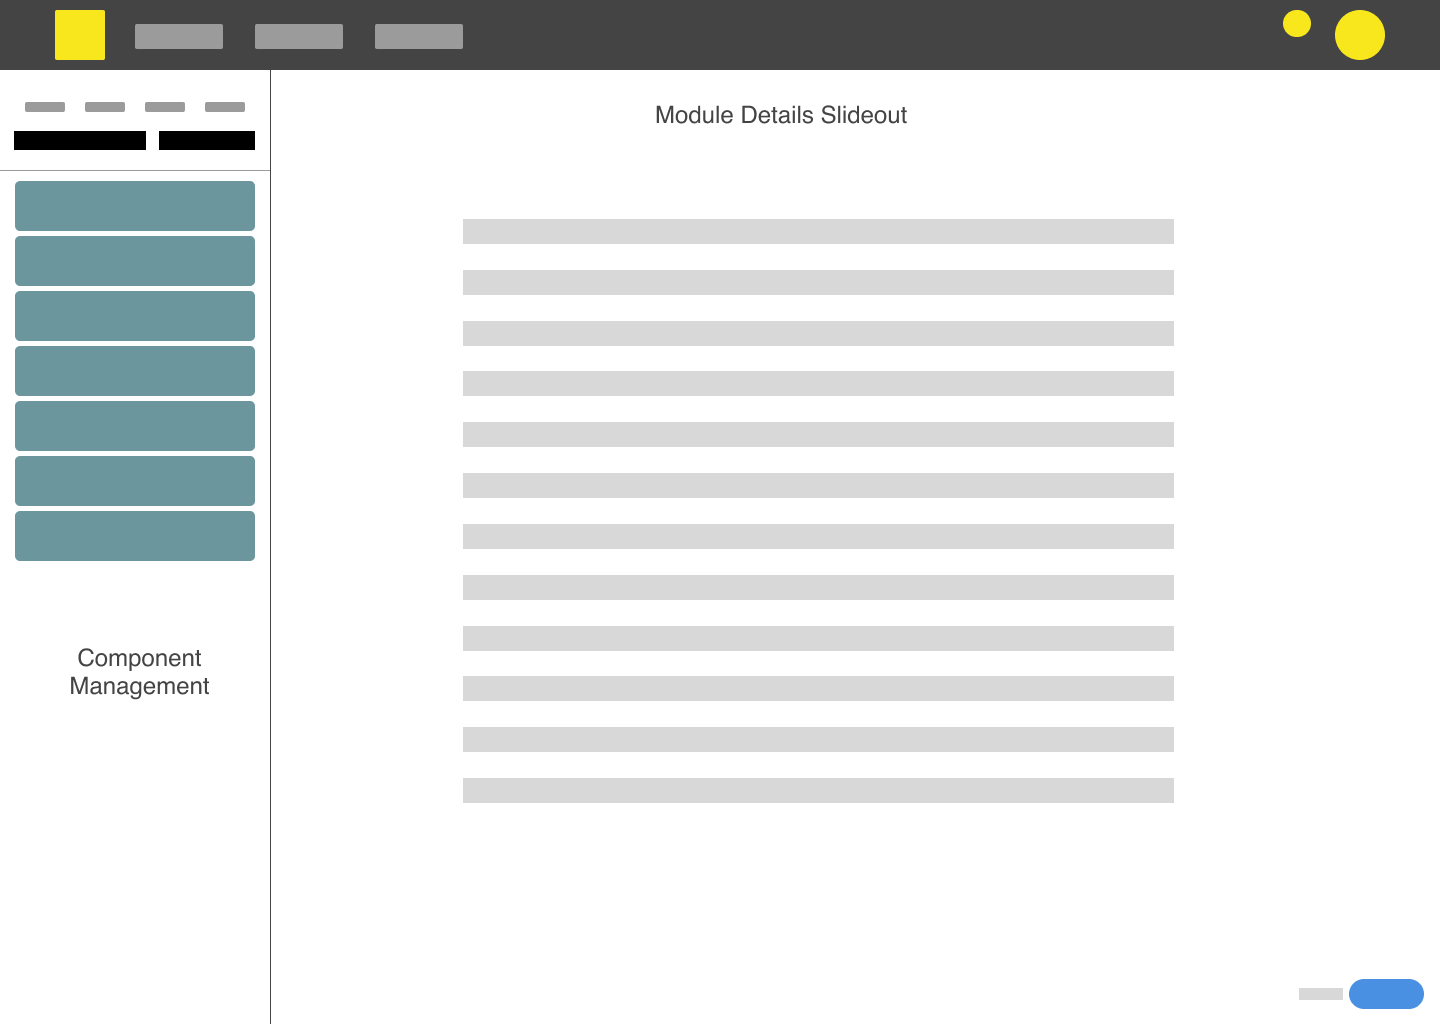
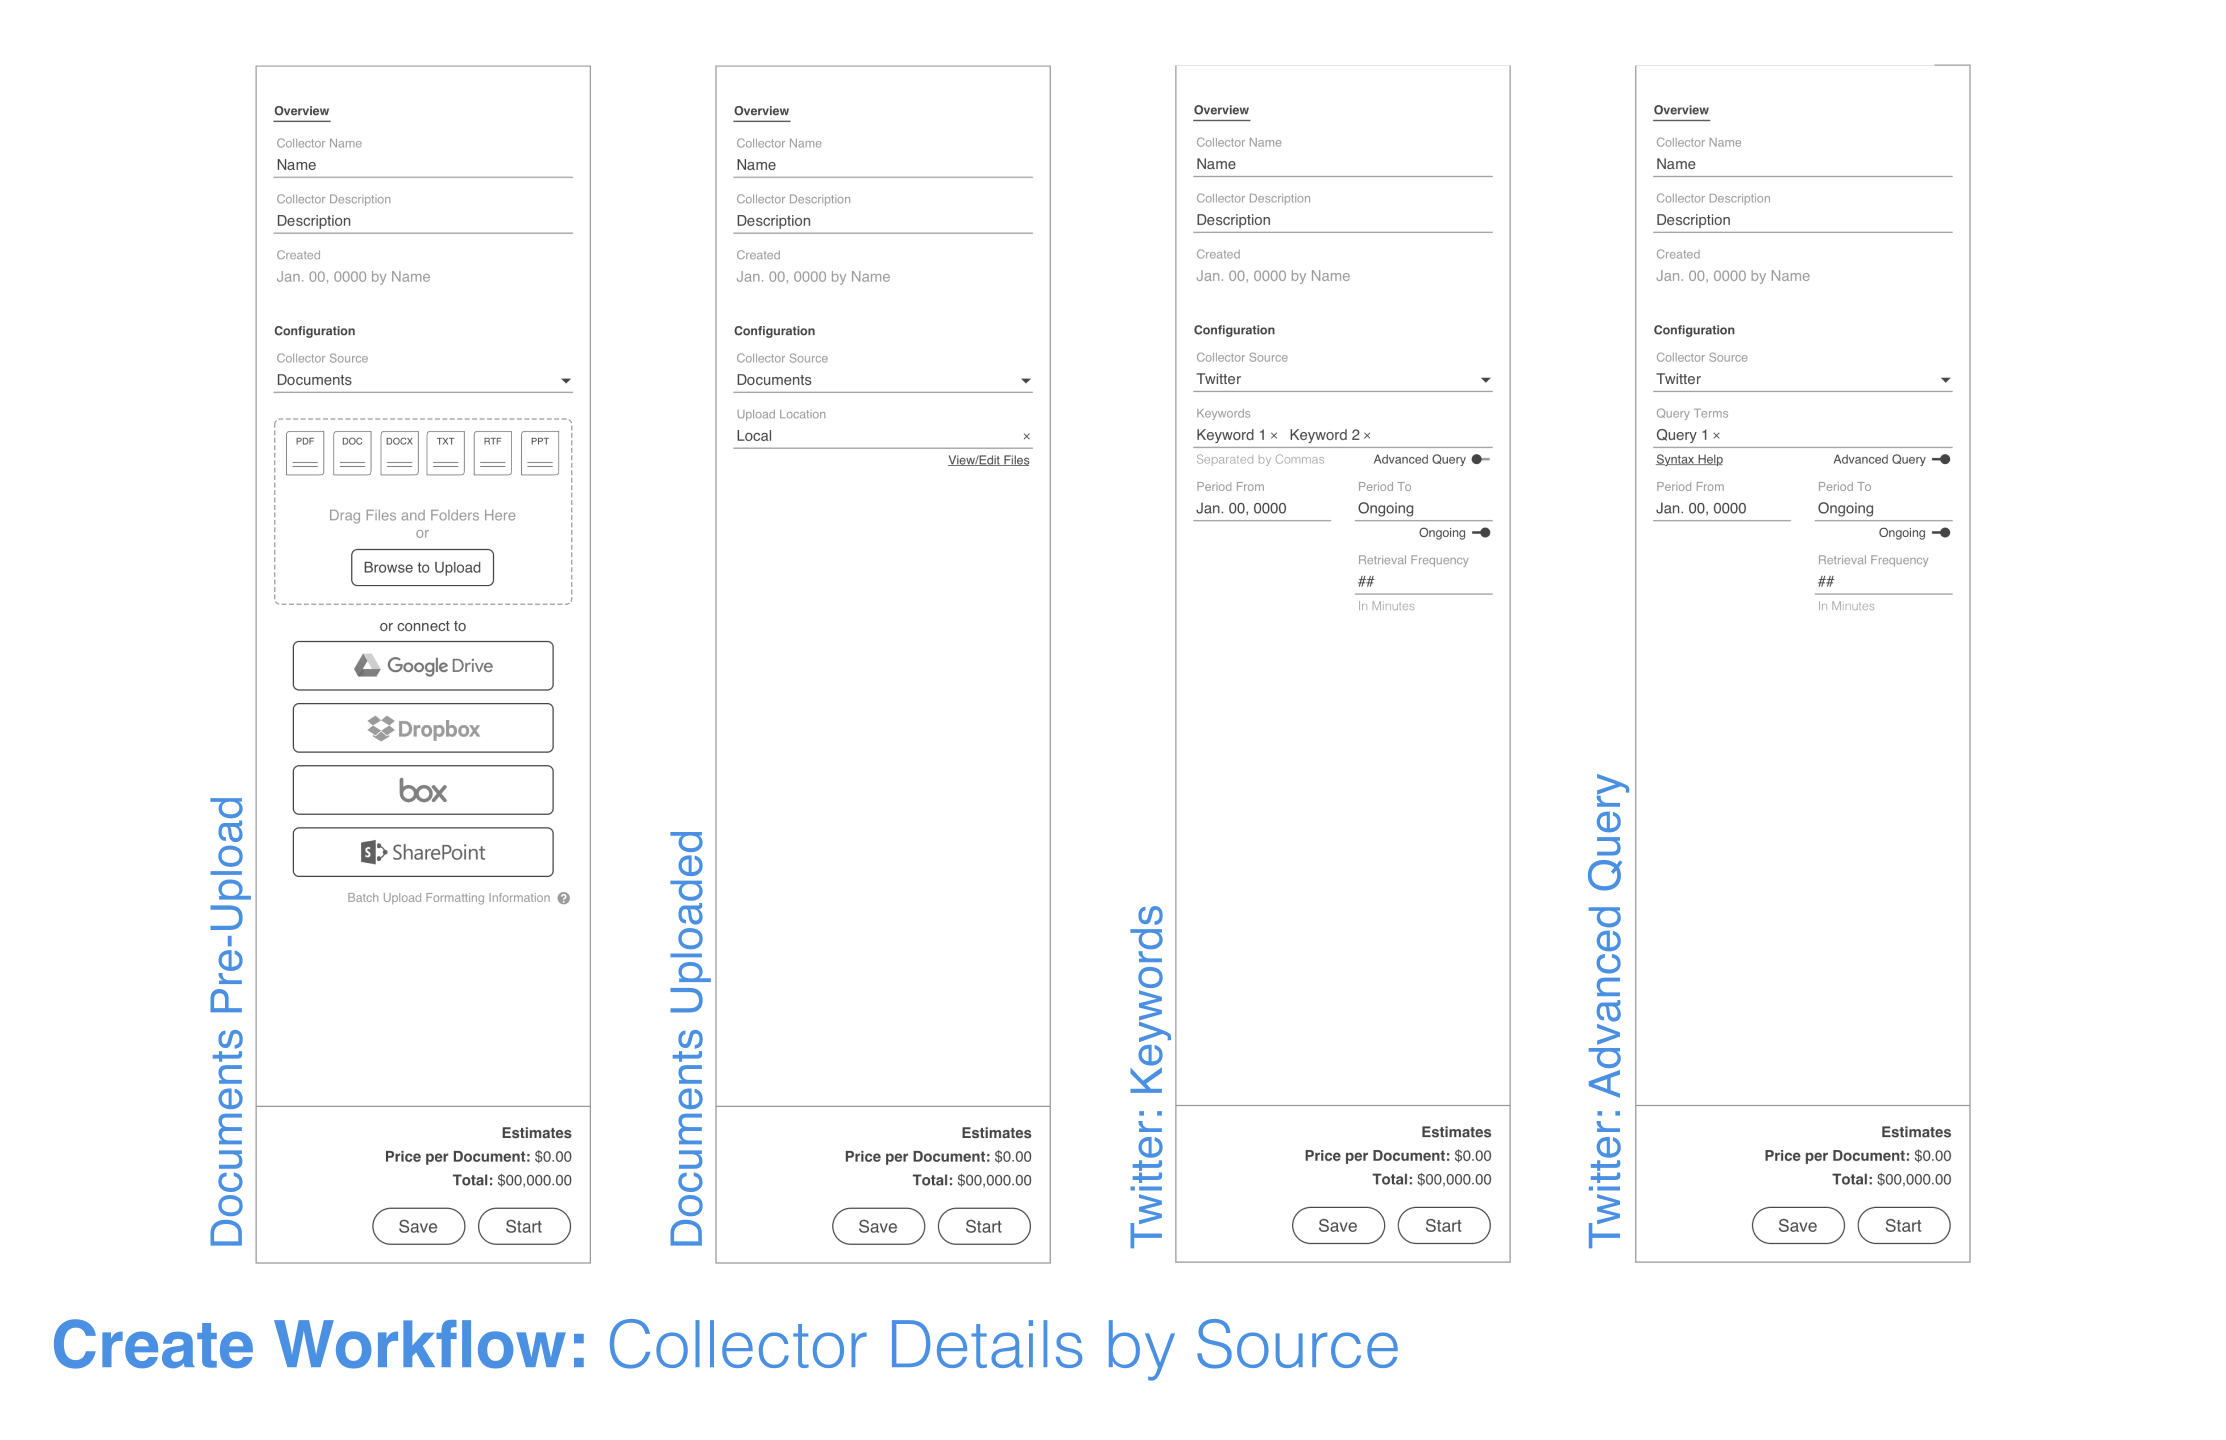
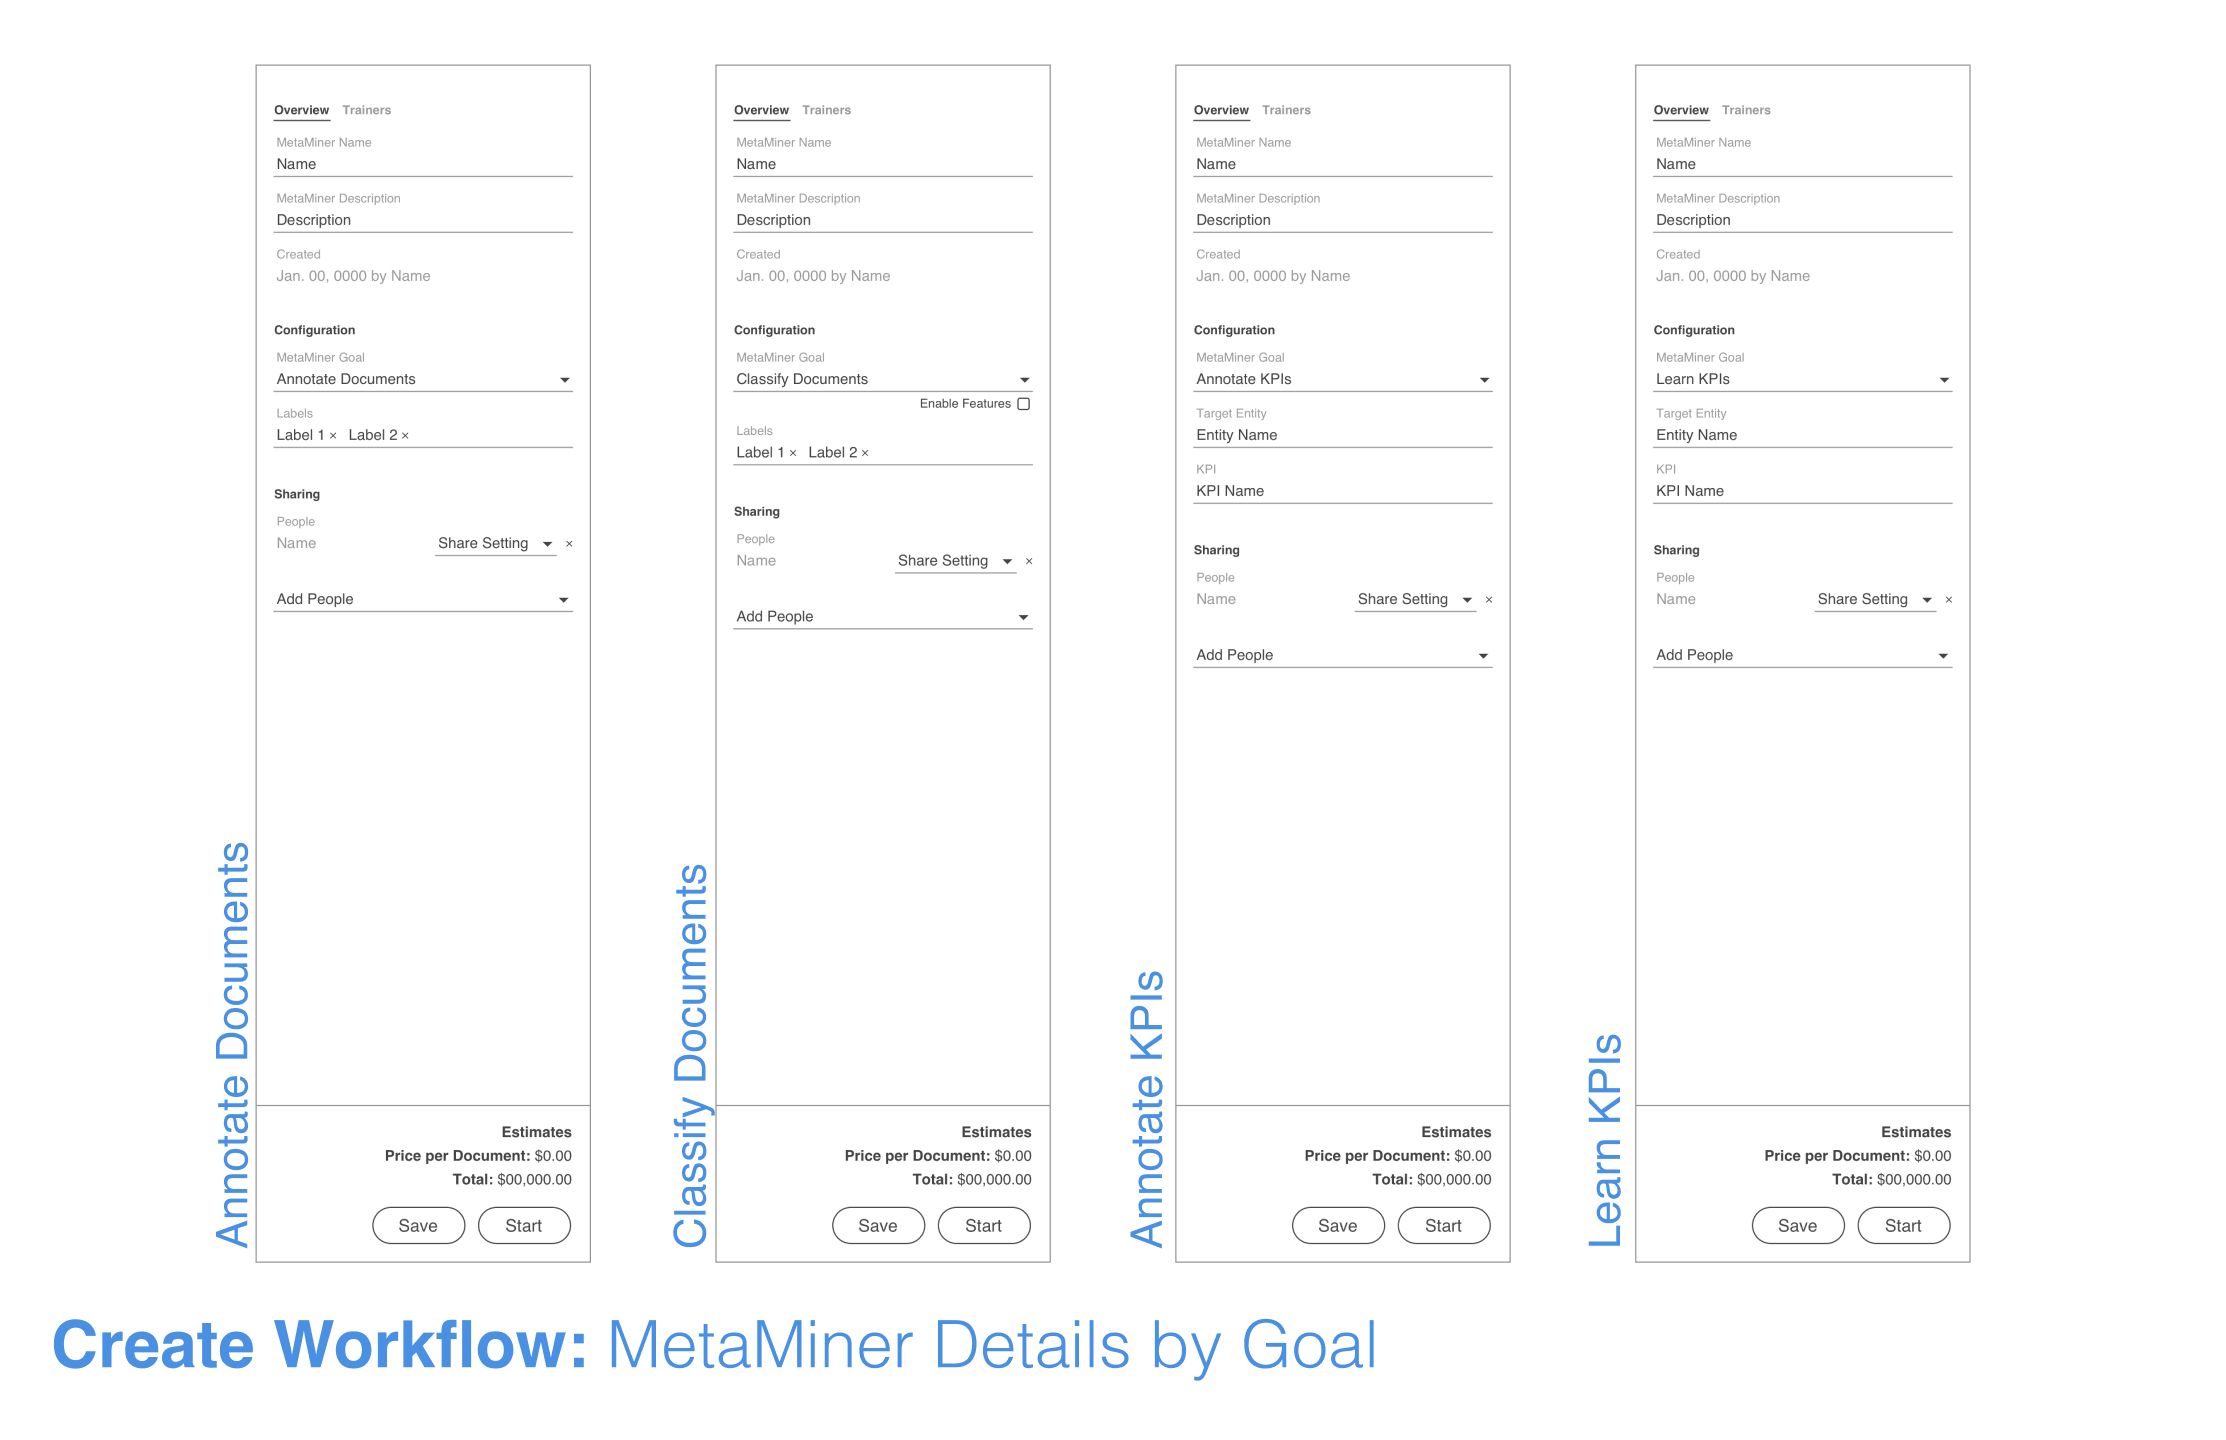
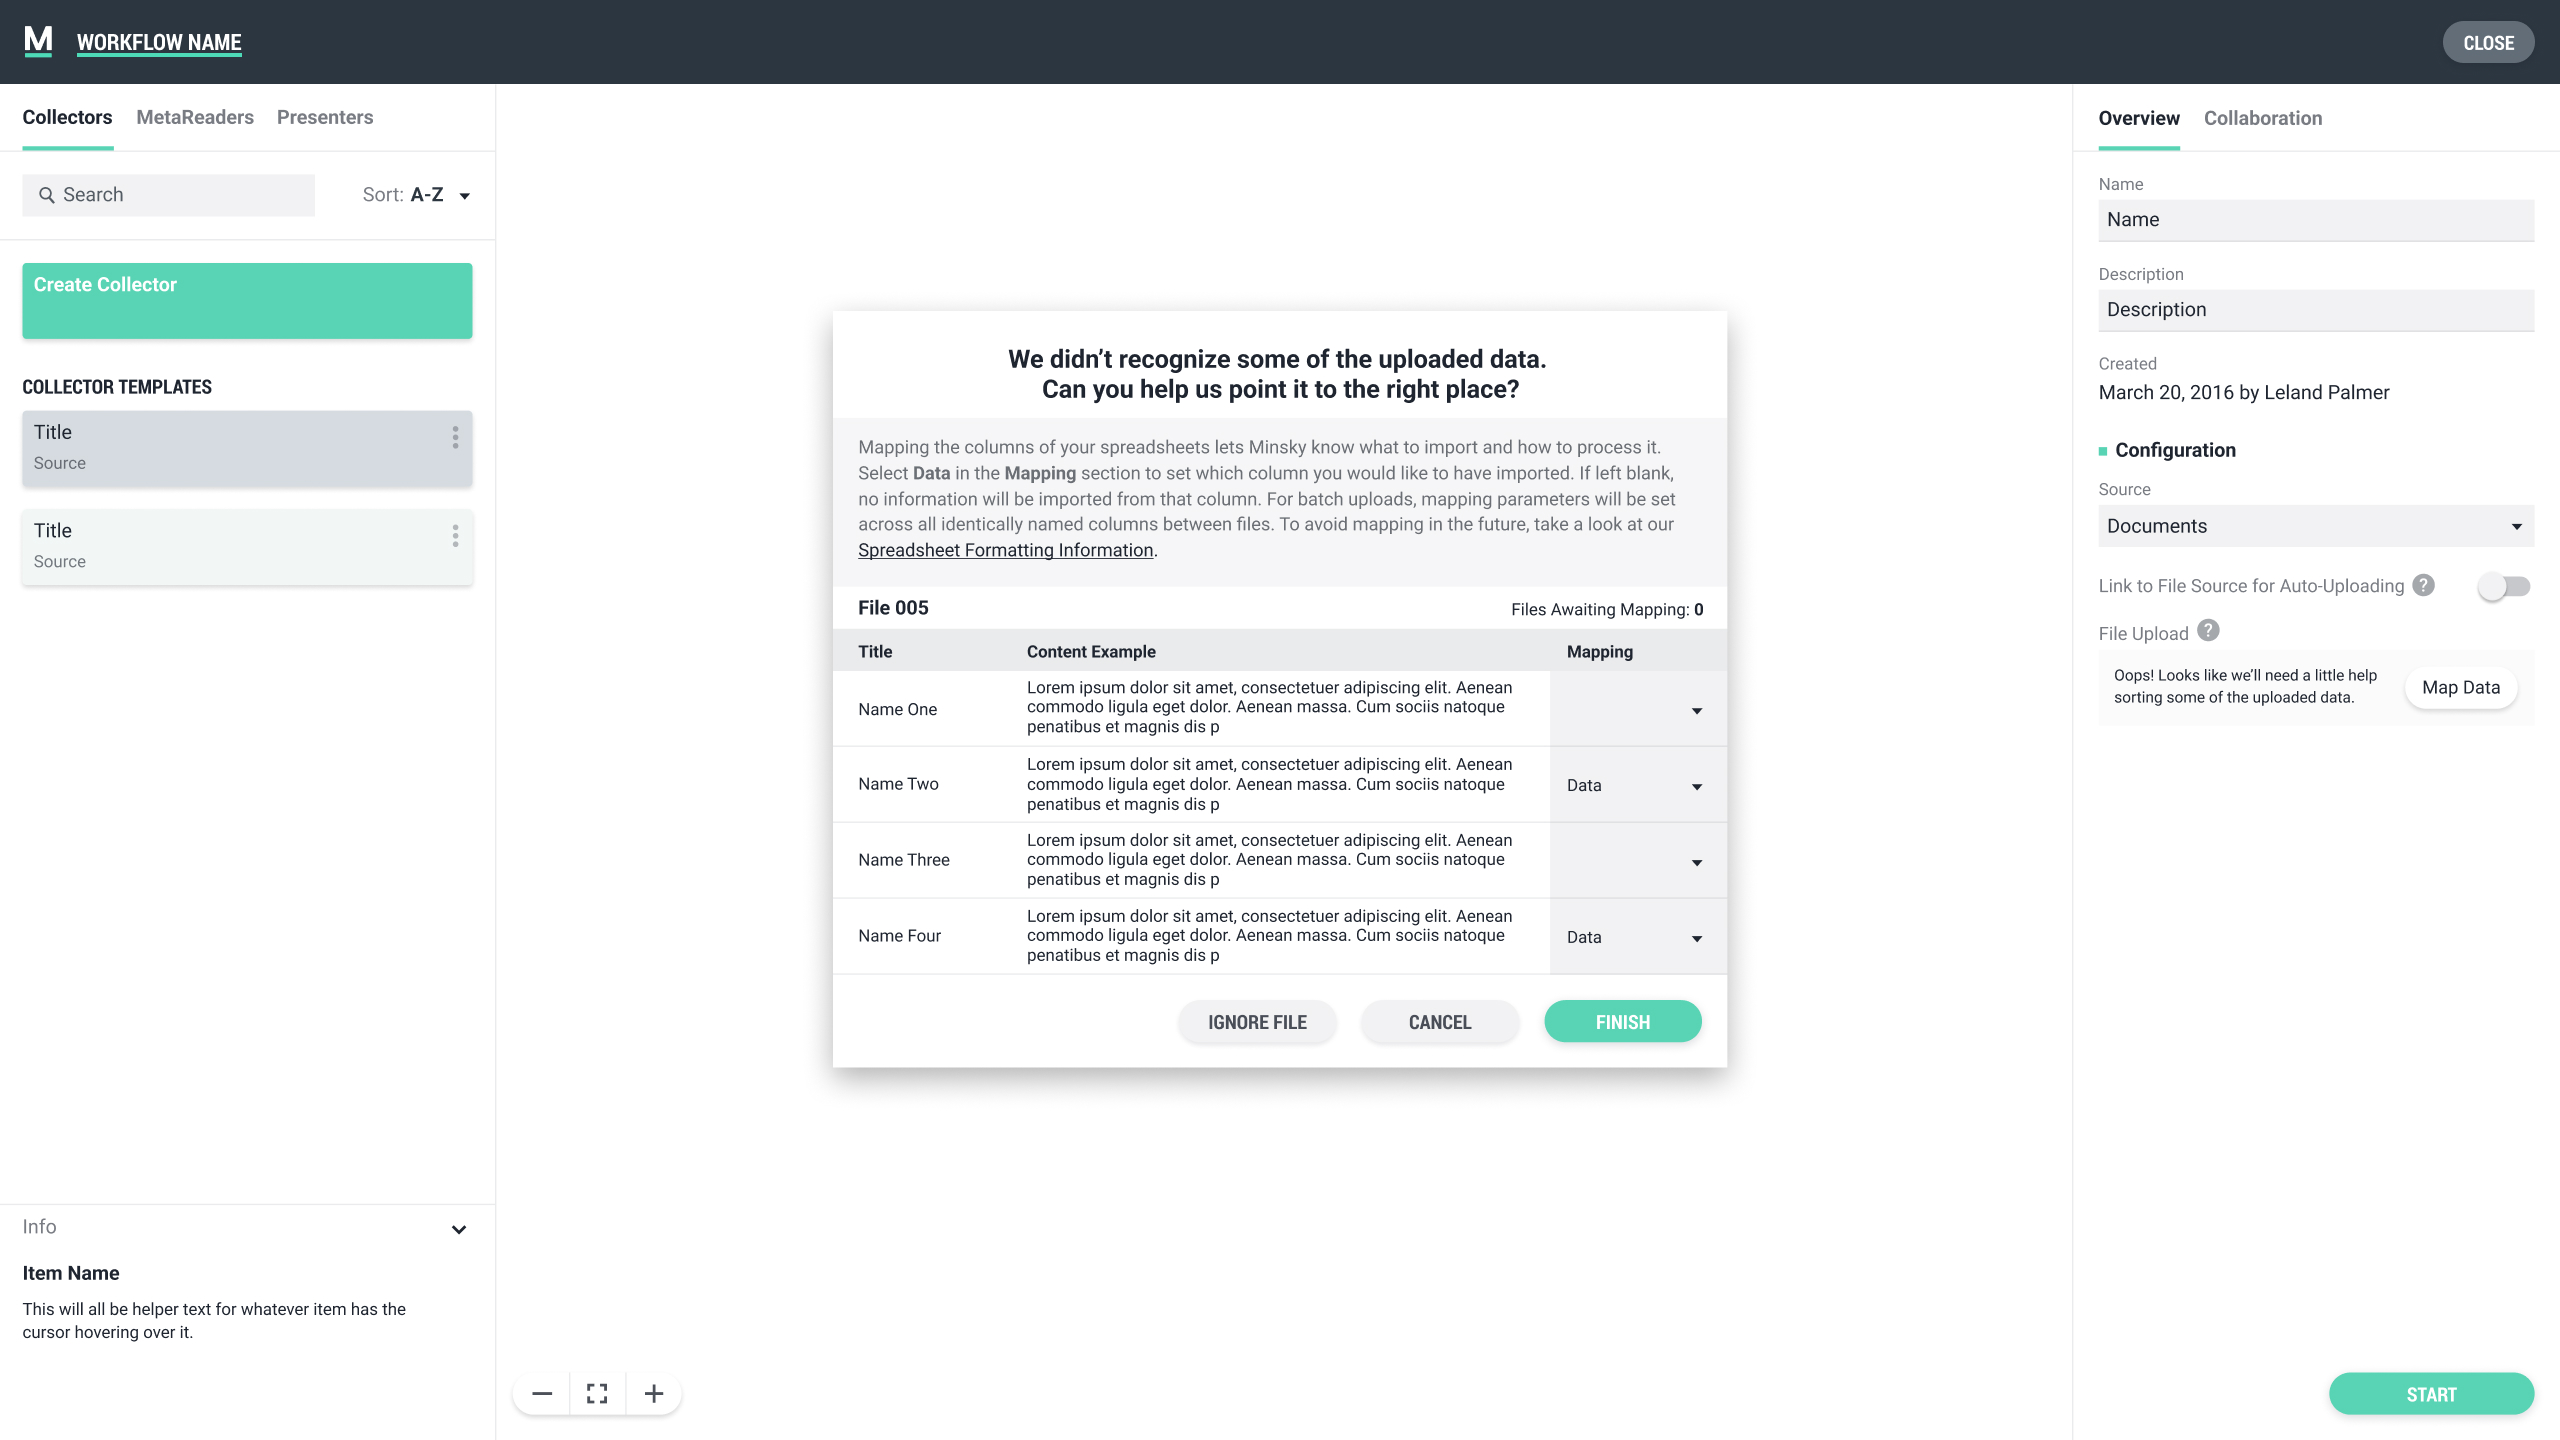
When a module is selected in the left sidebar list or directly in the main workflow editor, the right sidebar displays all associated contextual information, and any edits to the attributes can take place. Each module has a different set of attributes, so I had to organize everything in a way that was efficient and felt consistent across the various types. Attributes were editable until a workflow was actually run, at which point everything was locked for processing reasons.
USER TESTING
I wanted to get prototypes in front of users, so I used Invision and Flinto to create different flows. I also worked with engineering to create rough code prototypes for some of the interaction patterns. I tested with users unfamiliar with machine learning, but I also tested with NLP researchers, since we began to see use cases for that user group.
While working with those less familiar with machine learning or node editors, it became apparent quite early that the biggest issue was understanding the overall concept of Natural Language Processing and how it worked. This was causing hesitation when trying to create a workflow. It was clear we would need to develop some fairly extensive onboarding and provide plenty of documentation and help information throughout the interface. When actually interacting with the interface in terms of pure usability, users felt it was organized in a way that made sense and that building a workflow was fairly intuitive. I got some feedback on the Information Architecture for the module details and made updates accordingly.
When discussing the prototypes with the NLP researchers, the interface itself was not what had the most feedback. Instead, the focus was on the way attributes were named and how certain language was used to describe specific features. This put me in a difficult spot - the language the researchers wanted to see was very specific to their field of study, and obviously those who were not versed in NLP or ML did not understand the terminology. We had decided as a team to keep most language as basic and straightforward as possible, and in the end, we remained dedicated to that idea, except in some of the most advanced features.
FINAL DESIGN
Taking the feedback from the testing, I made updates where necessary. Working with the CEO and a branding consultant, I started to apply the final polish to the workflow editor and the rest of the application. At this point, I also had a junior UI Designer working under me, so we developed the final patterns and design language together. At the same time, I built out the design system and pattern library in Figma. The goal was to get the application working well enough and looking good enough to get in front of current and potential clients for feedback.
MATTHEW KROLL © 2024
